Blog

  • war-effort

    Preview

    WarEffort

    I made this project to understand and build a chain management game (like Factorio).

    Demo

    Click here to check it

    Info

    The game is built over a 2D grid (yet it’s 3d, so i’m using Vector3) where you can place “Machines”. Machines can take 1 or more grid slots and there are several types:

    • Belt: Moves items from one slot to another.
    • Generator: Creates items out of nowhere and places them on it’s connected belts.
    • Converter: Takes X items to create an Y item.
    • Seller: Makes items disappear in exchange of cash.

    To avoid having tons of Monobehaviours, items are managed by the Grid or the machine where they are.

    I hardly remember how i coded it, but i believe it was multithread. With belts running as one job and the rest of the machines in another. The demo is WebGL, and webGL isn’t multithread in unity (yet?), so it won’t make any difference in that platform. This was made before ECS. If i were you, i would do it in ECS 100%.

    Visit original content creator repository https://github.com/tetreum/war-effort
  • Chat

    Banner

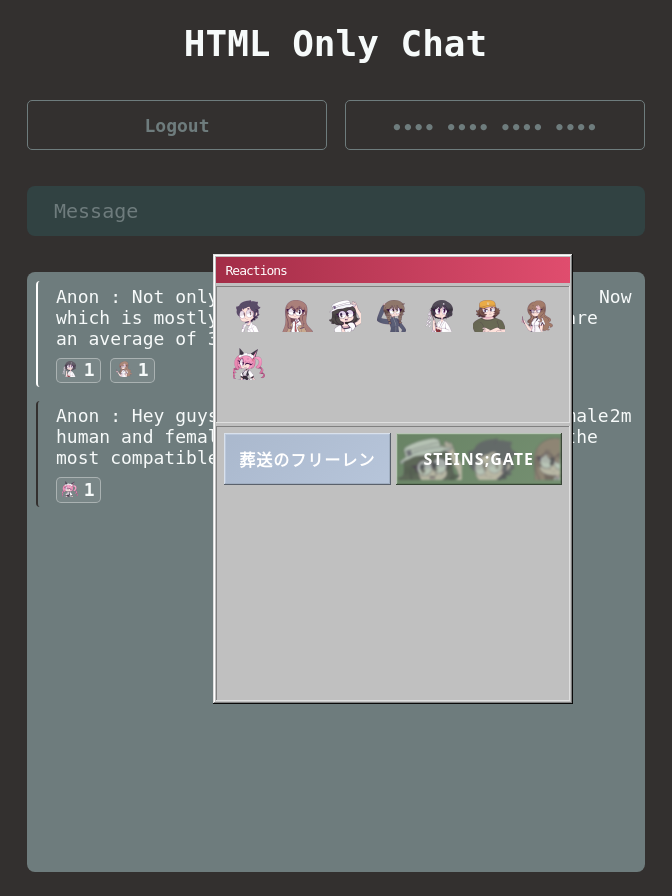
    Interactive chat using only HTML & CSS in the browser.


    Readmaybe

    While technically a working chat, it’s more of an Area69 testing ground.


    Hardmode

    While web technologies have advanced,
    this project cannot use most of them for
    technical & ethos-driven reason. ¯_(ツ)_/¯

    • Tor uses the enterprise edition of Firefox

    • Firefox has some important stuff
      Chrome doesn’t have & visa versa

      ( Scroll driven animations )

    • Can’t use Fonts , SVGs , HTTPS

      -> No one implements HTTP2/3 for
      HTTP so 5 – 6 connection limit 💀

      -> Back to good old optimization

      • Spritemaps

      • Inline everything

      • Manual procedural loading


    Techniques

    Mechanics I have learned , found or created.

    • Framed Buttons

      Every ‘button’ is an iframe containing a link / button
      content where the link redirects the iframe to itself
      and the backend recognizes the request as a click
      if it has a parameter in the url.


    • Double Framed Buttons

      Moving a framed buttons content below the iframe
      into the parent context reduced the amount of requests ,
      data & loading time spent on each click + no icon flickering.


    • Inline Frames

      Using the srcdoc attribute , the initial rendered
      content of an iframe can be set in a stringified form
      which can save on requests + load time

      -> Works great together with framed buttons
      -> No need for unique parameter in link href

    • Dynamic Frames

      Using a kept alive connection + chunked encoding ( HTTP1.1 )
      or just HTTP2/3 one can continually send data to a client.

      The browser parses every chunk and appends it to the
      existing page , which allows to send server -> client
      updates without any use of JavaScript.

    • CSS Sparks

      Using the loading behavior of resources linked
      in CSS rules allows to send cheap client events.

      A resource is only loaded when the rule is in scope ,
      thus a hover rule only calls the server when the user
      hovers over the element.

      -> Request = Event
      -> Linked resources are cached -> Cache Busting required
      -> Always needs an opposite event -> Unhover <-> Hover
      ( Can’t send same css rule as it will activate immediately )

    • Data URIs

      Using data URIs with modern image formats such as
      webp makes for a great initial loading experience!

      -> Useful for double framed icon buttons
      -> Useful for initial thumbnail image


    Visit original content creator repository https://github.com/JSLess/Chat
  • mercadolibre-dark

    Mercadolibre – Dark @version 2.1.0

    Complete dark and customizable theme for Mercadolibre/mercadolivre website with a few improvements and customizable options.

    18/06/2025 (dd/mm/yyyy)

    Updated styles after a while…

    21/06/2024 (dd/mm/yyyy)

    This v2 is a complete new work since some structures changed over this time without updates. Probably in some pages/section are not styled yet since I forgot my ML account and I waiting to recover it, I will make new updates soon to fix this sections that hasn’t been styled yet

    http://cybermint.top/wp-content/uploads/2025/08/Install from-userstyles.world-116b59.svg

    Works on:

    • Argentina ~ mercadolibre.com.ar
    • Bolivia ~ mercadolibre.com.bo
    • Brasil ~ mercadolivre.com.br
    • Chile ~ mercadolibre.com.cl
    • Colombia ~ mercadolibre.com.co
    • Costa Rica ~ mercadolibre.co.cr
    • Dominicana ~ mercadolibre.com.do
    • Ecuador ~ mercadolibre.com.ec
    • Guatemala ~ mercadolibre.com.gt
    • Honduras ~ mercadolibre.com.hn
    • México ~ mercadolibre.com.mx
    • Nicaragua ~ mercadolibre.com.ni
    • Panamá ~ mercadolibre.com.pa
    • Paraguay ~ mercadolibre.com.py
    • Perú ~ mercadolibre.com.pe
    • Salvador ~ mercadolibre.com.sv
    • Uruguay ~ mercadolibre.com.uy
    • Venezuela ~ mercadolibre.com.ve

    Features

    • Custom backgrounds colors
    • Custom texts colors
    • Custom links colors
    • Custom price color
    • Custom muted text (this option is using the color of “text-color” with opacity)

    Installation

    You have to install the Stylus extension.

    You can go to: userstyles.world and install it from there.

    OR

    click on the install link below.

    http://cybermint.top/wp-content/uploads/2025/08/Install theme with-Stylus-116b59.svg.svg+xml;charset=utf-8

    Contributions

    Any contribution is greatly appreciated.

    If you’d like to contribute code, please make sure to read the contribution guidelines.

    If you really like this project and would like to tip me for my work, then you can:

    • Buy me a coffee over at ko-fi

    License

    Code released under the MIT license.

    Visit original content creator repository https://github.com/santi-san/mercadolibre-dark
  • node-authbot

    AuthBot for Node.js with Microsoft Bot Framework

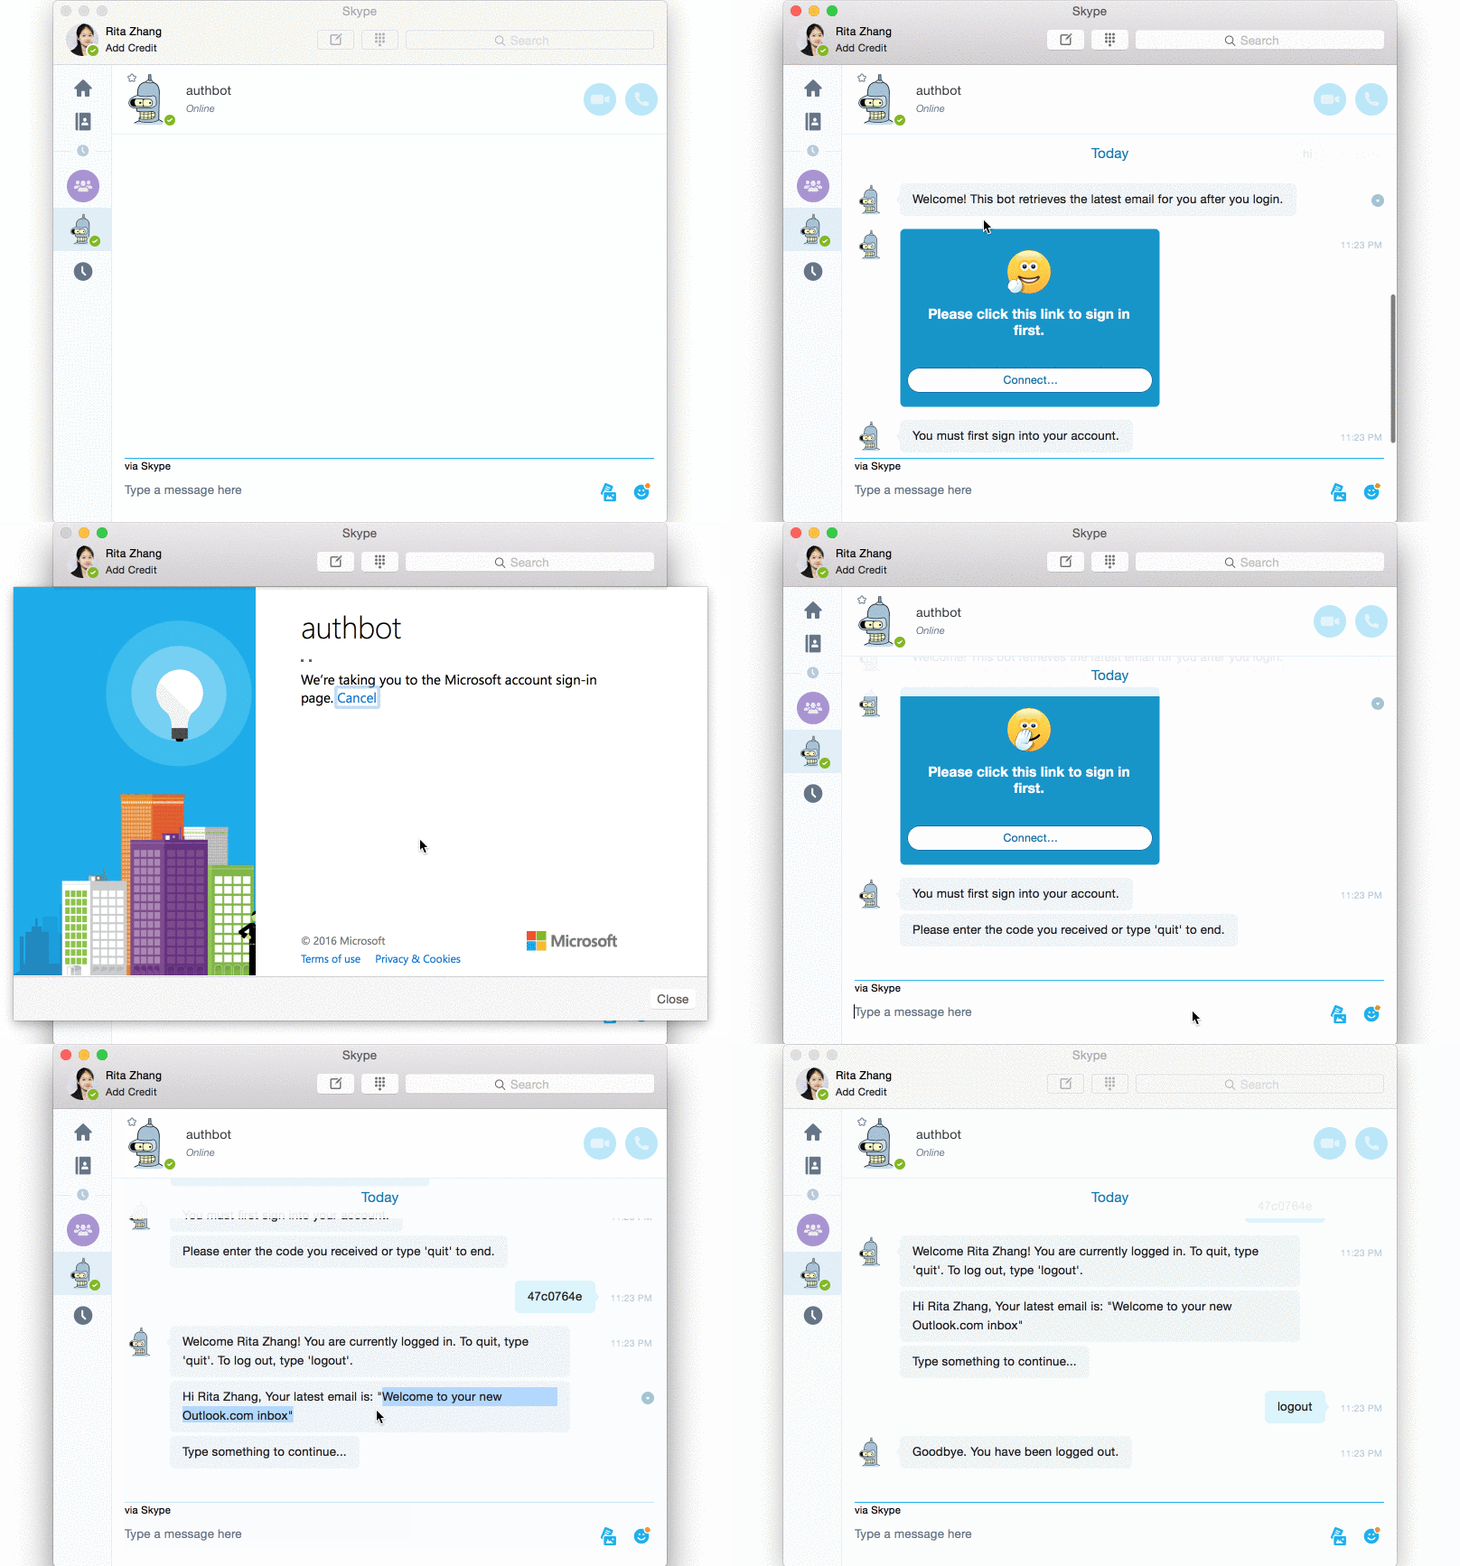
    A bot that authenticates users and get profile information and the latest email for the logged in user.

    Checkout out the bot on Skype Auth Bot Demo in Skype

    Check out the demo site

    This bot enables users to authenticate with their Microsoft id and/or their AD domain. Then the bot uses the accesstoken to retrieve the latest email for the user.

    Features

    • Support endpoints V1 (only supports AD accounts)
    • Support endpoints V2 (now supports both AD accounts and Microsoft accounts)

    Allow easy and secure sign in, even in chat sessions including multiple users

    Installation

    Clone this repo and then install dependencies:

    git clone https://github.com/CatalystCode/node-authbot.git
    cd node-authbot
    git checkout master
    npm install
    

    Push directly to Azure Web App: The dev branch has been setup to push directly to Azure web app

    Setup the bot:

    • Populate environment variables in .env.template.
    • Follow the instructions on Bot Framework website to setup Channels.
    • [Optional] If the bot is hosted on Azure App Service, make sure to increase the maxQueryString limit by updating the web.config file in $HOME/site/wwwroot like this:
    <security>
    	  <requestFiltering>
    	  	<requestLimits maxQueryString="10000"/>
    	  	...
    	  </requestFiltering>
    </security>


    Acknowledgement

    Many thanks to @sozercan and @GeekTrainer for your contribution.

    License

    Licensed using the MIT License (MIT); Copyright (c) Microsoft Corporation. For more information, please see LICENSE.

    Visit original content creator repository https://github.com/CatalystCode/node-authbot
  • remote-jmx-reporter

    JMX Reporter

    A simple JAVA client for extracting JMX data from a JMX-enabled java process.

    Features

    • Connect and collect data to JMX enabled java process
    • Export to various formats: text, JSON, HTML

    Build

    On project folder run

    mvn clean package
    

    Go to folder target and execute the jar file for printing out usage

    java -jar jmx-Reporter-0.0.1-full.jar
    

    Usage

    java -jar jmx-Reporter-1.0-full.jar [-ssl] [-d=Description] -f=Format of output file
    -h=RemoteHost -o=OutputFile -p=RemotePort [-ps=Password]
    [-u=JMX url path] [-us=Username] [Object names…]
    `

    • [Object names…] A list of names of JMX MBeans to be collected, giving no name means
      collect all.

      • Eg:
        • Collect only one object: "java.lang:type=Memory"
        • Collect 3 objects: "java.lang:type=Memory" "java.lang:type=OperatingSystem" "java.lang:type=Threading"
        • Collect all available objects: “
    • -d, –desc=Description Extra text to put into report

    • -f, –format=Format of output file.
      Supported:

      • text
      • json
      • html
    • -h, –jmx-host=RemoteHost JMX remote host

    • -o, –output=OutputFile

    • -p, –jmx-port=RemotePort JMX remote port

    • -ps, –pass=Password Password

    • -ssl, –useSSL Use SSL

    • -u, –jmx-url-path=JMX url path. Path to JMX Bean server, default is “jmxrmi”

    • -us, –user=Username Username

    Visit original content creator repository
    https://github.com/zeroboo/remote-jmx-reporter

  • benchmark_utils

    Benchmark utils

    Utils for benchmark – wrapper over python timeit.

    PyPI - Python Version PyPI Status
    Tests Codecov

    Tested on python 3.8 – 3.12

    Install

    Install from pypi:

    pip install benchmark_utils

    Or install from github repo:

    pip install git+https://github.com/ayasyrev/benchmark_utils.git

    Basic use.

    Lets benchmark some (dummy) functions.

    from time import sleep
    
    
    def func_to_test_1(sleep_time: float = 0.1, mult: int = 1) -> None:
        """simple 'sleep' func for test"""
        sleep(sleep_time * mult)
    
    
    def func_to_test_2(sleep_time: float = 0.11, mult: int = 1) -> None:
        """simple 'sleep' func for test"""
        sleep(sleep_time * mult)

    Let’s create benchmark.

    from benchmark_utils import Benchmark
    bench = Benchmark(
        [func_to_test_1, func_to_test_2],
    )
    bench
    output
    Benchmark(func_to_test_1, func_to_test_2)
    Now we can benchmark that functions.
    # we can run bench.run() or just:
    bench()
    output
     Func name  | Sec / run
    
    func_to_test_1:   0.10 0.0%
    
    func_to_test_2:   0.11 -9.1%
    

    We can run it again, all functions, some of it, exclude some and change number of repeats.

    bench.run(num_repeats=10)
    output
     Func name  | Sec / run
    
    func_to_test_1:   0.10 0.0%
    
    func_to_test_2:   0.11 -9.1%
    

    After run, we can print results – sorted or not, reversed, compare results with best or not.

    bench.print_results(reverse=True)
     Func name  | Sec / run
    
    func_to_test_2:   0.11 0.0%
    
    func_to_test_1:   0.10 10.0%
    

    We can add functions to benchmark as list of functions (or partial) or as dictionary: {"name": function}.

    bench = Benchmark(
        [
            func_to_test_1,
            partial(func_to_test_1, 0.12),
            partial(func_to_test_1, sleep_time=0.11),
        ]
    )
    bench
    output
    Benchmark(func_to_test_1, func_to_test_1(0.12), func_to_test_1(sleep_time=0.11))
    bench.run()
     Func name  | Sec / run
    
    func_to_test_1:   0.10 0.0%
    
    func_to_test_1(sleep_time=0.11):   0.11 -9.1%
    
    func_to_test_1(0.12):   0.12 -16.7%
    
    bench = Benchmark(
        {
            "func_1": func_to_test_1,
            "func_2": func_to_test_2,
        }
    )
    bench
    output
    Benchmark(func_1, func_2)

    When we run benchmark script in terminal, we got pretty progress thanks to rich. Lets run example_1.py from example folder:

    example_1

    BenchmarkIter

    With BenchmarkIter we can benchmark functions over iterables, for example read list of files or run functions with different arguments.

    def func_to_test_1(x: int) -> None:
        """simple 'sleep' func for test"""
        sleep(0.01)
    
    
    def func_to_test_2(x: int) -> None:
        """simple 'sleep' func for test"""
        sleep(0.015)
    
    
    dummy_params = list(range(10))
    from benchmark_utils import BenchmarkIter
    
    bench = BenchmarkIter(
        func=[func_to_test_1, func_to_test_2],
        item_list=dummy_params,
    )
    bench()
     Func name  | Items/sec
    
    func_to_test_1:  97.93
    
    func_to_test_2:  65.25
    

    We can run it again, all functions, some of it, exclude some and change number of repeats. And we can limit number of items with num_samples argument: bench.run(num_samples=5)

    Multiprocessing

    By default we tun functions in one thread.
    But we can use multiprocessing with multiprocessing=True argument: bench.run(multiprocessing=True) It will use all available cpu cores. And we can use num_workers argument to limit used cpu cores: bench.run(multiprocessing=True, num_workers=2)

    bench.run(multiprocessing=True, num_workers=2)
     Func name  | Items/sec
    
    func_to_test_1: 173.20
    
    func_to_test_2: 120.80
    
    Visit original content creator repository https://github.com/ayasyrev/benchmark_utils
  • api_hanami

    API app example

    Objectives

    This is am example app. My goal was to create a concurrent? small and fast JSON API app. Requirements:

    • API calls should be faster than 100ms after data seeding (see Data Seed)
    • DB = PostgreSQL
    • It’s allowed to use any gems and ORMs
    • Don’t use RoR
    • It’s allowed to use DB capabilities to speed up responses
    • Code should be clean, e.g. don’t use generators
    • Specs are required

    Endpoints

    There are 3 models – User (fields: login), Post (fields: title, content, author ip address) and Rating (fields: value(1..5)). Rating belongs to Post, Post belongs to User.

    Create Post

    Params: title, content, author ip, author login

    Behaviour: Create post. Create user if not exists

    Response: 200 – created post attributes, 422 – in case of error

    POST http://127.0.0.1:9292/api/v1/posts?login=<user>&title=<title>&ip=<ip>&content=<content>

    Rate Post

    Params: post id, rating

    Behaviour: post has many ratings

    Important: action should work correctly on a concurrent update of the same post

    Response: 200 – average post rating, 422 – in case of error

    PUT http://localhost:9292/api/v1/posts/<post_id>?rating=<rating>

    Top Posts by Rating

    Params: number of posts to return (optional)

    Behaviour: Collection of posts with their attributes should be returned

    Response: 200 – N posts with their attributes

    GET http://localhost:9292/api/v1/posts?count=<count>

    List of IP addresses

    Params: user logins

    Behaviour: Get all user’s IP addresses from his posts. It should be possible to get some users simultaneously

    Response: 200 – users and their IP addresses

    GET http://localhost:9292/api/v1/users/ip?logins=<login1>%20<login2>

    Data Seed

    db/seed.db file should be created. Import data to the DB using JSON API – start server and use API endpoints.

    DB should be filled with:

    • 100 uniq users
    • 50 uniq IP addresses
    • 200k posts

    Solution

    This was my first non-Rails API app so I decided to create an app from scratch using something extremely light and fast.
    I should have used Roda or Hanami but my decision was to try something experimental 🙂
    So my choice for this test task is Hanami::API.

    Actually I’ve benchmarked requests/second for Hanami::API, Hanami::Router and Roda on ruby 2.7.0 and the winner was Hanami::Router. Roda was very close to it.
    Anyway I would prefer Hanami or Roda for production.

    Quick start

    Install gems:

    bundle install
    

    Start Postgres server:

    docker-compose up -d
    

    Prepare database:

    bundle exec rake db:create RACK_ENV=production
    bundle exec rake db:migrate RACK_ENV=production
    

    Start server:

    bundle exec bin/rackup -q -E production -o 127.0.0.1
    

    Start data seed:

    bundle exec rake db:seed RACK_ENV=production
    

    Run tests

    bundle exec rake db:create RACK_ENV=test
    bundle exec rake db:migrate RACK_ENV=test
    bundle exec rspec
    

    Visit original content creator repository
    https://github.com/yuri-karpovich/api_hanami

  • celeste-dialog-highlighter

    Celeste Dialog Highlighter

    A Visual Studio Code extension that provides basic syntax highlighting for Celeste Language Dialog documents.

    Configuration

    This extension’s language is called “Celeste Dialog Document”, but targets .txt files. You may need to manually switch to this language whenever you create a file, or if Visual Studio Code doesn’t detect it automatically. There are multiple ways to do this:

    • When you create a new file, Visual Studio Code should let you know that you can manually set the desired language.
    • The currently selected language is displayed at the bottom right of the window. For .txt files, it’s usually something like “Plain Text”, but it varies depending on the extension of the file. Clicking on it will allow you to change the file’s language regardless of its extension.
    • Use the command palette (brought with Ctrl+Shift+P) and search for the “Change Language Mode” setting. This brings a dropdown menu from which you can look for the Celeste Dialog Document language.
    • You can configure Visual Studio to always associate a .txt file with the Celeste Dialog Document language within the scope of your project, or globally.
      • To do so, open up the Preferences Settings tab (through File > Preferences > Settings, or with Ctrl+,).
      • Look for the “file association” option. You can choose whether you edit this setting globally or for this workspace only, by clicking on the corresponding tab below the search bar.
      • Then, add an entry to associate .txt files with the Celeste Dialog Document language. The key should be *.txt, and the value should be celeste-dialog. If your workspace is a the root directory of a mod, you can specifically target Dialog files only, by setting the key as Dialog/*.txt.

    Known Issues

    If you find a bug, or have a suggestion, please consider opening an issue. Alternatively, we can chat on discord; message me at catapillie#1927, or you can find me in the Mt. Celeste Climbing Association Discord server.

    Visit original content creator repository
    https://github.com/catapillie/celeste-dialog-highlighter

  • school_management_system_flutter

    School Management System

    Introduction

    The School Management System is a comprehensive application designed to streamline interactions within the educational ecosystem, benefiting students, teachers, and administrators alike. By automating essential tasks, this system enhances operational efficiency and ensures a seamless experience for all stakeholders.

    Key Features

    Real-time Notifications: Leveraging Firebase, the system provides instant notifications to keep users informed of important updates.

    Robust State Management: Implemented using GetX, the application maintains a solid foundation for managing state throughout the user interface.

    Efficient MVC Architecture: The codebase follows a Model-View-Controller (MVC) architecture, promoting clean, maintainable code for easy scalability.

    Dedicated UI/UX Focus: As the Flutter developer, I took on the role of a UI/UX developer to ensure an intuitive and user-friendly experience.

    Libraries and Frameworks Integration: Integration of crucial libraries and frameworks, including Firebase Core, Firebase Messaging, firedart, curved_navigation_bar, and more, enhances the application’s capabilities.

    Error Handling and Validation: Rigorous error handling and input validation processes were put in place to manage potential issues related to internet connectivity, user interaction, and input validation.

    RESTful API Integration: The system seamlessly integrates with external systems through RESTful APIs, facilitating smooth communication.

    Impact

    While the application did not undergo formal testing, it proved immensely valuable to the development team and select users. Its functional and aesthetically pleasing design, coupled with features like post and assignment management, as well as comprehensive reporting for individual students, showcased its effectiveness.

    Conclusion

    The School Management System successfully simplifies interactions within the educational environment, demonstrating a commitment to best practices in Flutter development. Its robust functionality and user-friendly design make it an invaluable tool for students, teachers, and administrators.

    Visit original content creator repository
    https://github.com/EyasWannous/school_management_system_flutter