Blog

  • message-pusher

    message-pusher logo

    消息推送服务

    ✨ 搭建专属于你的消息推送服务,支持多种消息推送方式,支持 Markdown,仅单可执行文件,开箱即用✨

    license release docker pull release GoReportCard

    程序下载 · 部署教程 · 使用教程 · 意见反馈 · 在线演示

    Note:官方部署站 https://msgpusher.com 现已上线,当前开放注册,欢迎使用。如果收到积极反馈未来可以考虑换用延迟更低的服务器。

    Warning:从 v0.3 版本升级到 v0.4 版本需要手动迁移数据库,具体方法见迁移数据库

    描述

    1. 多种消息推送方式
      • 邮件消息,
      • 微信测试号,
      • QQ,
      • 企业微信应用号,
      • 企业微信群机器人
      • 飞书自建应用
      • 飞书群机器人,
      • 钉钉群机器人,
      • Bark App,
      • WebSocket 客户端(官方客户端接入文档),
      • Telegram 机器人,
      • Discord 群机器人,
      • 腾讯云自定义告警:免费的短信提醒,
      • 群组消息:可以将多个推送通道组合成一个群组,然后向群组发送消息,可以实现一次性推送到多个渠道的功能,
      • 自定义消息:可以自定义消息请求 URL 和请求体格式,实现与其他服务的对接,支持众多第三方服务
    2. 支持自定义 Webhook,反向适配各种调用平台,你可以接入各种已有的系统,而无需修改其代码。
    3. 支持在 Web 端编辑 & 管理发送的消息,新消息发送后 Web 端即时刷新
    4. 支持异步消息发送。
    5. 支持用户管理,支持多种用户登录注册方式:
    6. 支持 Markdown。
    7. 支持 Cloudflare Turnstile 用户校验。
    8. 支持在线发布公告,设置关于界面以及页脚。
    9. API 兼容其他消息推送服务,例如 Server 酱

    用途

    1. 整合进自己的博客系统,每当有人登录时发微信消息提醒
    2. 在进行深度学习模型训练时,在每个 epoch 结束后将关键数据发送到微信以方便及时监控。
    3. 在各种脚本运行结束后发消息提醒,例如监控 GitHub Star 数量的脚本,又例如自动健康填报的脚本,用来通知运行结果。
    4. 其他系统提供消息推送功能。

    部署

    通过 Docker 部署

    部署:docker run -d --restart always --name message-pusher -p 3000:3000 -e TZ=Asia/Shanghai -v /home/ubuntu/data/message-pusher:/data justsong/message-pusher

    如果无法拉去,请将 justsong/message-pusher 替换为 ghcr.io/songquanpeng/message-pusher

    更新:docker run --rm -v /var/run/docker.sock:/var/run/docker.sock containrrr/watchtower -cR

    开放的端口号为 3000,之后用 Nginx 配置域名,反代以及 SSL 证书即可,具体参考详细部署教程

    数据将会保存在宿主机的 /home/ubuntu/data/message-pusher 目录(只有一个 SQLite 数据库文件),请确保该目录存在且具有写入权限,或者更改为合适的目录。

    Nginx 的参考配置:

    server{
       server_name msgpusher.com;  # 请根据实际情况修改你的域名
       
       location / {
              client_max_body_size  64m;
              proxy_http_version 1.1;
              proxy_pass http://localhost:3000;  # 请根据实际情况修改你的端口
              proxy_set_header Host $host;
              proxy_set_header X-Forwarded-For $remote_addr;
              proxy_cache_bypass $http_upgrade;
              proxy_set_header Accept-Encoding gzip;
       }
    }
    

    之后使用 Let’s Encrypt 的 certbot 配置 HTTPS:

    # Ubuntu 安装 certbot:
    sudo snap install --classic certbot
    sudo ln -s /snap/bin/certbot /usr/bin/certbot
    # 生成证书 & 修改 Nginx 配置
    sudo certbot --nginx
    # 根据指示进行操作
    # 重启 Nginx
    sudo service nginx restart

    手动部署

    1. GitHub Releases 下载可执行文件或者从源码编译:
      git clone https://github.com/songquanpeng/message-pusher.git
      cd message-pusher/web
      npm install
      npm run build
      cd ..
      go mod download
      go build -ldflags "-s -w" -o message-pusher
    2. 运行:
      chmod u+x message-pusher
      ./message-pusher --port 3000 --log-dir ./logs
    3. 访问 http://localhost:3000/ 并登录。初始账号用户名为 root,密码为 123456

    如果服务需要长久运行,只是单纯地启动是不够的,详细部署教程

    注意

    如果需要使用 WebSocket 客户端推送功能,则 Nginx 的配置文件中 proxy_read_timeoutproxy_send_timeout 务必设置超过 1 分钟。

    推荐设置:

    proxy_read_timeout 300s;
    proxy_send_timeout 300s;   
    

    配置

    系统本身仅需要下载一个可执行文件即可开始使用,无其他依赖。

    你可以通过设置环境变量或者命令行参数进行配置。

    等到系统启动后,使用 root 用户登录系统并做进一步的配置,默认密码为 123456

    环境变量

    1. REDIS_CONN_STRING:设置之后将使用 Redis 作为请求频率限制的存储,而非使用内存存储。
      • 例子:REDIS_CONN_STRING=redis://default:redispw@localhost:49153
    2. SESSION_SECRET:设置之后将使用固定的会话密钥,这样系统重新启动后已登录用户的 cookie 将依旧有效。
      • 例子:SESSION_SECRET=random_string
    3. SQL_DSN:设置之后将使用指定数据库而非 SQLite。
      • 例子:SQL_DSN=root:123456@tcp(localhost:3306)/message-pusher

    注意:使用 Docker 部署时,请使用 -e key=value 设置环境变量。

    例子:docker run -e SESSION_SECRET=random_string ...

    命令行参数

    1. --port <port_number>: 指定服务器监听的端口号,默认为 3000
      • 例子:--port 3000
    2. --log-dir <log_dir>: 指定日志文件夹,如果没有设置,日志将不会被保存。
      • 例子:--log-dir ./logs
    3. --version: 打印系统版本号并退出。

    进一步的配置

    1. 系统设置:
      1. 填写服务器地址。
      2. 配置登录注册选项,如果系统不对外开放,请取消选择允许新用户注册
      3. 配置 SMTP 服务,可以使用 QQ 邮箱的 SMTP 服务。
      4. 其他配置可选,请按照页面上的指示完成配置。
    2. 个人设置:
      1. 点击更新用户信息更改默认用户名和密码。
      2. 点击绑定邮箱地址绑定邮箱以启用邮件消息推送方式。
    3. 推送设置:
      1. 设置默认推送方式,默认为通过邮件进行推送。
      2. 设置推送 token,用以推送 API 调用鉴权,如果不需要留空即可。
      3. 设置其他推送方式,按照页面上的指示即可,完成配置后点击对应的测试按钮即可测试配置是否成功。
    4. 其他设置:如果系统对外提供服务,本系统也提供了一定的个性化设置功能,你可以设置关于界面和页脚,以及发布公告。

    用法

    1. 消息推送 API URL:https://<domain>/push/<username>
      • 将上面的 <domain> 以及 <username> 替换为真实值,例如:https://push.mydomain.cn/push/admin
    2. GET 请求方式:https://<domain>/push/<username>?title=<标题>&description=<描述>&content=<Markdown 文本>&channel=<推送方式>&token=<推送 token>
      1. title:选填,受限于具体的消息推送方式,其可能被忽略。
      2. description:必填,可以替换为 desp
      3. content:选填,受限于具体的消息推送方式,Markdown 语法的支持有所区别。
      4. channel:选填,如果不填则系统使用你在后台设置的默认推送通道。注意,此处填的是消息通道的名称,而非类型。可选的推送通道类型有:
        1. email:通过发送邮件的方式进行推送(使用 titledescription 字段设置邮件主题,使用 content 字段设置正文,支持完整的 Markdown 语法)。
        2. test:通过微信测试号进行推送(使用 description 字段设置模板消息内容,不支持 Markdown)。
        3. corp_app:通过企业微信应用号进行推送(仅当使用企业微信 APP 时,如果设置了 content 字段,titledescription 字段会被忽略;使用微信中的企业微信插件时正常)。
        4. lark_app:通过飞书自建应用进行推送。
        5. corp:通过企业微信群机器人推送(设置 content 字段则将渲染 Markdown 消息,支持 Markdown 的子集;设置 description 字段则为普通文本消息)。
        6. lark:通过飞书群机器人进行推送(注意事项同上)。
        7. ding:通过钉钉群机器人进行推送(注意事项同上)。
        8. bark:通过 Bark 进行推送(支持 titledescription 字段)。
        9. client:通过 WebSocket 客户端进行推送(支持 titledescription 字段)。
        10. telegram:通过 Telegram 机器人进行推送(descriptioncontent 字段二选一,支持 Markdown 的子集)。
        11. discord:通过 Discord 群机器人进行推送(注意事项同上)。
        12. one_api:通过 OneAPI 协议推送消息到 QQ。
        13. group:通过预先配置的消息推送通道群组进行推送。
        14. custom:通过预先配置好的自定义推送通道进行推送。
        15. tencent_alarm:通过腾讯云监控告警进行推送,仅支持 description 字段。
        16. none:仅保存到数据库,不做推送。
      5. token:如果你在后台设置了推送 token,则此项必填。另外可以通过设置 HTTP Authorization 头部设置此项。
        • 注意令牌有两种,一种是全局鉴权令牌,一种是通道维度的令牌,前者可以鉴权任何通道,后者只能鉴权指定通道。
      6. url:选填,如果不填则系统自动为消息生成 URL,其内容为消息详情。
      7. to:选填,推送给指定用户,如果不填则默认推送给自己,受限于具体的消息推送方式,有些推送方式不支持此项。
        1. @all:推送给所有用户。
        2. user1|user2|user3:推送给多个用户,用户之间使用 | 分隔。
      8. async:选填,如果设置为 true 则消息推送将在后台异步进行,返回结果包含 uuid 字段,可用于后续[获取消息发送状态](./docs/API.md#通过消息 UUID 获取消息发送状态)。
      9. render_mode:选填,
        1. 如果设置为 code,则消息体会被自动嵌套在代码块中进行渲染;
        2. 如果设置为 raw,则不进行 Markdown 解析;
        3. 默认 markdown,即进行 Markdown 解析。
    3. POST 请求方式:字段与上面 GET 请求方式保持一致。
      • 如果发送的是 JSON,HTTP Header Content-Type 请务必设置为 application/json,否则一律按 Form 处理。
      • POST 请求方式下的 token 字段也可以通过 URL 查询参数进行设置。

    各种通道的支持程度:

    通道类型 title description content url to Markdown 支持
    email ✅️ ✅️
    test ✅️ ✅️
    corp_app ✅️
    corp ✅️ ✅️
    lark
    lark_app ❌️
    ding ✅️
    bark ✅️
    client
    telegram
    discord
    tencent_alarm

    注意:

    1. 对于大部分通道,description 字段和 content 是不能同时存在的,如果你只需要文字消息,请使用 description 字段,如果你需要发送 Markdown 消息,请使用 content 字段。
    2. 部分通道的 Markdown 支持实际上是通过 URL 跳转到本系统所渲染的消息详情实现的,其他通道的 Markdown 支持受限于具体的通道,支持的语法并不统一。

    示例:

    Bash 示例
    #!/bin/bash
    
    MESSAGE_PUSHER_SERVER="https://msgpusher.com"
    MESSAGE_PUSHER_USERNAME="test"
    MESSAGE_PUSHER_TOKEN="666"
    
    function send_message {
      # POST Form
      curl -s -X POST "$MESSAGE_PUSHER_SERVER/push/$MESSAGE_PUSHER_USERNAME" \
        -d "title=$1&description=$2&content=$3&token=$MESSAGE_PUSHER_TOKEN" \
        >/dev/null
    }
    
    function send_message_with_json {
      # POST JSON
      curl -s -X POST "$MESSAGE_PUSHER_SERVER/push/$MESSAGE_PUSHER_USERNAME" \
        -H 'Content-Type: application/json' \
        -d '{"title":"'"$1"'","desp":"'"$2"'", "content":"'"$3"'", "token":"'"$MESSAGE_PUSHER_TOKEN"'"}' \
        >/dev/null
    }
    
    send_message 'title' 'description' 'content'

    另一个版本:

    MESSAGE_PUSHER_SERVER="https://msgpusher.com"
    MESSAGE_PUSHER_USERNAME="test"
    MESSAGE_PUSHER_TOKEN="666"
    MESSAGE_PUSHER_CHANNEL="lark"
    
    sendmsg() {
        if [ -t 0 ]; then
            local param="$*"
        else
            local param=$(</dev/stdin)
        fi
        curl -s -o /dev/null --get --data-urlencode "content=${param}" "$MESSAGE_PUSHER_SERVER/push/$MESSAGE_PUSHER_USERNAME?channel=$MESSAGE_PUSHER_CHANNEL&token=$MESSAGE_PUSHER_TOKEN"
    }

    之后便可以进行这样的操作:

    uname -ra | sendmsg
    Python 示例
    import requests
    
    SERVER = "https://msgpusher.com"
    USERNAME = "test"
    TOKEN = "666"
    
    
    def send_message(title, description, content):
        # GET 方式
        # res = requests.get(f"{SERVER}/push/{USERNAME}?title={title}"
        #                    f"&description={description}&content={content}&token={TOKEN}")
    
        # POST 方式
        res = requests.post(f"{SERVER}/push/{USERNAME}", json={
            "title": title,
            "description": description,
            "content": content,
            "token": TOKEN
        })
        res = res.json()
        if res["success"]:
            return None
        else:
            return res["message"]
    
    
    error = send_message("标题", "描述", "**Markdown 内容**")
    if error:
        print(error)
    Go 示例
    package main
    
    import (
       "bytes"
       "encoding/json"
       "errors"
       "fmt"
       "net/http"
       "net/url"
    )
    
    var serverAddress = "https://msgpusher.com"
    var username = "test"
    var token = "666"
    
    type request struct {
       Title       string `json:"title"`
       Description string `json:"description"`
       Content     string `json:"content"`
       URL         string `json:"url"`
       Channel     string `json:"channel"`
       Token       string `json:"token"`
    }
    
    type response struct {
       Success bool   `json:"success"`
       Message string `json:"message"`
    }
    
    func SendMessage(title string, description string, content string) error {
       req := request{
          Title:       title,
          Description: description,
          Content:     content,
          Token:       token,
       }
       data, err := json.Marshal(req)
       if err != nil {
          return err
       }
       resp, err := http.Post(fmt.Sprintf("%s/push/%s", serverAddress, username),
          "application/json", bytes.NewBuffer(data))
       if err != nil {
          return err
       }
       var res response
       err = json.NewDecoder(resp.Body).Decode(&res)
       if err != nil {
          return err
       }
       if !res.Success {
          return errors.New(res.Message)
       }
       return nil
    }
    
    func SendMessageWithForm(title string, description string, content string) error {
       resp, err := http.PostForm(fmt.Sprintf("%s/push/%s", serverAddress, username),
          url.Values{"title": {title}, "description": {description}, "content": {content}, "token": {token}})
       if err != nil {
          return err
       }
       var res response
       err = json.NewDecoder(resp.Body).Decode(&res)
       if err != nil {
          return err
       }
       if !res.Success {
          return errors.New(res.Message)
       }
       return nil
    }
    
    func main() {
       //err := SendMessage("标题", "描述", "**Markdown 内容**")
       err := SendMessageWithForm("标题", "描述", "**Markdown 内容**")
       if err != nil {
          fmt.Println("推送失败:" + err.Error())
       } else {
          fmt.Println("推送成功!")
       }
    }
    C# 示例
    using Newtonsoft.Json;
    using RestSharp;
    
    namespace Demo
    {
        public class Program
        {
            public static void Main(string[] args)
            {
                //推送消息
                var sendMsg = MessagePusherTool.SendMessage("标题", "描述", "**Markdown 内容**");
                if(sendMsg.Success)
                {
                    Console.WriteLine($"推送成功!");
                }
                else
                {
                    Console.WriteLine($"推送失败:{sendMsg.Message}");
                }
            }
        }
    
        /// <summary>
        /// 消息推送工具
        /// 
        /// <para>开源地址:https://github.com/songquanpeng/message-pusher</para>
        /// <para>支持:Framework、Net3.1、Net5、Net6</para>
        /// <para>引用包:</para>
        /// <para>dotnet add package Newtonsoft.Json -v 13.0.2</para>
        /// <para>dotnet add package RestSharp -v 108.0.3</para>
        /// </summary>
        public class MessagePusherTool
        {
            /// <summary>
            /// ServerAddress
            /// </summary>
            public const string ServerAddress = "https://msgpusher.com";
    
            /// <summary>
            /// UserName
            /// </summary>
            public const string UserName = "test";
    
            /// <summary>
            /// Token
            /// </summary>
            public const string Token = "666";
    
            /// <summary>
            /// SendMessage
            /// </summary>
            /// <param name="title">title</param>
            /// <param name="description">description</param>
            /// <param name="content">content</param>
            public static Response SendMessage(string title, string description, string content)
            {
                var requestData = new Request()
                {
                    Title = title,
                    Description = description,
                    Content = content,
                    Token = Token,
                };
                var url = $"{ServerAddress}";
                var client = new RestClient(url);
                var request = new RestRequest($"push/{UserName}", Method.Post);
                request.AddJsonBody(requestData);
                var response = client.Execute(request);
                var responseData = response.Content;
                var responseJson = JsonConvert.DeserializeObject<Response>(responseData);
                return responseJson;
            }
    
            /// <summary>
            /// Request
            /// </summary>
            public class Request
            {
                /// <summary>
                /// Title
                /// </summary>
                [JsonProperty(PropertyName = "title")]
                public string Title { get; set; }
    
                /// <summary>
                /// Description
                /// </summary>
                [JsonProperty(PropertyName = "description")]
                public string Description { get; set; }
    
                /// <summary>
                /// Content
                /// </summary>
                [JsonProperty(PropertyName = "content")]
                public string Content { get; set; }
    
                /// <summary>
                /// URL
                /// </summary>
                [JsonProperty(PropertyName = "url")]
                public string URL { get; set; }
    
                /// <summary>
                /// Channel
                /// </summary>
                [JsonProperty(PropertyName = "channel")]
                public string Channel { get; set; }
    
                /// <summary>
                /// Token
                /// </summary>
                [JsonProperty(PropertyName = "token")]
                public string Token { get; set; }
            }
    
            /// <summary>
            /// Response
            /// </summary>
            public class Response
            {
                /// <summary>
                /// Success
                /// </summary>
                [JsonProperty(PropertyName = "success")]
                public bool Success { get; set; }
    
                /// <summary>
                /// Message
                /// </summary>
                [JsonProperty(PropertyName = "message")]
                public string Message { get; set; }
            }
        }
    }
    Node.js 示例
    const axios = require('axios');
    const querystring = require('querystring');
    
    const MESSAGE_PUSHER_SERVER = 'https://msgpusher.com'
    const MESSAGE_PUSHER_USERNAME = 'test'
    const MESSAGE_PUSHER_TOKEN = '666'
    
    async function send_message(title, description, content) {
      try {
        const postData = querystring.stringify({
          title: title,
          desp: description,
          content: content,
          token: MESSAGE_PUSHER_TOKEN,
        })
    
        const response = await axios.post(`${MESSAGE_PUSHER_SERVER}/push/${MESSAGE_PUSHER_USERNAME}`, postData, {
          headers: {
            'Content-Type': 'application/x-www-form-urlencoded',
          },
        })
        if (response.data.success) {
          return response.data
        }
      } catch (error) {
        if (error.response) {
          return error.response.data
        } else {
          throw error
        }
    
      }
    }
    
    send_message('标题', '描述', '**Markdown 内容**')
      .then((response) => {
        if (response.success) {
          console.log('推送成功:', response)
        } else {
          console.log('推送失败:', response)
        }
      }, (error) => {
        console.log(error.message);
      })

    欢迎 PR 添加更多语言的示例。

    迁移数据库

    此处均以 SQLite 为例,其他数据库请自行修改。我已经让 ChatGPT 翻译成对应的 SQL 版本,见 bin 文件夹,供参考。

    v0.3 迁移到 v0.4

    1. 首先备份你的数据库文件。
    2. 下载最新的 v0.4 版本,启动程序,程序会自动进行数据库表结构的迁移。
    3. 终止程序。
    4. 之后执行脚本:./bin/migrate_v3_to_v4.py,进行数据的迁移。
    5. 重新启动程序即可。

    注意,执行前请确保数据库中 users 表中字段的顺序和脚本中的一致,否则会出现数据错乱的情况。

    其他

    1. v0.3 之前的版本基于 Node.js,你可以切换到 nodejs 分支查看,该版本不再有功能性更新。
    2. v0.3 以及后续版本基于 Gin Template v0.2.1 版本开发。
    3. 如果想要自行编译,请首先编译前端,之后再编译后端,否则会遇到 pattern web/build: no matching files found 问题。
    Visit original content creator repository https://github.com/songquanpeng/message-pusher
  • pixiv-helper

    基于 Mirai ConsolePixiv 插件

    基于 Kotlin Pixiv库 PixivClient ,通过清除ServerHostName 绕过SNI审查,免代理

    Release Downloads MiraiForum

    使用前应该查阅的相关文档或项目

    Pixiv Helper 2 重构进行中,部分功能还不可用. 需要重新登录Pixiv 账号,你可以使用之前登录得到的 Token

    目前没有自动缓存清理,请使用 #删除指令 手动清理
    R18图会按照Pixiv所给信息过滤
    群聊模式使用默认账号,私聊模式Pixiv账号和QQ号关联,初次使用请先 /pixiv 指令登陆账号
    然后使用 /cache recommended 缓存系统推荐作品,然后再使用色图相关指令
    推荐使用 /task cache recommended 定时自动缓存

    Gif图片需要由机器人自己合成,如果设备性能不足,请调整相关参数

    1.9.0 起将数据库部分功能拆分
    需要 Mirai Hibernate Plugin 做前置插件
    这是必要
    MCL安装指令 ./mcl --update-package xyz.cssxsh.mirai:mirai-hibernate-plugin --channel maven-stable --type plugins

    打开浏览器,登录PIXIV 需要 Mirai Selenium Plugin 做前置插件 并且需要代理配置(可以打开浏览器后,在浏览器中配置),浏览器登录只是其中一种登录方法,不必要安装 Selenium 插件

    群聊默认输出最少作品信息,需要增加请使用 /setting 指令修改

    发送模式可以使用 /setting 指令修改为闪照或撤销或转发
    注意, 闪照等模式 并不会降低 机器人被封禁 的风险。
    机器人被封禁的主要风险来自

    • QQ号是新注册的
    • Bot挂在服务器上,但是服务器IP被腾讯列为风险IP(腾讯通过IP确定 登录地区)
    • Bot被高频使用,(另外,高频发图再高频撤销属于不打自招,正常用户有这个手速吗?)
    • 发送大量违规链接,或者触发关键词

    指令

    注意: 使用前请确保可以 在聊天环境执行指令
    带括号的/前缀是可选的
    <...>中的是指令名,由空格隔开表示或,选择其中任一名称都可执行例如/色图
    [...]表示参数,当[...]后面带?时表示参数可选
    {...}表示连续的多个参数

    本插件指令权限ID 格式为 xyz.cssxsh.mirai.plugin.pixiv-helper:command.*, * 是指令的第一指令名
    例如 /pixiv sina 的权限ID为 xyz.cssxsh.mirai.plugin.pixiv-helper:command.pixiv

    Pixiv相关操作指令

    指令 描述
    /<pixiv> <sina> 扫码登录关联了PIXIV的微博账号,以登录PIXIV
    /<pixiv> <cookie> 通过Cookie,登录PIXIV
    /<pixiv> <selenium> 打开浏览器,登录PIXIV
    /<pixiv> <refresh> [token] 登录 通过 refresh token
    /<pixiv> <bind> [uid] [contact]? 绑定 Pixiv 账户
    /<pixiv> <pool> 账户池详情
    /<follow> <user> {uid} 为当前助手关注指定用户
    /<follow> <copy> [uid] 关注指定用户的关注
    /<mark bookmark> <add> [uid] {words}? 添加指定作品收藏
    /<mark bookmark> <delete> [pid] 删除指定作品收藏
    /<mark bookmark> <random> [tag]? 随机发送一个收藏的作品
    /<mark bookmark> <list> 显示收藏列表

    Pixiv helper 2 重构中,follow 和 mark 暂不可用
    Pixiv helper 2 中 新加入 /pixiv bind 指令,此指令用于为一个联系人(群/用户)绑定一个 pixiv 账号(已登录)

    cookie 文件为工作目录下的 cookie.json
    内容 为 浏览器插件 EditThisCookie 导出的Json
    EditThisCookie 安装地址 Chrome Firefox Edge

    色图相关指令

    指令 描述
    (/)<ero 色图 涩图> 缓存中随机一张色图
    (/)<get 搞快点 gkd> [pid] [flush]? 获取指定ID图片
    (/)<tag 标签> [word] [bookmark]? [fuzzy]? 随机指定TAG图片
    (/)<boom 射爆 社保> [limit]? [word]? 随机一组色号图,默认30张
    (/)<illustrator 画师> <uid id user 用户> [uid] 根据画师UID随机发送画师作品
    (/)<illustrator 画师> <name 名称 名字 推特> [name] 根据画师name或者alias随机发送画师作品
    (/)<illustrator 画师> <alias 别名> [name] [uid] 设置画师alias
    (/)<illustrator 画师> <list 列表> 显示别名列表
    (/)<illustrator 画师> <info 信息> [uid] 获取画师信息
    (/)<illustrator 画师> <search 搜索> [name] [limit]? 搜索画师
    (/)<search 搜索 搜图> [image]? saucenao、ascii2d 搜索图片

    Pixiv helper 2 重构中,illustrator 暂不可用

    色图指令基于缓存信息,使用前请先缓存一定量的作品,推荐使用 /cache recommended 指令
    使用色图指令时 指令后附带 更好, 可以使收藏数比前一张更高, 如果两次色图指令间隔小于触发时间(默认时间10s)也会触发这个效果
    tag指令检索结果过少时,会自动触发缓存
    tag指令可以尝试按照格式 角色名(作品名) 检索角色, 举例 红(明日方舟)
    tag指令多keyword时,请使用 _|,, + 等符号将keyword连接起来,不要使用空格,举例 明日方舟+巨乳
    [image]? 为空时会从回复消息最近图片获取
    bookmark 参数指收藏数过滤
    fuzzy 参数指模糊搜索
    boom指令使用时
    word 会随机给出色图
    word 为数字时会查找对应uid画师的色图
    其余情况则按 tag 处理

    画师别名的uid为0时表示删除指定别名

    搜图使用 https://saucenao.com 的 api,无KEY时,每天限额 100次, KEY参数在设置中添加
    举例:
    从指令参数中获取
    从回复消息中获取
    从最近图片中获取
    从输入等待中获取

    1.9.1 开始,添加 通过At来搜索头像的功能

    当 saucenao 的 搜索结果不足时,会自动补充 ascii2d 的搜索结果

    缓存指令

    指令 描述
    /<cache> <follow> 缓存关注推送
    /<cache> <rank> [mode] [date]? 缓存指定排行榜信息
    /<cache> <recommended> 缓存推荐作品
    /<cache> <bookmarks> [uid] 缓存用户的收藏中缓存色图作品
    /<cache> <following> [fluhsh]? 缓存关注画师作品
    /<cache> <fwm> [jump]? 缓存关注画师收藏
    /<cache> <user> [uid] 缓存指定画师作品
    /<cache> <tag> [word] 缓存搜索tag得到的作品
    /<cache> <ero> [range]? 缓存色图画师的作品
    /<cache> <ewm> [range]? 缓存色图画师的收藏
    /<cache> <search> 缓存搜索记录
    /<cache> <stop> [name] 停止缓存任务
    /<cache> <detail> 缓存任务详情

    Pixiv helper 2 重构中,部分缓存指令 暂不可用

    [uid]? 会自动填充当前用户

    mode 可选值: MONTH, WEEK, WEEK_ORIGINAL, WEEK_ROOKIE, DAY, DAY_MALE, DAY_FEMALE, DAY_MANGA

    任务指令

    指令 描述
    /<task> <user> [uid] [cron] [target]? 推送用户新作品
    /<task> <rank> [mode] [cron] [target]? 推送排行榜新作品
    /<task> <follow> [cron] [target]? 推送关注用户作品
    /<task> <recommended> [cron] [target]? 推送推荐作品
    /<task> <trending> [cron]? [target]? 推送热门标签
    /<task> <cache> [uid] [cron] {args} 数据自动缓存
    /<task> <cron> [id] [cron] 查看任务详情
    /<task> <detail> 查看任务详情
    /<task> <delete> [id] 删除任务

    Pixiv helper 2 重构中,部分任务指令 暂不可用

    备份文件优先推送到群文件,其次百度云
    duration 单位分钟,默认3小时
    /task cache {args} 是 task 和 cache 指令的组合,举例,/task cache recommended

    设置指令

    指令 描述
    /<setting> <interval> [sec] 设置连续发送间隔时间, 单位秒
    /<setting> <forward> 设置Task发送模式
    /<setting> <link> 设置是否显示Pixiv Cat 原图链接
    /<setting> <tag> 设置是否显示TAG INFO
    /<setting> <attr> 设置是否显示作品属性
    /<setting> <cooling> 设置cooling置零 废除
    /<setting> <max> [num] 设置显示最大图片数
    /<setting> <model> [type] [ms]? 设置发送模式

    Pixiv helper 2 重构中,部分设置指令 暂不可用

    发送模式 有三种 NORMAL, FLASH, RECALL, ms 是Recall的延迟时间,单位毫秒
    注意:FLASH, RECALL 这两种模式 并不会降低 机器人被封禁 的风险
    forward, link, tag, attr 使用指令后会对当前值取反

    统计信息指令

    指令 描述
    /<info> <user> [target]? 获取用户信息
    /<info> <group> [target]? 获取群组信息
    /<info> <top> [limit]? 获取TAG指令统计信息
    /<info> <cache> 获取缓存信息

    删除指令

    指令 描述
    /<delete> <artwork> [pid] [record]? 删除指定作品
    /<delete> <user> [uid] [record]? 删除指定用户作品
    /<delete> <bookmarks> [max] [record]? 删除小于指定收藏数作品
    /<delete> <page> [min] [record]? 删除大于指定页数作品
    /<delete> <manga> [record]? 删除漫画作品
    /<delete> <record> 删除已记录作品

    第二参数 record 表明是否写入数据库,默认为否,只删除图片文件

    URL 自动解析

    Pixiv helper 2 重构中,部分自动解析 暂不可用

    权限 id: xyz.cssxsh.mirai.plugin.pixiv-helper:url
    匹配一下正则表达式的URL将会被解析

    val URL_ARTWORK_REGEX = """(?<=pixiv\.net/(i|artworks)/|illust_id=)\d+""".toRegex()
    val URL_USER_REGEX = """(?<=pixiv\.net/(u/|users/|member\.php\?id=))\d+""".toRegex()
    val URL_PIXIV_ME_REGEX = """(?<=pixiv\.me/)[\w-]{3,32}""".toRegex()
    

    设置

    PixivHelperSettings.yml

    • cache_path 缓存目录
    • backup_path 备份目录
    • temp_path 临时目录
    • ero_chunk 色图分块大小 和自动触发TAG缓存有关
    • ero_up_expire 色图自动触发更高收藏数的最大时间,单位毫秒
    • ero_work_types 涩图标准 内容类型 ILLUST, UGOIRA, MANGA, 为空则全部符合
    • ero_bookmarks 涩图标准 收藏
    • ero_page_count 涩图标准 页数
    • ero_tag_exclude 涩图标准 排除的正则表达式
    • ero_user_exclude 涩图标准 排除的UID
    • pximg 反向代理, 若非特殊情况不要修改这个配置,保持留空,可选代理 i.pixiv.re, i.pixiv.cat
    • proxy API代理
    • proxy_download DOWNLOAD代理 图片下载器会对代理产生很大的负荷,请十分谨慎的开启这个功能
    • timeout_api API超时时间, 单位ms
    • timeout_download DOWNLOAD超时时间, 单位ms
    • block_size DOWNLOAD分块大小, 单位B, 默认 523264, 为零时, 不会分块下载
    • tag_sfw tag 是否过滤r18 依旧不会放出图片
    • ero_sfw ero 是否过滤r18 依旧不会放出图片
    • cache_capacity 下载缓存容量,同时下载的任务上限
    • cache_jump 缓存是否跳过下载
    • upload 压缩完成后是否上传百度云,不上传百度云则会尝试发送文件

    ImageSearchConfig.yml

    • key KEY 不是必须的,无KEY状态下,根据IP每天可以搜索 100 次,有KEY状态下搜索次数依据于账户
      KEY 参数请到 https://saucenao.com/ 注册账号,
      在用户页面 https://saucenao.com/user.php?page=search-api 获得的KEY填入
      信息只在启动时读取,修改后需重启
    • limit 显示的搜索结果数
    • bovw ascii2d 检索类型,false色合検索 true特徴検索
    • wait 图片等待时间,单位秒
    • forward 转发方式发送搜索结果

    PixivGifConfig.yml

    • quantizer 编码器, com.squareup.gifencoder.ColorQuantizer 的实现
      目前可选值,图片质量和所需性能按顺序递增, 推荐使用 OctTreeQuantizer
      com.squareup.gifencoder.UniformQuantizer
      com.squareup.gifencoder.MedianCutQuantizer
      com.squareup.gifencoder.OctTreeQuantizer
      com.squareup.gifencoder.KMeansQuantizer
      xyz.cssxsh.pixiv.tool.OpenCVQuantizer (需要 安装 OpenCV, 对应 jar 放进 plugins 文件夹)
    • ditherer 抖动器, com.squareup.gifencoder.Ditherer 的实现
      目前可选值, 推荐使用 AtkinsonDitherer
      com.squareup.gifencoder.FloydSteinbergDitherer
      com.squareup.gifencoder.NearestColorDitherer
      xyz.cssxsh.pixiv.tool.AtkinsonDitherer
      xyz.cssxsh.pixiv.tool.JJNDitherer
      xyz.cssxsh.pixiv.tool.SierraLiteDitherer
      xyz.cssxsh.pixiv.tool.StuckiDitherer
    • disposal 切换方法
      可选值 UNSPECIFIED, DO_NOT_DISPOSE, RESTORE_TO_BACKGROUND, RESTORE_TO_PREVIOUS
    • max_count OpenCVQuantizer 最大迭代数

    System.getProperty

    • pixiv.rate.limit.delay 默认 3 * 60 * 1000L ms
    • pixiv.download.async 默认 32

    hibernate.properties

    如果不是特殊需要,使用默认的 SQLite 配置就好
    配置 mysql 举例 (字符集要设置为utf8mb4_bin),其他数据库类推 配置 文件

    hibernate.connection.url=jdbc:mysql://localhost:3306/pixiv?autoReconnect=true
    hibernate.connection.driver_class=com.mysql.cj.jdbc.Driver
    hibernate.connection.CharSet=utf8mb4
    hibernate.connection.useUnicode=true
    hibernate.connection.username=username
    hibernate.connection.password=password
    hibernate.dialect=org.hibernate.dialect.MySQL5Dialect
    hibernate.connection.provider_class=org.hibernate.hikaricp.internal.HikariCPConnectionProvider
    hibernate.hbm2ddl.auto=none
    hibernate-connection-autocommit=true
    hibernate.connection.show_sql=false
    hibernate.autoReconnect=true
    

    关于表的自动创建可以查看 model

    Visit original content creator repository https://github.com/cssxsh/pixiv-helper
  • raven-writer

    raven-writer

    raven-writer is a FE utility to allow for easy translations and interpolations for projects using the popular POEditor localization service.

    What raven-writer does:

    • GETs and caches localizations for your project
    • Refreshes those localizations at a given interval
    • Transforms simple markdown in your content into HTML strings
    • Allows for dynamic interpolation of string values into your content
    • Easily gets values by term

    Docs

    Install

    npm install raven-writer -S
    

    Quick start example

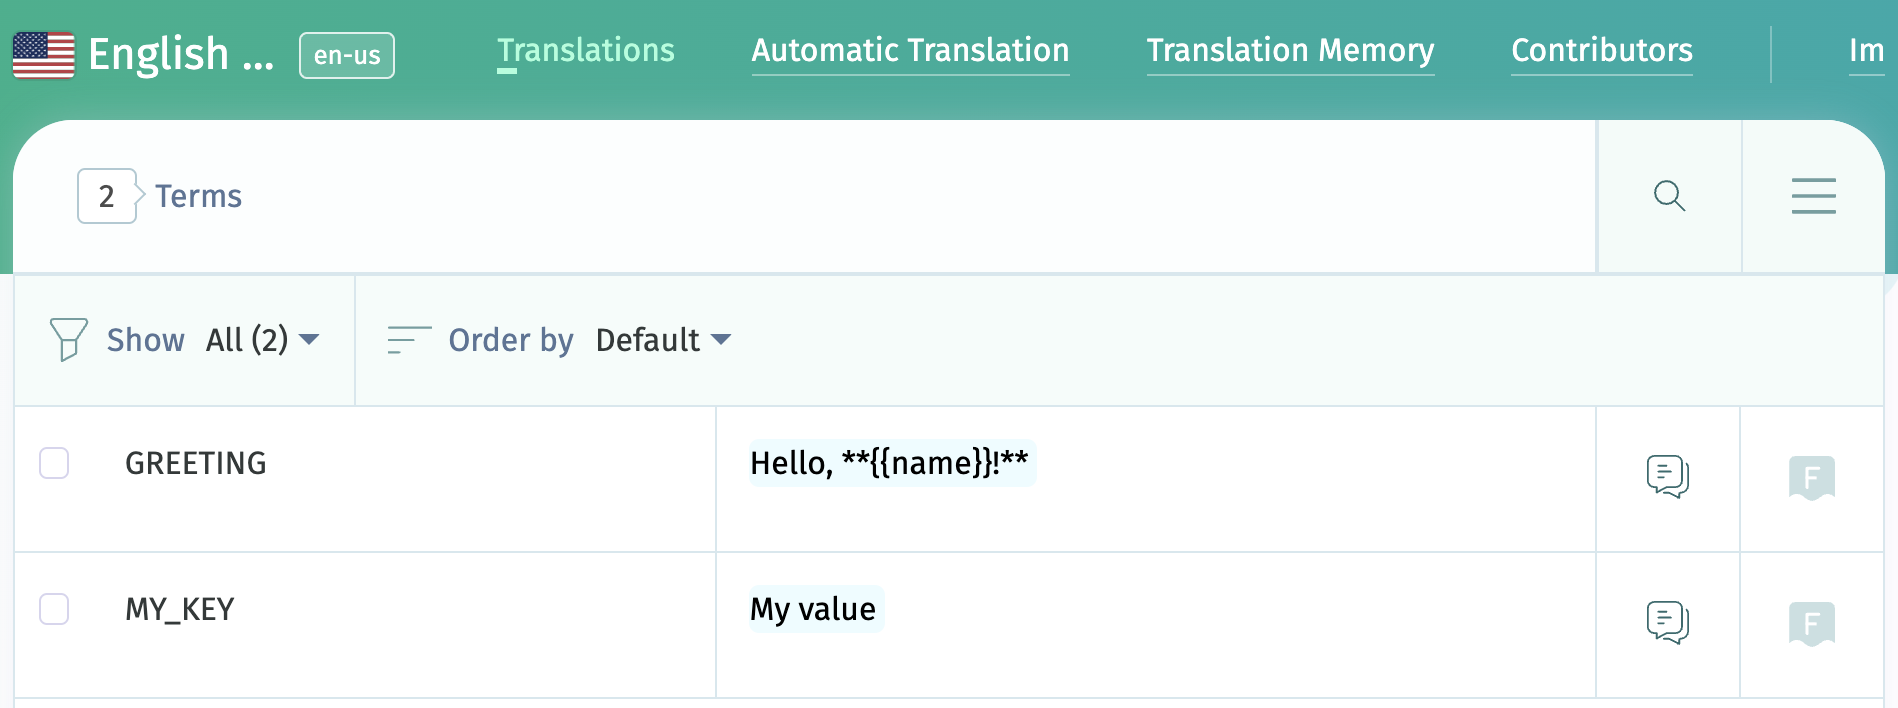
    Given the following POEditor project

    In our project we have:

    • A language that is American english, which has a ISO 639-1 language code of en-us
    • A term MY_KEY that has a content value of "My value"
    • A second term GREETING that has a content value of "Hello, **{{name}}!**"
      • Note that the value has {{}} to denote an interpolated value with the key name
      • It also has ** markdown indicating it should be bolded
    import { Raven } from "raven-writer";
    
    // make the POE instance
    const POE = new Raven();
    
    // load localizations into the instance
    await POE.fetchLocalizations({
      id: "<POEDITOR_PROJECT_ID>",
      token: "<YOUR_READ_ONLY_POEDITOR_API_TOKEN>",
      languages: ["en-us"]
    });
    
    // make a dictionary
    const Translate = POE.makeDictionary("en-us");
    
    // Logs: "My value"
    console.log(Translate("MY_KEY"));
    
    // Logs: "Hello, <b>Nate!</b>"
    console.log(Translate("GREETING", {name: "Nate"}));

    Instantiation

    In most cases you’ll instantiate the POE instance simply by calling new Raven().

    You can optionally pre-load the POE instance with localizations. You’d do this if you wanted access to the POE.makeDictionary(language) functionality without having to make API calls. Refer to the localizations structure if you want to do this.

    Props

    Prop Type Required? Description
    localizations Object The preloaded localizations

    Returns

    A POE instance that has the following methods:

    POE.getLocalizations(localizations);
    POE.fetchLocalizations({id, token, languages, keepAlive, url});
    POE.makeDictionary(language);
    POE.makeText(string, interpolations);
    POE.kill();

    Usage

    Most common case

    import { Raven } from "raven-writer";
    const POE = new Raven();

    Optional preloading

    import { Raven } from "raven-writer";
    
    const localizations = {
      "en-us": {
        "GREETING": "Hi!"
      }
    };
    
    const PRELOADED = new Raven(localizations);
    const Translate = POE.makeDictionary("en-us");
    console.log(Translate("GREETING")); // Logs: "Hi!"

    POE.fetchLocalizations({...})

    Fetches and catches localizations.

    Props

    Prop Type Required? Description
    token String if url is undefined The readonly api_token found in your POEditor acct
    id String if url is undefined The project id found in your POEditor acct
    languages Array of ISO 639-1 language codes if url is undefined The languages you want to fetch for the given project
    keepAlive Integer If present the localizations will be refreshed per milliseconds defined this value
    url String if url, id, and languages are undefined If present calls will be made to that url instead of hitting the POEditor endpoint

    Returns

    A promise that once resolved will populate the POE instance with localizations.

    Usage

    Most common usage

    import { Raven } from "raven-writer";
    const tenMins = 1000 * 60 * 10;
    const POE = new Raven();
    await POE.fetchLocalizations({
      id: "<POEDITOR_PROJECT_ID>",
      token: "<YOUR_READ_ONLY_POEDITOR_API_TOKEN>",
      languages: ["en-us", "sp_mx"],
      keepAlive: tenMins // optional
    });

    Overwriting the endpoint

    import { Raven } from "raven-writer";
    const POE = new Raven();
    await POE.fetchLocalizations({
      url: "<YOUR_CUSTOM_GET_ENDPOINT>"
    });

    Note: the response from your endpoint must have the same structure as the localizations structure

    POE.makeDictionary(language)

    Makes a Dictionary function for a given language that has already been cached in the POE instance

    Props

    Prop Type Required? Description
    language String yes A ISO 639-1 language code

    Returns

    A Dictionary function

    Usage

    import { Raven } from "raven-writer";
    const POE = new Raven();
    await POE.fetchLocalizations({..., languages: ["en-us", "sp-mx"]});
    const enUsDictionary = POE.makeDictionary("en-us");
    const spMxDictionary = POE.makeDictionary("sp-mx");

    POE.getLocalizations(language)

    Returns the raw localizations object. see: localizations structure.

    Props

    Prop Type Required? Description
    language String A ISO 639-1 language code

    Returns

    A localizations object

    Usage

    Assume the cached localizations are the following:

    {
      "en-us": {
        "GREETING": "Hello"
      },
      "sp-mx": {
        "GREETING": "Hola"
      }
    }
    import { Raven } from "raven-writer";
    const POE = new Raven();
    await POE.fetchLocalizations({..., languages: ["en-us", "sp_mx"]});
    console.log(POE.getLocalizations()) // Logs the preceding full object
    console.log(POE.getLocalizations("sp_mx")) // Logs { GREETING: "Hola" }

    POE.makeText(str, interolations)

    Adds interpolations and/or Markdown transformed into HTML string to a given string. See: Content markdown and interpolation syntax.

    Props

    Prop Type Required? Description
    str String Any string value, ie not a POE term
    interolations Object An object with key names that match the dynamic content markers in the str

    Returns

    A string with interpolations and Markdown transformed into HTML str (if applicable).

    Usage

    import { Raven } from "raven-writer";
    const POE = new Raven();
    
    // Logs: "Plain text"
    console.log(POE.makeText("Plain text"));
    
    // Logs: "Hello, Nate"
    console.log(POE.makeText("Hello, {{name}}", { name: "Nate" }));
    
    // Logs: "Some <i>italic text</i>"
    console.log(POE.makeText("Some *italic text*"));
    
    // Logs: "Hello, <b>Nate</b>"
    console.log(POE.makeText("Hello, **{{name}}**", { name: "Nate" }));

    POE.kill()

    If you call POE.fetchLocalizations({...}) and set it to refresh localizations via keepAlive, this stops all refreshes on that instance.

    Returns

    undefined

    Usage

    import { Raven } from "raven-writer";
    const tenMins = 1000 * 1000 * 60 * 10;
    const POE = new Raven();
    await POE.fetchLocalizations({..., keepAlive: tenMins});
    ...
    POE.kill();

    Dictionary(term, interpolations)

    The function returns the localized content value of a term, optionally with injected interpolations. Markdown is transformed into HTML strings.

    Props

    Prop Type Required? Description
    term String Any string value, ie not a POE term
    interolations Object An object with key names that match the dynamic content markers for the content value associated with the term

    Returns

    A string with interpolations and Markdown transformed into HTML str (if applicable) for the language used to create the function.

    Usage

    import { Raven } from "raven-writer";
    
    const POE = new Raven();
    await POE.fetchLocalizations({..., languages: ["en-us", "sp-mx"]});
    
    /*
    Assume `POE.fetchLocalizations({...})` caches the following localizations:
    {
      "en-us": {
        "GREETING": "*Hello*, {{name}}"
      },
      "sp-mx": {
        "GREETING": "Hola, {{name}}"
      }
    }
    */
    
    const EN_US = POE.makeDictionary("en-us");
    const SP_MX = POE.makeDictionary("sp-mx");
    
    // Logs: "<i>Hello</i>, Nate"
    console.log(EN_US("GREETING", {name: "Nate"}));
    
    // Logs: "Hola, Nate"
    console.log(SP_MX("GREETING", {name: "Nate"}));

    Content markdown and interpolation syntax

    raven-writer supports a limited subset of markdown and a simple way of adding interpolations to your content. Use this as a guide when adding content values on the POEditor dashboard

    Supported Markdown

    Style Markdown Output
    bold **bold** <b>world</b>
    italic *italic* <i>italic</i>
    bold italic ***bold italics*** <b><i>bold italic</i></b>
    link [link name](https://example.com) <a href="https://example.com" target="_blank">link name</a>

    Interpolations

    Add variables into your content by using interpolations object. The keys in the interpolations object wrapped between {{ and }} can be used to represent dynamic content.

    Localizations structure

    The localizations are stored as a single nested object. Top level keys are ISO 639-1 language codes, each holding that language’s localizations in key/value pairs where the key is what POEditor refers to as the term and value is what POEditor refers to as the content. See the POEditor API for more details.

    Here is an example assuming 3 languages in the project with only one entry in each:

    {
      "en-us": {
        "GREETING": "Hello"
      },
      "en-au": {
        "GREETING": "G'day"
      },
      "sp-mx": {
        "GREETING": "Hola"
      }
    }
    Visit original content creator repository https://github.com/64bit-polygon/raven-writer
  • Processes-Threads-Concurrency-exercise-practice

    Processes, Threads, Concurrency exercise practice

    Practice exercises from my education in Computer Science. Exercises in Processes, Threads, and Concurrency.

    The exercises helped me gain a better understanding of the topics.

    Credit

    The original code can be seen here: https://github.com/goldfingyr/DMA-CSD-S233

    I’ve only made small changes to some of the code. My primary goal was to get an understanding of the topic.

    Topics

    • Processes – How to start a process
    • Threads – How to make a thread using ‘extends Thread’ and ‘implement Runnable’.
    • Semaphores – Synchronization to prevent deadlock
    • Circular buffer – Data structure
    • FIFO (First in, First out)

    Documentation

    Processes 💻

    The processes package provides examples of how to start and manage operating system processes from a Java application. The package contains multiple classes demonstrating different approaches for launching external applications, such as web browsers and text editors, using the ProcessBuilder class and the Runtime.exec() method.

    • ProcessDemoProcessBuilder demonstrates how to start an external process (e.g., Google Chrome) using the ProcessBuilder class in Java. It encapsulates the process management functionality and provides feedback on whether the process started successfully.
    • ProcessDemoRuntimeExec demonstrates how to start an external process (e.g., Google Chrome) using the Runtime.exec() method in Java. Like the ProcessDemoProcessBuilder, this class manages the process and provides feedback on its execution status.
    • StartProcess provides a basic example of starting a process using ProcessBuilder to open the Notepad application on the user’s system.

    Threads 💿

    This code covers the implementation of multi-threading in Java using two different approaches: implementing the Runnable interface and extending the Thread class. The code examples demonstrate how to create and run multiple threads, each printing a greeting, sleeping for a random amount of time, and then printing a goodbye message.

    • MyRunnable: This class represents a task that can be executed by a thread. The task includes printing a greeting message, sleeping for a random duration (0 to 1000 milliseconds), and then printing a goodbye message.
    • MyThread: This class extends the Thread class and overrides the run() method to define the thread’s behavior. Similar to MyRunnable, it prints a greeting, sleeps for a random duration, and then prints a goodbye message.
    • ThreadsDemoExtendsThread: This class demonstrates the creation and execution of threads using the MyThread class, which extends the Thread class.
    • ThreadsDemoRunnable: This class demonstrates the creation and execution of threads using the MyRunnable class, which implements the Runnable interface.

    Semaphores 🎧

    This package demonstrates the use of semaphores to solve the classic Producer/Consumer problem, where two threads (a producer and a consumer) coordinate access to a shared resource. A semaphore is a synchronization mechanism used in programming to control access to shared resources by multiple threads. It works like a signaling system, allowing threads to perform operations based on the availability of the resource.

    Semaphores maintain a counter, which represents the number of permits available. When a thread wants to access the resource, it tries to “acquire” a permit:

    • If a permit is available (the counter is greater than 0), the counter is decremented, and the thread gains access to the resource.

    • If no permits are available (the counter is 0), the thread is blocked until another thread “releases” a permit by incrementing the counter.

    • Semaphores are useful in preventing race conditions, ensuring that only a specific number of threads can access the shared resource simultaneously, thus maintaining data integrity and proper synchronization between threads.

    • MyThread extends the Thread class and represents a thread that can act as either a producer or a consumer, depending on its name. The synchronization between the producer and consumer is managed by two semaphores: semProducer and semConsumer. SemProducer controls access for the producer thread and SemConsumer controls access for the consumer thread.

    • SemaphoreDemo is the driver class that sets up the environment for the producer and consumer threads: SemProducer: Initialized with 1 permit, allowing the producer to start immediately. SemConsumer: Initialized with 0 permits, blocking the consumer until the producer releases a permit.

    • The main method creates two MyThread objects, starts them, and waits for their completion. After both threads finish execution, it prints the final value of the shared resource count, which should be 5.

    • SharedResource contains a static integer count that is shared between the producer and consumer threads. It is initially set to 0 and is incremented by the producer during the execution of the program. The consumer reads this value.

    Circular buffer 📀

    A buffer is a general term that refers to a temporary storage area used to hold data while it is being transferred from one place to another. A circular buffer is a special type of buffer that treats the buffer memory as if it were circular—meaning that when it reaches the end of the buffer, it wraps around to the beginning. A circular buffer is a fixed-size data structure that uses a single, contiguous block of memory. The write and read positions (pointers) wrap around to the beginning once they reach the end of the buffer, forming a continuous loop.

    The code consists of two classes: Buffer and CircularBuffer. The Buffer class implements a thread-safe circular buffer, while CircularBuffer demonstrates how to use this buffer with producer and consumer threads.

    • The Buffer class simulates a circular buffer, which allows data to be written and read in a first-in, first-out (FIFO) manner. This implementation is designed to be thread-safe, ensuring that multiple threads can interact with the buffer concurrently without conflicts. The Buffer class uses synchronized methods and Java’s wait() and notifyAll() mechanisms to manage concurrent access by producer and consumer threads.
    • The read method in the Buffer class retrieves and removes an item from the buffer. If the buffer is empty (i.e., PositionRead == PositionWrite), the thread waits until data is available. Once data is read, the PositionRead pointer is incremented (with wrap-around using modulo operation). It notifies other waiting threads that the buffer state has changed.
    • The write method in the Buffer class adds an item to the buffer. If the buffer is full (i.e., the next write position equals the read position), the thread waits until space is available. It writes the value to the buffer and increments the PositionWrite pointer (with wrap-around using modulo operation). It notifies other waiting threads that the buffer state has changed.
    • The buffer size is fixed at 4, meaning it can hold up to 4 elements before it needs to start overwriting the oldest data or block new writes until space is available. Both the write and read positions (PositionWrite and PositionRead) wrap around when they reach the end of the buffer, effectively creating a loop. This wrap-around behavior is what makes it a circular buffer.
    • The CircularBuffer class demonstrates the practical use of the Buffer class. It creates and starts two threads: one for the producer (which writes data to the buffer) and one for the consumer (which reads data from the buffer). The producer and consumer threads run concurrently, interacting with the shared Buffer instance. The producer starts by writing data to the buffer. If the buffer becomes full, it waits until the consumer reads some data. The consumer reads data from the buffer as it becomes available. If the buffer is empty, it waits until the producer writes more data. This back-and-forth interaction between the producer and consumer, managed by the circular buffer, ensures that data is processed in the correct order and without loss.

    Fifo queue 🔓

    This Java code is an implementation of a Producer-Consumer problem using a shared FIFO (First In, First Out) queue. The Producer-Consumer is a common problem that deals with synchronizing and scheduling tasks in concurrent programming. This code demonstrates the use of synchronization primitives to manage access to a shared resource in a multithreaded environment.

    The SharedFiFoQueue is a FIFO queue because it retrieves elements in the same order they were added. The PosW and PosR pointers ensure that the first element added is the first one removed, maintaining the FIFO discipline.

    • The ConditionDemo class sets up the environment by creating and starting the producer and consumer threads.
    • The Producer thread reads words from a file and adds them to the SharedFiFoQueue. If the queue is full, it waits until space becomes available.
    • The Consumer thread removes words from the SharedFiFoQueue and processes them. If the queue is empty, it waits until the producer adds more elements.
    • The SharedFiFoQueue uses a circular buffer to manage elements efficiently, with ReentrantLock and Condition ensuring proper synchronization between threads.
    • The program terminates when both the producer and consumer threads finish their work, which is ensured by the join() calls in the ConditionDemo class.

    Monitor 🌟

    A monitor in concurrent programming is a synchronization construct that allows threads to have both mutual exclusion (i.e., only one thread can execute a critical section of code at a time) and the ability to wait (block) and be notified (awaken) when certain conditions are met. In Java, a monitor is implemented by using the synchronized keyword, along with the wait(), notify(), and notifyAll() methods provided by the Object class. Each object in Java has an associated monitor that a thread can lock or unlock.

    How the Code Uses a Monitor

    • The methods Put() and Get() in the Buffer class are declared as synchronized. This means that when a thread calls one of these methods on an instance of Buffer, it automatically acquires the lock (monitor) associated with that Buffer instance. No other thread can execute any other synchronized method on that instance until the lock is released.
    • wait() Method: Inside Put(), if the buffer is full (count == buffer.length), the producer thread calls wait(). This causes the producer thread to release the monitor (lock) and suspend its execution until it is notified.
      Similarly, in Get(), if the buffer is empty (count == 0), the consumer thread calls wait() and waits to be notified when an item is available in the buffer.
    • notify() Method: After producing an item and adding it to the buffer in Put(), the producer calls notify() to wake up a waiting consumer thread. After consuming an item and removing it from the buffer in Get(), the consumer calls notify() to wake up a waiting producer thread.
    • Mutual Exclusion: The synchronized keyword ensures that only one thread can execute the Put() or Get() method on the Buffer object at any given time.
    • Thread Coordination: The wait() and notify() methods are used to coordinate the actions of the producer and consumer. For instance, the producer must wait if the buffer is full, and the consumer must wait if the buffer is empty.
    • This use of monitors ensures that the producer and consumer threads work together correctly, avoiding race conditions and ensuring that the buffer is used properly.

    Visit original content creator repository
    https://github.com/solesen1992/Processes-Threads-Concurrency-exercise-practice

  • mov-cli

    Stargazers Pypi Version Pypi Downloads Python Versions Issues MIT License

    Logo

    Watch everything from your terminal.
    Report Bug · Request Feature


    Logo

    Warning

    You may have noticed, development slowing down and halting for a long while. This is because I and the other contributors sadly no longer have the time to take this project to the next level (v4.5).

    This isn’t the end, v4.4 may still continue to receive bug fixes here and there, but v4.4 is currently on feature freeze, so new features will only be added once v4.5 development begins again. v4.5 is a rewrite.

    We are hoping we have the time and motivation to return one day, hopefully with more contributors to help this time.

    Note

    v4 is constantly changing so be sure to keep the tool and your plugins up to date. Also, I would advise not using it as a library yet as the API still has many breaking changes.

    What is mov-cli? 💫

    mov-cli is a command line tool with plugin support that streamlines the process of streaming media from the comfort of your terminal; so you can show off to your friends the superiority of the command line. 💪 The tool is sort of a framework that handles metadata, configuration and scraping of the media to be streamed in your media player of choice.

    mov-cli is not a piracy tool; in fact, we encourage the opposite through the existence of our plugins mov-cli-files and mov-cli-jellyplex. 🫵 You obtain the media. You pick the plugins.

    Installation 🛠️

    Tip

    For in-depth installation instructions hit the wiki.

    Prerequisites

    • A supported platform:
    • python (required, with pip)
    • lxml (optional, ⚡ faster scraping)
    • fzf (optional but highly recommended)
    • mpv (recommended & default media player)

    To get running these are all the prerequisites you’ll need.

    With the prerequisites installed, mov-cli can be installed via the pip command on all platforms with Python version 3.8 or above.

    pip install mov-cli -U

    Check out the wiki on installation for more in-depth guidance on installing mov-cli.

    Usage 🖱️

    mov-cli.mp4

    mov-cli comes packaged with a CLI interface via the mov-cli command you can use in your respective terminal.

    Note

    You may notice mov-cli doesn’t ship with any scrapers (or previously known as providers) by default, this is because v4 is plugin-based and scrapers are now part of plugins that must be chosen to be installed. Find out how to do so at the wiki.

    1. Install the plugin of your choice. Visit this wiki page on how to do so and the mov-cli-plugin topic for a list of third-party mov-cli plugins.
    pip install mov-cli-youtube

    This is just an example. If you are struggling, visit that wiki page.

    1. Add the plugin to your config.
    mov-cli -e

    Alternatively, you may also edit by manually opening the config file. See this Wiki page on that.

    [mov-cli.plugins]
    youtube = "mov-cli-youtube"

    Check out the wiki for more in-depth explanation.

    1. Scrape away!
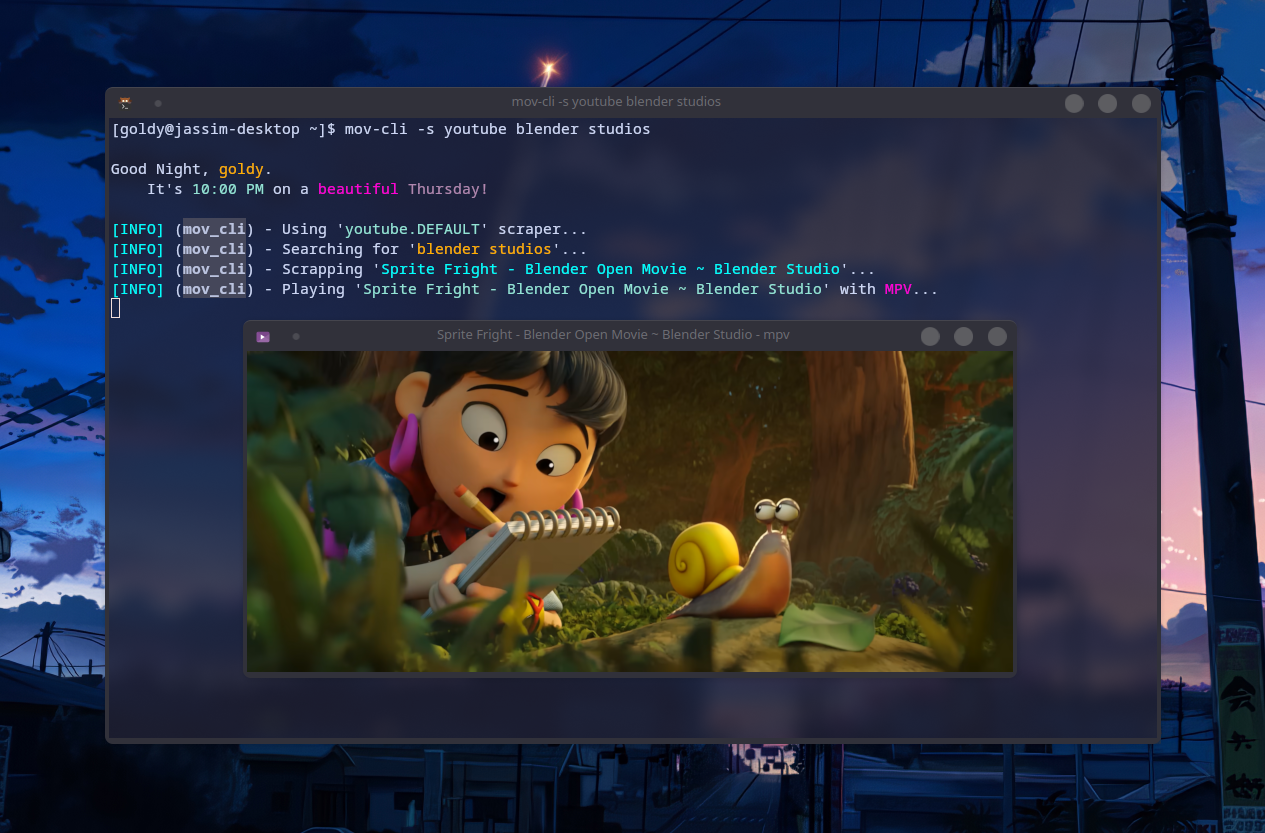
    mov-cli -s youtube blender studio

    The command above searches for blender studio with our youtube plugin, however once again mov-cli is plugin based and there are many of them in the wild. 😉

    Star Graph ⭐

    Star Graph Chart

    Contributing ✨

    Pull requests are welcome and appreciated. For major changes, please open an issue first to discuss what you would like to change.

    Inspiration 🌟

    Inspired by ani-cli, lobster and animdl

    Visit original content creator repository https://github.com/mov-cli/mov-cli
  • laravel-react-reverb-chat-app

    Laravel Logo

    Build Status Total Downloads Latest Stable Version License

    About Laravel

    Laravel is a web application framework with expressive, elegant syntax. We believe development must be an enjoyable and creative experience to be truly fulfilling. Laravel takes the pain out of development by easing common tasks used in many web projects, such as:

    Laravel is accessible, powerful, and provides tools required for large, robust applications.

    Learning Laravel

    Laravel has the most extensive and thorough documentation and video tutorial library of all modern web application frameworks, making it a breeze to get started with the framework.

    You may also try the Laravel Bootcamp, where you will be guided through building a modern Laravel application from scratch.

    If you don’t feel like reading, Laracasts can help. Laracasts contains thousands of video tutorials on a range of topics including Laravel, modern PHP, unit testing, and JavaScript. Boost your skills by digging into our comprehensive video library.

    Laravel Sponsors

    We would like to extend our thanks to the following sponsors for funding Laravel development. If you are interested in becoming a sponsor, please visit the Laravel Partners program.

    Premium Partners

    Contributing

    Thank you for considering contributing to the Laravel framework! The contribution guide can be found in the Laravel documentation.

    Code of Conduct

    In order to ensure that the Laravel community is welcoming to all, please review and abide by the Code of Conduct.

    Security Vulnerabilities

    If you discover a security vulnerability within Laravel, please send an e-mail to Taylor Otwell via taylor@laravel.com. All security vulnerabilities will be promptly addressed.

    License

    The Laravel framework is open-sourced software licensed under the MIT license.

    Visit original content creator repository https://github.com/ImAliSheraz/laravel-react-reverb-chat-app
  • Wander

    Wander

    In this practical you create the Wander app, which is a styled Google Map. The
    Wander app allows you to drop markers onto locations, see your location in
    real time, and look at Street View panoramas.

    Content: http://codelabs.developers.google.com/codelabs/advanced-android-training-google-maps/index.html

    Lab path

    3. Task 1. Set up the project an get an API Key

    1. google_maps_api.xml
    2. activity_maps.xml
    3. MapsActivity.java

    4. Task 2. Add map types and markers

    1. map_options.xml
    2. strings.xml
    3. MapsActivity.java

    5. Task 3. Style your map

    1. activity_maps.xml

    2. map_style.json

      Created using Maps Platform Styling Wizard

    3. MapsActivity.java

    4. android.png

    6. Task 4. Enable location tracking and Street View

    1. AndroidManifest.xml
    2. MapsActivity.java
    3. activity_maps.xml

    The Google Maps Android API Street View service requires to link a billing
    account to the project on Google Cloud.

    References

    License

    Copyright 2017 Google, Inc.

    Licensed to the Apache Software Foundation (ASF) under one or more contributor
    license agreements. See the NOTICE file distributed with this work for
    additional information regarding copyright ownership. The ASF licenses this
    file to you under the Apache License, Version 2.0 (the “License”); you may not
    use this file except in compliance with the License. You may obtain a copy of
    the License at

    http://www.apache.org/licenses/LICENSE-2.0

    Unless required by applicable law or agreed to in writing, software
    distributed under the License is distributed on an “AS IS” BASIS, WITHOUT
    WARRANTIES OR CONDITIONS OF ANY KIND, either express or implied. See the
    License for the specific language governing permissions and limitations under
    the License.

    Visit original content creator repository
    https://github.com/dscoppelletti/Wander

  • beautiful-capi

    Beautiful Capi

    Build Status Build Status

    Introduction

    Beautiful Capi is a tool which automates the creation of compiler-independent and binary compatible C++ libraries across different C++ compilers. Libraries prepared by Beautiful Capi enable C++ libraries to be compiled once then used many times by the other C++ compilers without any recompilation. Of course, the compiled C++ libraries are compatible only on the same platforms and architectures where they were built. For instance, a shared library which was built by Visual Studio 2015 C++ compiler could be wrapped and called by Mingw Clang C++ compiler on Windows operating system (allowing both forward and backward compatibility) and vice versa.

    This tool generates the required C++ and C code to wrap your C++ classes for use in a compiler-independent way.

    This tool requires Python 3.6 or higher.

    Another main concept is to generate a well-crafted beautiful C API, which is clear, readable and visibly suitable for human usage (not only for computers or compilers).

    Beautiful Capi is written in Python 3. Note it does not parse the library source code to obtain its API description. Instead of that, as author you should provide a library API description in XML format. Usually such XML files which describe the library API are created by hand. There are no tools for creating XML API description files yet, however, such tools could be created in the future. There are plans to add support of some convenient DSL (Domain-Specific Language) in parallel to XML format.

    Beautiful Capi is not intended as a tool for automating cross-language C++ library creation (for instance, the cases when a C++ library is used in Java or C# application) like SWIG. However, in the future Beautiful Capi could introduce such features and support for some other target languages. For details please see issue 7 and issue 39.

    The main goal of this project is to produce highly efficient code and design elegance. This goal is informed by knowing Java programmers prefer to write wrappers by hand to avoid sub-optimal SWIG outputs.

    Beautiful Capi has many examples which help to learn it step by step. You can find all examples in examples folder.

    Regarding the license – the code generated by this tool can be used for any purpose, including commercial. Only the code generator tool itself is subject to GPL licensing.

    C++ problems

    C++ ABI

    The one of the well-known C++ language problems is ABI (Application Binary Interface) incompatibility. The C++ language standard does not specify any ABI and it is implementation specific. For instance, the C++ language standard does not define size of int type. Each C++ compiler vendor can provide his own implementation of ABI. Any C++ library must be built again and again for every different C++ compiler which needs to use the library in an application.

    Name mangling

    The second problem in C++ is name mangling. In C++ name mangling is an encoding scheme which translates complex C++ identifiers (including overloaded functions and methods, template instantiations, namespaces, etc.) to plain C functions. The C++ language standard does not specify any name mangling scheme. Again, each C++ compiler vendor can provide his own implementation of name manging. A C++ compiler is used to build an application could use a different name mangling scheme incompatible from the C++ compiler used for building the original library. The typical result for the developer of the application is to face unresolved symbol linking errors.

    C++ STL ABI

    The third problem is binary incompatible C++ standard libraries. For instance, the size of std::string class is implementation specific and could vary from one C++ compiler to another, and even from one build configuration to another.

    Exceptions

    Different C++ compilers implement different exception throwing and catching schemas. An exception thrown from one C++ compiler runtime, in general, could not be caught and managed by another C++ compiler runtime.

    Basic solutions

    C++ application developers face and work-around these issues every day with some basic coding methods. A common basic solution for providing a stable ABI is to use special types which have fixed sizes. For instance, using int32_t type instead of int type, etc. The calling convention is also important, so, the developer needs to manually specify the calling convention for each method or function in the library.

    The basic solution for overcoming different name mangling schemes is to manually write plain C functions. However, it is boiler-plate and error-prone, reducing development productivity.

    The basic solution for the binary incompatible C++ standard libraries problem is to avoid exposing C++ standard library classes at the library public API. So, the library API should contain only primitive and fixed sized types in its API. As result, a developer should manually split some complex C++ standard library templates (such as std::vector<>, std::map<>) to primitive functions and types, which is also boiler-plate and error-prone.

    Also, the developer is often forced to manually write C++ wrapper classes which will expose some higher level API rather than plain C functions and types. Such a process is laborious, boiler-plate and error-prone.

    Beautiful Capi solution

    Beautiful Capi is a tool which automates the creation of compiler-independent C++ libraries. It greatly helps to solve the name mangling problem, generating C++ wrapper classes, wrapping C++ STL library template classes, catching and rethrowing exceptions and much more.

    Consider hello_world Beautiful Capi example. It exposes the following class:

    #include <iostream>
    
    namespace HelloWorld
    {
        class PrinterImpl
        {
        public:
            void Show() const;
        };
    }
    
    void HelloWorld::PrinterImpl::Show() const
    {
        std::cout << "Hello Beautiful World!" << std::endl;
    }

    In fact HelloWorld::PrinterImpl class is an internal class and it is not exposed directly for HelloWorld library clients. Instead of HelloWorld::PrinterImpl class an opaque void* pointer is used by the following automatic generated plain C functions:

    void* hello_world_printer_default()
    {
        return new HelloWorld::PrinterImpl();
    }
    
    void hello_world_printer_show_const(void* object_pointer)
    {
        const HelloWorld::PrinterImpl* self = static_cast<HelloWorld::PrinterImpl*>(object_pointer);
        self->Show();
    }
    
    void* hello_world_printer_copy(void* object_pointer)
    {
        return new HelloWorld::PrinterImpl(*static_cast<HelloWorld::PrinterImpl*>(object_pointer));
    }
    
    void hello_world_printer_delete(void* object_pointer)
    {
        delete static_cast<HelloWorld::PrinterImpl*>(object_pointer);
    }

    For simplicity we show only partial details here, we do not show details such as calling conventions or C linkage options for these functions.

    Note that all plain C function names have hello_world_ prefix which came from HelloWorld namespace. The second part of all plain C function names is printer_ which came from the Printer class name. The remaining parts are method names. Observe there are some simple rules for the conversion of any C++ identifier to a plain C function name.

    And automatic generated C++ wrapper class:

    namespace HelloWorld
    {
        class Printer
        {
        public:
            Printer()
            {
                SetObject(hello_world_printer_default());
            }
            void Show() const
            {
                hello_world_printer_show_const(GetRawPointer());
            }
            Printer(const Printer& other)
            {
                if (other.GetRawPointer())
                {
                    SetObject(hello_world_printer_copy(other.GetRawPointer()));
                }
                else
                {
                    SetObject(0);
                }
            }
            ~Printer()
            {
                if (GetRawPointer())
                {
                    hello_world_printer_delete(GetRawPointer());
                    SetObject(0);
                }
            }
            void* GetRawPointer() const
            {
                return mObject;
            }
        protected:
            void SetObject(void* object_pointer)
            {
                mObject = object_pointer;
            }
            void* mObject;
        };
    }

    Of course, as author you need to manually create the following XML API description file to accompany the C++:

    <?xml version="1.0" encoding="utf-8" ?>
    <hello_world:api xmlns:hello_world="http://gkmsoft.ru/beautifulcapi" project_name="HelloWorld">
      <namespace name="HelloWorld">
        <class name="Printer" lifecycle="copy_semantic" implementation_class_name="HelloWorld::PrinterImpl" implementation_class_header="PrinterImpl.h">
          <constructor name="Default"/>
          <method name="Show" const="true"/>
        </class>
      </namespace>
    </hello_world:api>

    And sample usage of this class from client side:

    #include <iostream>
    #include <cstdlib>
    #include "HelloWorld.h"
    
    int main()
    {
        HelloWorld::Printer printer;
        printer.Show();
    
        return EXIT_SUCCESS;
    }

    In this example HelloWorld::PrinterImpl is the implementation class, HelloWorld::Printer is the wrapper class. In the XML API description file HelloWorld::Printer identifier could be used for referencing this wrapped class and it is called API identifier or just identifier. In this example our wrapper class name is the same as the identifier, but in general they could be different.

    Note that HelloWorld::PrinterImpl class has copy semantic. This means that the implementation class object instances are always copied when the wrapper class object instances are copied, and the implementation class object instances are deleted when the wrapper class object instances are deleted. There are other possible behaviours. In terms of this Beautiful Capi tool such behaviour is called lifecycle semantic. Beautiful Capi supports several typical lifecycle semantics.

    There is hello_world example example which shows the first steps and the basic principles.

    We can designate the following three code structure design concepts:

    1. The implementation side. It means all code inside the C++ library, all classes, functions, methods and other types inside the C++ library. The implementation classes are used in the C++ library. Usually the C++ libraries are shared libraries which are intended to use by different C++ compilers.
    2. The tiny C glue layer. The bodies of C glue functions are located inside the C++ library, in an automatically generated .cpp file. In fact these functions are written in C++ (to have access to the implementation classes) and just have C linkage option enabled. So, outside the C++ library these functions are seen as pure C functions. Beautiful Capi generates both bodies of these functions and their declarations. The declarations are visible outside of the C++ library.
    3. The wrap side. It means all code generated by Beautiful Capi for clients of the C++ library, all classes, functions, methods and other types inside any client of the C++ library. Clients of the C++ library could be executable files, static libraries or shared libraries. The clients could be written in either pure C language or in C++ language. The C++ clients usually use the generated wrapper classes. The C clients use pure C functions directly. The wrapper classes are automatically generated by Beautiful Capi and visible only outside of the C++ library, inside the C++ library the wrapper classes are hidden and unavailable.

    Lifecycle semantics

    Beautiful Capi assumes that the implementation class object instances are always created on the heap. This fact is applied for all lifecycle semantics.

    You can specify lifecycle semantic for each wrapped class in the XML API description file.

    Copy semantic

    Copy semantics means that the implementation class object instance is always copied when the wrapper class object instance is copied. In other words, copy semantics emulates objects by value, however, as we noted above, Beautiful Capi assumes that the implementation class object instances are always created on the heap. So, Beautiful Capi generates a special _copy C API function and the wrapper class calls the copy function.

    void* namespace_prefix_class_name_copy(void* object_pointer)
    {
        return new ImplementationClass(*static_cast<ImplementationClass*>(object_pointer));
    }

    This works only if the copy constructor for implementation class is available. If a class has a copy semantic then Beautiful Capi assumes that a copy constructor for the implementation class is available. Currently this supposition is hard-coped inside the Beautiful Capi and can not be changed.

    The copy C API function is used both within the wrapper class copy constructor and the assignment operator.

    Copy semantic emulates objects by value, thus, the generated wrapper classes propose to use “.” (the dot sign) for accessing the wrapped class methods:

    int main()
    {
        // Creates the underlying implementation class on the heap of the C++ library
        HelloWorld::Printer printer;
    
        // Calls copy function to allocate new PrinterImpl class on the heap
        // of the C++ library by using PrinterImpl copy constructor.
        // printer and printer2 are different objects which have
        // different underlying implementation objects.
        HelloWorld::Printer printer2 = printer;
    
        // You have to use "." sign to access the wrapped PrinterImpl methods
        printer.Show();
    
        // At the end of this scope two PrinterImpl objects allocated on the heap
        // will be deallocated by using _delete function.
        // Please note that a heap manager of the C++ library will be used for that.
        return EXIT_SUCCESS;
    }

    The generated wrapper classes deallocate the underlying implementation class object instances by using a special generated _delete C API function. This function has _delete suffix and looks like this:

    void namespace_prefix_class_name_delete(void* object_pointer)
    {
        delete static_cast<ImplementationClass*>(object_pointer);
    }

    Delete C API function is called at the wrapper class destructor, thus memory leaks are nearly always eliminated. There is copy_semantic example which demonstrates this lifecycle semantic.

    Reference counted semantic

    Reference counted semantics means that the implementation class has a reference counter. The value of reference counter of the newly created objects should be equal 1. When a new reference to the object is created then the reference counter is normally increased by 1. When an existing reference to the object is destroyed then the reference counter is normally decreased by 1. The objects themselves should be deleted when the reference counter become 0.

    Beautiful Capi requires the availability of the following functions for the reference counted implementation classes:

    void intrusive_ptr_add_ref(ImplementationClass* object);
    void intrusive_ptr_release(ImplementationClass* object);

    Beautiful Capi generates _addref and _release special C API functions which use the above declarations:

    void namespace_prefix_class_name_addref(void* object_pointer)
    {
        intrusive_ptr_add_ref(static_cast<ImplementationClass*>(object_pointer));
    }
    void namespace_prefix_class_name_release(void* object_pointer)
    {
        intrusive_ptr_release(static_cast<ImplementationClass*>(object_pointer));
    }

    The generated _addref C API function is used both in the wrapper class copy constructor and the assignment operator. The wrapper class destructor calls the generated _release C API function.

    The reference counted semantic does not require any copy constructors for the implementation classes, thus allowing abstract C++ implementation classes to be used freely.

    Reference counted semantic emulates object pointers (smart pointers). So, you should use “->” (the arrow) for accessing the wrapped class methods, also the generated wrapper classes have Ptr suffix by default:

    int main()
    {
        // Creates the underlying implementation class on the heap of the C++ library.
        // Reference counter is 1.
        HelloWorld::PrinterPtr printer;
    
        // Calls _addref function to create a new reference to the existing object.
        // Reference counter is 2.
        // Both printer and printer2 reference to the same underlying implementation object.
        HelloWorld::PrinterPtr printer2 = printer;
    
        // You should use "->" to access wrapped PrinterImpl methods
        // However, "." sign is also could be used here, i.e.: printer.Show(); instruction will be compiled fine.
        // But we recommend you to always use "->".
        printer->Show();
    
        // At the end of this scope the PrinterImpl underlying implementation object will be deallocated.
        // This is because printer object destructor will decrease reference counter by 1 (from 2 to 1),
        // and printer2 object destructor will decrease reference counter by 1 (from 1 to 0),
        // and the underlying implementation object will be deallocated.
        // Please note that a heap manager of the C++ library will be used for that.
        return EXIT_SUCCESS;
    }

    There is a reference_counted example which demonstrates this lifecycle semantic.

    Raw pointer semantic

    Raw pointer semantic does not have any special requirements to the implementation classes. It emulates pointers (just raw pointers, not smart pointers). The generated wrapper classes do nothing at their destructors, so you need to manually destroy the created underlying implementation objects to avoid memory leaks.

    The generated wrapper classes have a special method for that, which usually has Delete() name by default. You can customize this name, see generation parameters XML schema. The special Delete() method uses a special generated _delete C API function. The generated _delete C API function is the same as the generated _delete C API function for copy semantic.

    Raw pointer semantic emulates non-owning pointers. So, you should use “->” (the arrow) for accessing the wrapped class methods, also the generated wrapper classes have RawPtr suffix by default:

    int main()
    {
        // Creates the underlying implementation class on the heap of the C++ library.
        HelloWorld::PrinterRawPtr printer;
    
        // Both printer and printer2 reference to the same underlying implementation object.
        HelloWorld::PrinterRawPtr printer2 = printer;
    
        // You should use "->" to access wrapped PrinterImpl methods
        // However, "." sign is also could be used here, i.e.: printer.Show(); instruction will be compiled fine.
        // But we recommend you to always use "->".
        printer->Show();
    
        // You need to manually deallocate the previously allocated PrinterImpl object.
        // Note that you need to deallocate it once by using either printer or printer2 object.
        // Here we used printer2 for deallocation, we could use printer instead, but not both.
        // This is because a double deallocation will happen in such a case.
        // Please note that a heap manager of the C++ library will be used for deallocation.
        printer2->Delete();
    
        return EXIT_SUCCESS;
    }

    There is a raw_pointer_semantic example which demonstrates this lifecycle semantic.

    Common methods of the wrapper classes

    If you need to create a wrapper class object which does not reference any underlying implementation object then you can use Null() static method:

        HelloWorld::PrinterRawPtr null_pointer = HelloWorld::PrinterRawPtr::Null();

    The same thing could be applied for all other semantics. This is because the underlying implementation objects are always created on the library heap, and the wrapper classes just hold pointers:

        // Copy semantic
        HelloWorld::Printer null_printer = HelloWorld::Printer::Null();
    
        // Reference counted semantic
        HelloWorld::PrinterPtr null_printer_ptr = HelloWorld::PrinterPtr::Null();

    There is an IsNull() helper method which returns true if an internal pointer to the underlying implementation object is null. For convenience, there is an overloaded operator! in the wrapper classes, so, you can write the following code:

        HelloWorld::PrinterPtr printer_ptr = HelloWorld::PrinterPtr::Null();
        if (!printer)
        {
            std::cout << "printer_ptr is NULL" << std::endl;
        }

    Command-line arguments

    The main script to execute Beautiful Capi generation is source/Capi.py. If you run it with –help argument then you will have a similar output:

    Beautiful Capi  Copyright (C) 2015  Petr Petrovich Petrov
    This program comes with ABSOLUTELY NO WARRANTY;
    This is free software, and you are welcome to redistribute it
    under certain conditions.
    
    usage: Beautiful Capi [-h] [-i INPUT] [-p PARAMS] [-o OUTPUT_FOLDER]
                          [-w OUTPUT_WRAP] [-s OUTPUT_SNIPPETS]
                          [-k API_KEYS_FOLDER] [-c] [-v] [-t UNIT_TESTS_FILE]
    
    This program generates C and C++ wrappers for your C++ classes.
    
    optional arguments:
      -h, --help            show this help message and exit
      -i INPUT, --input INPUT
                            specifies input API description file
      -p PARAMS, --params PARAMS
                            specifies generation parameters input file
      -o OUTPUT_FOLDER, --output-folder OUTPUT_FOLDER
                            specifies output folder for generated files
      -w OUTPUT_WRAP, --output-wrap-file-name OUTPUT_WRAP
                            specifies output file name for wrapper C-functions
      -s OUTPUT_SNIPPETS, --internal-snippets-folder OUTPUT_SNIPPETS
                            specifies output folder for generated library snippets
      -k API_KEYS_FOLDER, --api-keys-folder API_KEYS_FOLDER
                            specifies output folder for generated API keys
      -c, --clean           cleans input and snippets directories
      -v, --version         shows version number
      -t UNIT_TESTS_FILE, --tests-file UNIT_TESTS_FILE
                            generates unit tests for properties into specified
                            file
    

    The input API description file format (–input option) is described here. The generation parameters input file (–params option) has also XML format and its schema is described here. The output folder (–output-folder option) will contain the generated wrap classes and other files for using on the wrap side. The output file name for wrapper C-functions (–output-wrap-file-name option) will contain the C glue layer function bodies, this file have to be a part of the C++ library. The output folder for generated library snippets (–internal-snippets-folder option) will contain the generated snippets. For details about snippets please read snippets section. The output folder for generated API keys (–api-keys-folder option) will contain the generated keys for the C++ library secured API, more details please see in secured API section. The tests file (–tests-file option) specifies output file for the generated unit tests, please see unit tests section.

    Integration with CMake

    Basically integration with CMake could be done by using add_custom_command.

        add_custom_command(
            OUTPUT
                ${CMAKE_CURRENT_SOURCE_DIR}/AutoGenWrap.cpp
            COMMAND
                ${PYTHON_EXECUTABLE}
                ${beautiful_capi_SOURCE_DIR}/source/Capi.py
                -i ${CMAKE_CURRENT_SOURCE_DIR}/SampleAPI.xml
                -p ${CMAKE_CURRENT_SOURCE_DIR}/SampleAPI_params.xml
                -o ${CMAKE_CURRENT_SOURCE_DIR}/include
                -s ${CMAKE_CURRENT_SOURCE_DIR}/snippets
                -w ${generated_source}
            MAIN_DEPENDENCY
                ${CMAKE_CURRENT_SOURCE_DIR}/SampleAPI.xml
            DEPENDS
                ${CMAKE_CURRENT_SOURCE_DIR}/SampleAPI_params.xml
            WORKING_DIRECTORY
                ${CMAKE_CURRENT_SOURCE_DIR}
        )
    

    But you should find Python3.6 interpreter before:

    find_package(PythonInterp 3.6 REQUIRED)
    

    Also you need to include AutoGenWrap.cpp to SampleAPI library:

    add_library(SampleAPI SHARED
      ${CMAKE_CURRENT_SOURCE_DIR}/AutoGenWrap.cpp
      ...other files...
    )
    

    Important: You must do not insert the output folder for generated wrap classes to the library’s include path. But you can do this with snippets folder.

    XML API description schema

    The wrapped C++ library API is described in the portable XML format for the exposed API by using this schema. This schema uses http://gkmsoft.ru/beautifulcapi XSD namespace.

    The detailed description of this schema is here. The root element is api which has TBeautifulCapiRoot XSD type.

    XML generation parameters schema

    The Beautiful Capi generator has parameters in XML format, which has this schema. This schema uses http://gkmsoft.ru/beautifulcapi-params XSD namespace.

    The detailed description of this schema is here. The root element is params which has TBeautifulCapiParams XSD type.

    Mixing semantics

    In real C++ programs some class could be used by different ways. These ways could be pointers to this class, references, smart pointers and values. For each class Beautiful Capi XML API description specifies a semantic. Sometimes it is not enough, because some implementation methods could accept references to this class, other implementation methods could accept pointers to this class etc.

    Beautiful Capi proposes two ways to solve this problem: the first way is casting attributes, and the second way is lifecycle extensions.

    Exception handling

    Beautiful Capi takes care about exceptions. As described above, in C++ problems section, different C++ compilers have different exception throwing and catching schemas, also C language does not support exceptions. The exception_handling_mode attribute in XML parameters file specifies mode for exception handling. Value no_handling means that no special handling is done, so, any exception from the C++ library could crash the client application in general, unless the client application and the C++ library use the same C++ compiler.

    When by_first_argument value is used then exception information is passed in a special structure. A pointer to this structure is added as the first argument to each function or method which could, potentially, throw an exception.

    This was an introduction to Beautiful Capi. The full documentation is available here.

    Visit original content creator repository https://github.com/PetrPPetrov/beautiful-capi
  • awesome-bangla-parenting

    Awesome Bangla Parenting

    বাংলা ভাষাভাষী অভিভাবকদের জন্য কিউরেটেড রিসোর্স (ওয়েবসাইট, গ্রুপ, অ্যাপ, ইউটিউব চ্যানেল ইত্যাদি) – সহজ একটি স্ট্যাটিক সাইট হিসেবে পরিবেশিত।

    🔧 Stack

    • Jekyll (GitHub Pages)
    • Bootstrap 5 + Bootstrap Icons
    • Data source: _data/parenting.json

    🚀 লোকাল ডেভেলপমেন্ট (Jekyll)

    Prerequisites: Ruby (>= 3.1), Bundler

    git clone https://github.com/mdminhazulhaque/awesome-bangla-parenting.git
    cd awesome-bangla-parenting
    bundle install
    bundle exec jekyll serve --livereload

    সাইট দেখা যাবে: http://127.0.0.1:4000

    🗂 কাঠামো

    _config.yml          # সাইট কনফিগ
    _layouts/default.html# প্রধান লেআউট
    _data/parenting.json # রিসোর্স ডেটা (আপনি এখানেই পরিবর্তন যোগ করবেন)
    index.md             # ইনডেক্স পেজ (লেআউট রেন্ডার)
    

    ➕ নতুন রিসোর্স যুক্ত করার নিয়ম

    সব কনটেন্ট _data/parenting.json ফাইলে JSON অবজেক্ট আকারে ক্যাটেগরি অনুসারে রাখা হয়। স্ট্রাকচার:

    {
    	"Websites": {
    		"Example Site": "https://example.com"
    	},
    	"Facebook Groups": {
    		"Example Group": "https://facebook.com/groups/example"
    	}
    }

    ধাপসমূহ

    1. /_data/parenting.json ওপেন করুন
    2. উপযুক্ত ক্যাটেগরির মধ্যে নতুন key-value জোড়া যোগ করুন
    3. Key = প্রদর্শিত নাম, Value = URL (https, http নয় এমন হলে সাধারণত গ্রহণযোগ্য নয়)
    4. কমা (,) ব্যবহারে সতর্ক থাকুন – JSON ট্রেইলিং কমা সাপোর্ট করে না
    5. লোকালিতে bundle exec jekyll build অথবা serve রান করে ভিজ্যুয়ালি চেক করুন

    নতুন ক্যাটেগরি যোগ করতে চাইলে

    নতুন ক্যাটেগরি নাম একটি নতুন অবজেক্ট key হিসেবে যোগ করুন এবং ভিতরে একইভাবে নাম: URL জোড়া দিন। উদাহরণ:

    "Podcasts": {
    	"Parenting Talk": "https://example.com/podcast"
    }

    ✅ কনটেন্ট গাইডলাইন

    • বিশ্বস্ত, কার্যকরী ও প্যারেন্টিং সম্পর্কিত হওয়া উচিত
    • ভাঙা / রিডাইরেক্টেড / সন্দেহজনক লিংক এড়িয়ে চলুন
    • আগের এন্ট্রি আছে কি না সার্চ করে নিন (ডুপ্লিকেট হ্রাস)
    • ব্যক্তিগত ব্লগ হলে ধারাবাহিক প্যারেন্টিং কনটেন্ট থাকতে হবে

    🔍 যাচাই (Validation)

    JSON সিনট্যাক্স ভেরিফাই করতে দ্রুত:

    python -m json.tool _data/parenting.json > /dev/null && echo "Valid JSON"

    🛠 বিল্ড

    bundle exec jekyll build

    আউটপুট জেনারেট হবে _site/ ডিরেক্টরিতে।

    🤝 অবদান

    Pull Request স্বাগতম! সংক্ষেপে:

    1. ফর্ক করুন
    2. নতুন ব্রাঞ্চ নিন
    3. পরিবর্তন করুন (বিশেষ করে শুধু JSON এ হলে সবচেয়ে ভালো)
    4. লোকাল বিল্ড পাস নিশ্চিত করুন
    5. PR ওপেন করুন (পরিবর্তনের ছোট বিবরণ সহ)

    📜 লাইসেন্স

    MIT লাইসেন্স


    আরও আইডিয়া / উন্নয়ন প্রস্তাব দিতে Issue খুলতে পারেন। ধন্যবাদ! 🙏

    Visit original content creator repository
    https://github.com/mdminhazulhaque/awesome-bangla-parenting