It’s an early alpha version of the platform for SONM.io project.
For now it has lots of unfinished task. The main idea is to show that such platform can be implemented and to chose a techstack for future implementation.
What is it here?
This repository contains code for Hub, Miner and CLI.
Where can I get it?
A docker container contained every CLI, Miner, Hub can be found on public DockerHub: sonm/insonmnia
docker pull sonm/insonmnia
If you want it’s easy to build all the components. You need golang > 1.8:
ID <jobid>, Endpoint [27960/tcp-><ip:port> 27960/udp-><ip:port>]
jobid is an unique name for the task. Later it can be used to specify a task for various operations.
Endpoint describes mapping of exposed ports (google for Docker EXPOSE) to the real ports of a miner
NOTE: later STUN will be used for UDP packets and LVS (ipvs) or userspace proxy (like SSH tunnel) for TCP. Miners who have a public IPv4 or can be reached via IPv6 would not need this proxy. The proxy is intended to get through NAT.
stop a container
To stop the task just provide the jobid
sonmcli --hub <hubip:port> stop <jobid>
How to cook a container
Dockerfile for the image should follow several requirements:
ENTRYPOINT or CMD or both must present
Network ports should be specified via EXPOSE
Technical overview
Technologies we use right now:
golang is the main language. Athough golang has disadvantages, we believe that its model is good for fast start and the code is easy to understand. The simplicity leads to less errors. Also it makes easy to contribute to a project as a review process is very clean.
Docker is a heart of an isolation in our platform. We rely on security features (It’s not 100% safe!), metrics, ecosystem it provides. The cool thing Docker is supported by many platforms. Also Docker works a lot on a unikernel approach for container based applications, which opens a huge field for security and portability improvements.
whisper as a discovery protocol
Until the epoch of IPv6 begins we should bring a way to get through NAT. The solution depends on a concrete transport layer. For example, different approaches should be used for UDP (e.g. STUN) and TCP (naive userspace proxy). Each approach has its own overhead and the best fit solution depends on a task.
gRPC is an API protocol between components. It’s very easy to extend, supports traffic compression, flexible auth model, supported by many language. It’s becoming more and more popular as a technology for RPC.
Hub
Hub provides public gRPC-based API. proto files can be found in proto dir.
Miner
Miner is expected to discover a Hub using Whisper. Later the miner connects to the hub via TCP. Right now a Miner must have a public IP address. Hub sends orders to the miner via gRPC on top of the connection. Hub pings the miner from time to time.
The Kubernetes Learning Roadmap is constantly updated with new content, so you can be sure that you’re getting the latest and most up-to-date information available.
Learning Kubernetes can seem overwhelming. It’s a complex container orchestration system, that has a steep learning curve. But with the right roadmap and understanding of the foundational concepts, it’s something that any developer or ops person can learn.
In this Kubernetes learning roadmap, I have added prerequisites and complete Kubernetes learning path covering basic to advanced Kubernetes concepts.
Kubernetes Learning Prerequisites
Before jumping into learning kubernetes, you need to have a fair amount of knowledge of some of the underlying technologies and concepts.
Distributed system: Learn about distributed system basics & their use cases in modern IT infrastructure. CAP theorem is good to have knowledge.
Authentication & Authorization: A very basic concept in IT. However, engineers starting their careers tend to get confused. So please get a good understanding of learning from analogies. You will quite often see these terms in Kubernetes.
Key Value Store: It is a type of NoSQL Database. Understand just enough basics and their use cases.
API: Kubernetes is an API-driven system. So you need to have an understanding of RESTFUL APIs. Also, try to understand gRPC API. It’s good to have knowledge.
YAML: YAML stands for YAML Ain’t Markup Language. It is a data serialization language that can be used for data storage and configuration files. It’s very easy to learn and from a Kubernetes standpoint, we will use it for configuration files. So understanding YAML syntax is very important.
Container: Container is the basic building block of kubernetes.The primary work of Kubernetes is to orchestrate containers. You need to learn all the container basics and have hands-on experience working on container tools like Docker or Podman. I would also suggest reading about Open container initiative and Container Runtime Interface (CRI)
Service Discovery: It is one of the key areas of Kubernetes. You need to have basic knowledge of client-side and server-side service discovery. To put it simply, in client-side service discovery, the request goes to a service registry to get the endpoints available for backend services. In server-side service discovery, the request goes to a load balancer and the load balancer uses the service registry to get the ending of backend services.
Networking Basis
CIDR Notation & Type of IP Addresses
L3, L4 & L7 Layers (OSI Layers)
SSL/TLS: One way & Mutual TLS
Proxy
DNS
IPTables
IPVS
Software Defined Networking (SDN)
Virtual Interfaces
Overlay networking
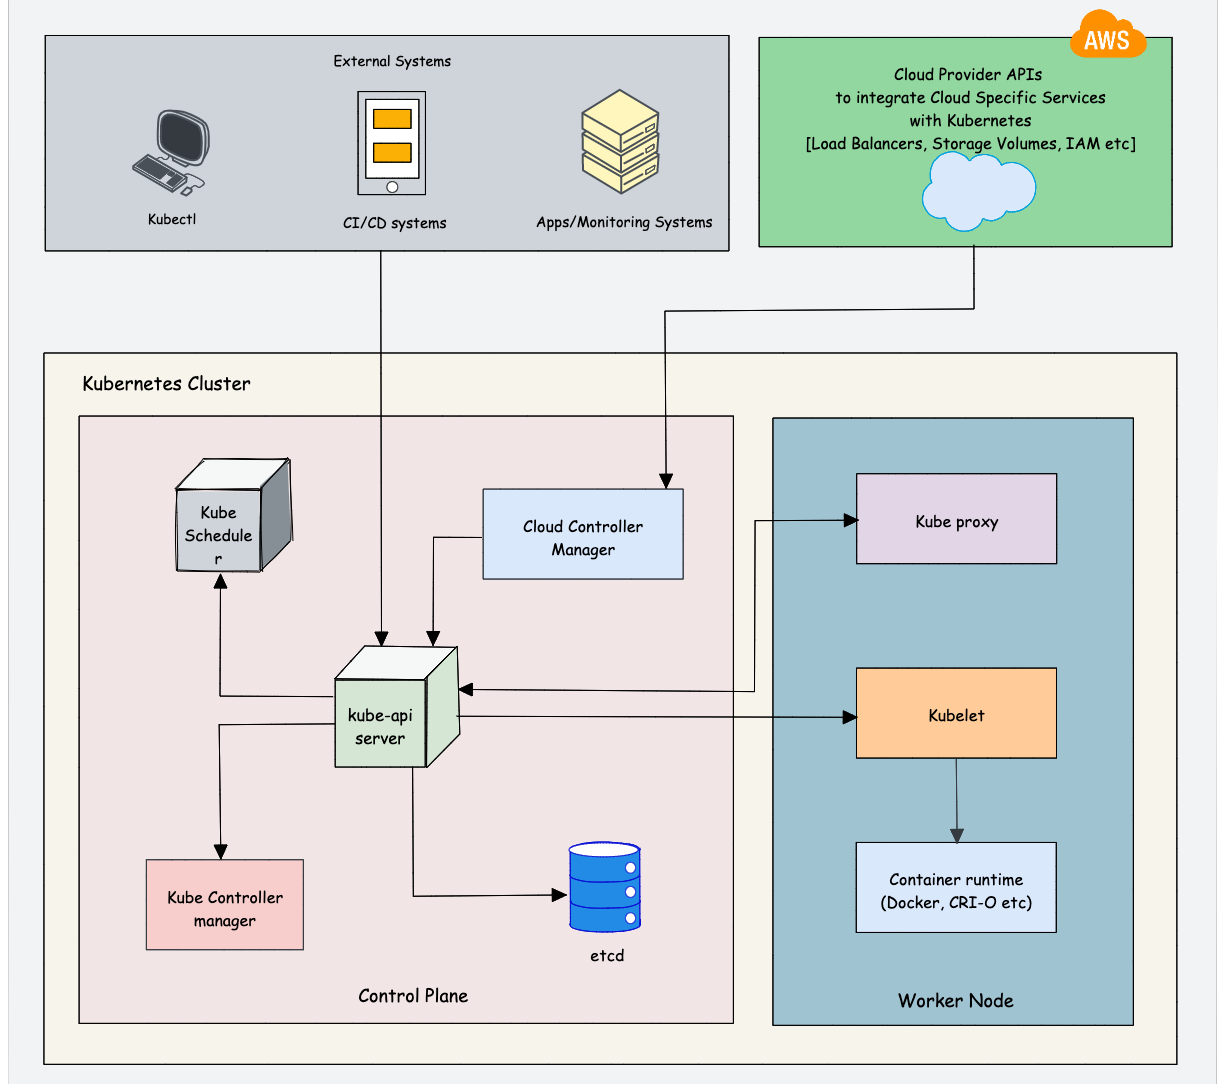
Learn Kubernetes Architecture
Understanding Kubernetes architecture is not an easy task. The system has many moving parts that need to be understood in order for you to get a grip on what’s happening beneath the surface. While learning architecture, you will come across the concepts we discuss in the prerequisites.
As Kubernetes is a complex system, trying to understand the core architecture could be a little overwhelming for DevOps Engineers. As you get more hands-on experience, you would be able to understand the core architecture better.
Here is my suggestion. Learn the high-level architecture and key components involved in Kubernetes. If you are not able to grasp the concept, either you can spend time and do more research on a specific topic or you can learn the concept while doing hands-on. It’s your choice.
Check out the Kubernetes Architecture guide to learn about all the Kubernetes components in detail.
Overall you need to learn the following:
Control plane components: Understand the role of each component like API server, etcd, Scheduler, and Controller manager.
Worker node components: Learn about Kube Proxy, Kubelet, Container Runtime
Addon Components: CoreDNS, Network plugins (Calico, weave, etc), Metric Server
Cluster high availability: Most organizations use managed Kubernetes services (GKE, EKS, AKS, etc). So the cloud provider takes care of the cluster’s control plane’s high availability. However, it is very important to learn the high availability concepts in scaling the cluster in multi zones and regions. It will help you in real-time projects and devops interviews.
Network Design: While it is easy to set up a cluster in an open network without restrictions, it is not that easy in a corporate network. As a DevOps engineer, you should understand the Kubernetes network design and requirements so that you can collaborate with the network team better. For example, When I was working with kubernetes setup on Google cloud, we used a CIDR pod range that was not routable in the corporate network. As a workaround, we had to deploy IP masquerading for the pod network.
$1000+ Free Cloud Credits to Launch Clusters
Deploying big clusters on the cloud could be expensive. So make use of the following cloud credits and learn to launch clusters as if you would on a real-time project. All platforms offer managed k8s services.
Use one account at a time. Once the credits are expired. move to the next account. You need to keep a watch on your credits as well as expiry. Or else you could get charged. Also, check the terms and instance usage limits if any.
Also, setting up servers on this platform is very easy and every cloud provider had extensive documentation to get started.
The Best Resources to Learn Kubernetes Online
Here are some of the best online resources to learn Kubernetes practically:
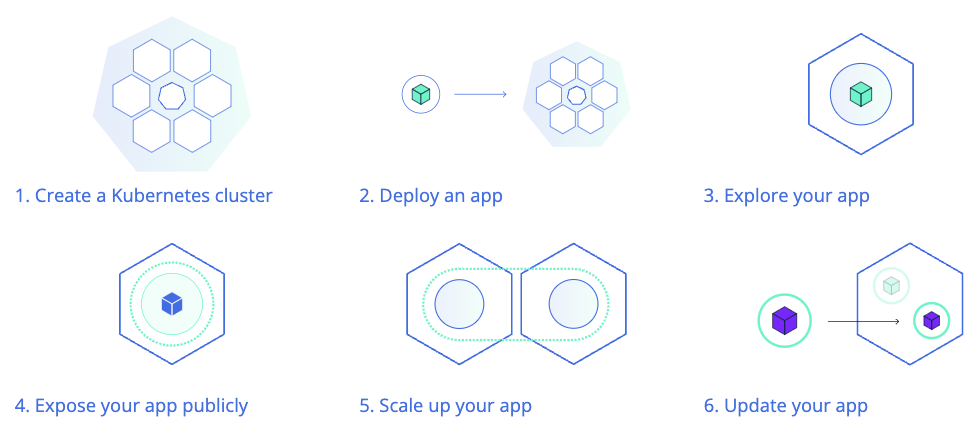
1️. The Official Kubernetes Basics Tutorial
The official Kubernetes website offers browser-based, hands-on tutorials powered by Katacoda scenarios. It covers:
Kubernetes Basics
Configurations
Stateless & Stateful Application Deployment
Services & Networking
Security & Access Control
🔹 You can also explore the official Kubernetes tasks for hands-on experience with real-world Kubernetes implementations. This will also help in preparing for Kubernetes certifications.
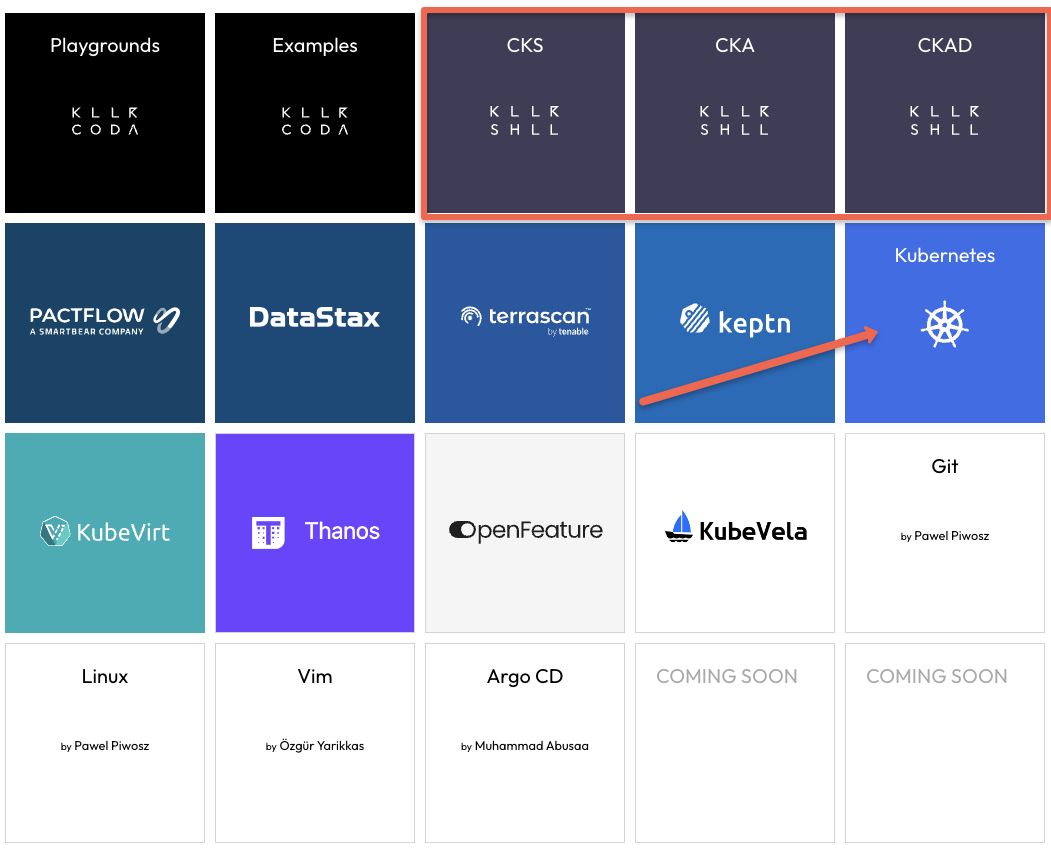
For a fully interactive browser-based learning experience, KillerCoda offers scenario-based Kubernetes playgrounds, where you can practice commands and learn in real-time.
Learn Kubernetes Cluster Setup & Administration
Kubernetes Cluster Setup
As DevOps engineers, it is very important to learn every component and cluster configuration. While there are many options to deploy a Kubernetes cluster, It is always better to learn to deploy multi-node clusters from scratch.
With multi-node clusters, you can learn about all the concepts like Cluster security, High Availability, Scaling, Networking, etc.
It gives you the feeling of working on a real-world project. It will also help you in interviews and you can be confident about production-level cluster configurations.
Following are my cluster setup suggestions.
Kubernetes the Hard Way: I would suggest you start with Kubernetes the hard way set up. It helps you understand all the configurations involved in bootstrapping a kubernetes cluster. If you want to work on production clusters, this lab will help you a lot. The setup is based on google cloud. You can use the $300 free credits to complete the lab.
Kubeadm Cluster Setup: Learning kubeadm cluster setup helps you in Kubernetes certification preparation. Also, it helps you automate Kubernetes cluster setup with best practices.
Minikube: If you want to have a minimal development cluster setup, minikube is the best option.
Kind: Kind is another local development Kubernetes cluster setup.
Vagrant Automated Kubernetes: If you prefer to have a multi-VM-based local Kubernetes cluster setup, you can try the automated vagrant setup that uses Kubeadm to bootstrap the cluster.
Learn About Cluster Configurations
Once you have a working cluster, you should learn about the key cluster configurations. This knowledge will be particularly helpful when working in a self-hosted Kubernetes setup.
Even if you use a managed Kubernetes cluster for your project, there may be certain cluster configurations that you need to modify.
For example, if you set up a cluster in a hybrid network, you may need to configure it with an on-premises private DNS server for private DNS resolution. This can be done via CoreDNS configuration.
Also, having a solid understanding of cluster configurations will help you with Kubernetes certifications (CKA & CKS) where you need to troubleshoot cluster misconfiguration and issues.
Understand KubeConfig File
Kubeconfig file is a YAML file that contains all the cluster information and credentials to connect to the cluster.
As a Devops Engineer, You should learn to connect to kubernetes clusters in different ways using the Kubeconfig file. Because you will be responsible for setting up cluster authentication for CI/CD systems, providing cluster access to developers, etc.
So spend some time, understanding the Kubeconfig file structure and associated parameters.
Understand Kubernetes Objects And Resources
You will quite often come across the names “Kubernetes Object” and “Kubernetes Resource“
First, you need to Understand the difference between an object and a resource in kubernetes.
To put it simply, anything a user creates and persists in Kubernetes is an object. For example, a namespace, pod, Deployment configmap, Secret, etc.
Before creating an object, you represent it in a YAML or JSON format. It is called an Object Specification (Spec). You declare the desired state of the object on the Object Spec. Once the object is created, you can retrieve its details from the Kubernetes API using Kubectl or client libraries.
As we discussed earlier in the prerequisite section, everything in Kubernetes is an API. To create different object types, there are API endpoints provided by the Kubernetes API server. Those object-specific api-endpoints are called resources. For example, an endpoint to create a pod is called a pod resource.
So when you try to create a Kubernetes Object using Kubectl, it converts the YAML spec to JSON format and sends it to the Pod resource (Pod API endpoint).
Learn About Pod & Associated Resources
Once you have an understanding of Kubernetes Objects and resources, you can start with a native Kubernetes object called Pod. A pod is a basic building block of Kubernetes.
You should learn all the Pod concepts and their associated objects like Service, Ingress, Persistent Volume, Configmap, and Secret. Once you know everything about a pod, it is very easy to learn other pod-dependent objects like deployments, Daemonset, etc.
First, learn about the Pod Resource Definition (YAML). A typical Pod YAML contains the following high-level constructs.
Kind
Metadata
Annotations
Labels
Selectors
Once you have a basic understanding of the above, move on to hands-on learning. These concepts will make more sense when you do hands-on.
Following are the hands-on tasks to learn about Pod and its associated objects.
Deploy a pod
Deploy pod on the specific worker node
Add service to pod
Expose the pod Service using Nodeport
Expose the Pod Service using Ingress
Setup Pod resources & limits
Setup Pod with startup, liveness, and readiness probes.
Add Persistent Volume to the pod.
Attach configmap to pod
Add Secret to pod
multi-container pods (sidecar container pattern)
Init containers
Ephemeral containers
Static Pods
Learn to troubleshoot Pods
Few advanced pod scheduling concepts.
Pod Preemption & Priority
Pod Disruption Budget
Pod Placement Using a Node Selector
Pod Affinity and Anti-affinity
Container Life Cycle Hooks
Learn About Pod Dependent Objects
Now that you have a better understanding of Pod and independent kubernetes resources, you can start learning about objects that are dependent on the Pod object. While learning this, you will come across concepts like HPA (Horizontal Pod Autoscaling) and VPA (Verification Pod Autoscaling)
Replicaset
Deployment
Daemonsets
Statefulset
Jobs & Cronjobs
Deploy End to End Application on Kubernetes
Once you understand the basics of these objects, you can try deploying an end-to-end microservices application on Kubernetes. Start with simple use cases and gradually increase complexity.
I would suggest you get a domain name and try setting up a microservice application from scratch and host it on your domain.
You don’t need to develop an application for this. Choose any open-source microservice-based application and deploy it. My suggestion is to choose the open-source pet clinic microservice application based on spring boot.
Following are the high-level tasks.
Build Docker images for all the services. Ensure you optimize the Dockerfile to reduce the Docker Image size.
Create manifests for all the services. (Deployment, Statefulset, Services, Configmaps, Secrets, etc)
Expose the front end with service type ClusterIp
Deploy Nginx Ingress controller and expose it with service type Loadbalancer
Map the load balancer IP to the domain name.
Create an ingress object with a DNS name with the backend as a front-end service name.
Validate the application.
Learn About Securing Kubernetes Cluster
Security is a key aspect of Kubernetes. There are many ways to implement security best practices in Kubernetes starting from building a secure container image.
Following the native ways of implementing security in kubernetes.
Service account
Pod Security Context
Seccomp & AppArmor
Role Based Access Control (RBAC)
Attribute-based access control (ABAC)
Network Policies
The following are the open-source tools you need to look at.
Open Policy Agent
Kyverno
Kube-bench
Kube-hunter
Falco
Learn About Kubernetes Operator Pattern
Kubernetes Operators is an advanced concept.
To understand operators, first, you need to learn the following Kubernetes concepts.
Custom resource definitions
Admission controllers
Validating & Mutating Webhooks
To get started with operators, you can try setting the following operators on Kubernetes.
Prometheus Operator
MySQL Operator
If you are a Go developer or you want to learn to extend/customize kubernetes, I would suggest you create your own operator using Golang.
Learn Important Kubernetes Configurations
While learning kubernetes, you might use a cluster in open network connectivity. So most of the tasks get executed without any issues. However, it is not the case with clusters set up on corporate networks.
So following are the some of the custom cluster configurations you should be aware of.
Custom DNS server
Custom image registry
Shipping logs to external logging systems
Kubernetes OpenID Connect
Segregating & securing Nodes for PCI & PII Workloads
Learn Kubernetes Production Best Practices
Following are the resources that might help and add value to the Kubernetes learning process in terms of best practices.
12 Factor Apps: It is a methodology that talks about how to code, deploy and maintain modern microservices-based applications. Since Kubernetes is a cloud-native microservices platform, it is a must-know concept for DevOps engineers. So when you work on a real-time kubernetes project, you can implement these 12-factor principles.
Kubernetes Failure Stories: Kubernetes failure stories is a website that has a list of articles that talk about failures in Kubernetes implementation. If you read those stories, you can avoid those mistakes in your kubernetes implementation.
Case Studies From Organizations: Spend time on use cases published by organizations on Kubernetes usage and scaling. You can learn a lot from them. Following are some of the case studies that are worth reading.
Scheduling 300,000 Kubernetes Pods in Production Daily
Scaling Kubernetes to 7,500 Nodes
Real-World Kubernetes Case Studies
When I spoke to the DevOps community, I found that a common issue was the lack of real-world experience with Kubernetes. If you don’t have an active Kubernetes project in your organization, you can refer to case studies and learning materials published by organizations that use Kubernetes. This will also help you in Kubernetes interviews.
Here are some good real-world Kubernetes case studies that can enhance your Kubernetes knowledge:
Resources: Links to official documentation, practice labs, and study guides.
Community and News Sources
News and Blogs: Resources to stay updated with Kubernetes trends, like CNCF blog, Kubernetes Podcast, and KubeWeekly.
Community Forums: Links to Kubernetes Slack channels, Stack Overflow, and other communities for support.
Contribute and Collaborate
Tip
This repository thrives on community contributions and collaboration. Here’s how you can get involved:
Fork the Repository: Create your own copy of the repository to work on.
Submit Pull Requests: Contribute your projects or improvements to existing projects by submitting pull requests.
Engage with Others: Participate in discussions, provide feedback on others’ projects, and collaborate to create better solutions.
Share Your Knowledge: If you’ve developed a new project or learned something valuable, share it with the community. Your contributions can help others in their learning journey.
Join the Community
Important
We encourage you to be an active part of our community:
Join Our Telegram Community: Connect with fellow DevOps enthusiasts, ask questions, and share your progress in our Telegram group.
Follow Me on GitHub: Stay updated with new projects and content by following me on GitHub.
Code of Conduct
Caution
We are committed to fostering a welcoming and respectful environment for all contributors. Please take a moment to review our Code of Conduct before participating in this community.
Hit the Star! ⭐
If you find this repository helpful and plan to use it for learning, please give it a star. Your support is appreciated!
🛠️ Author & Community
This project is crafted by Harshhaa 💡.
I’d love to hear your feedback! Feel free to share your thoughts.
                                 Apache License
                           Version 2.0, January 2004
                        http://www.apache.org/licenses/

   TERMS AND CONDITIONS FOR USE, REPRODUCTION, AND DISTRIBUTION

   1. Definitions.

      "License" shall mean the terms and conditions for use, reproduction,
      and distribution as defined by Sections 1 through 9 of this document.

      "Licensor" shall mean the copyright owner or entity authorized by
      the copyright owner that is granting the License.

      "Legal Entity" shall mean the union of the acting entity and all
      other entities that control, are controlled by, or are under common
      control with that entity. For the purposes of this definition,
      "control" means (i) the power, direct or indirect, to cause the
      direction or management of such entity, whether by contract or
      otherwise, or (ii) ownership of fifty percent (50%) or more of the
      outstanding shares, or (iii) beneficial ownership of such entity.

      "You" (or "Your") shall mean an individual or Legal Entity
      exercising permissions granted by this License.

      "Source" form shall mean the preferred form for making modifications,
      including but not limited to software source code, documentation
      source, and configuration files.

      "Object" form shall mean any form resulting from mechanical
      transformation or translation of a Source form, including but
      not limited to compiled object code, generated documentation,
      and conversions to other media types.

      "Work" shall mean the work of authorship, whether in Source or
      Object form, made available under the License, as indicated by a
      copyright notice that is included in or attached to the work
      (an example is provided in the Appendix below).

      "Derivative Works" shall mean any work, whether in Source or Object
      form, that is based on (or derived from) the Work and for which the
      editorial revisions, annotations, elaborations, or other modifications
      represent, as a whole, an original work of authorship. For the purposes
      of this License, Derivative Works shall not include works that remain
      separable from, or merely link (or bind by name) to the interfaces of,
      the Work and Derivative Works thereof.

      "Contribution" shall mean any work of authorship, including
      the original version of the Work and any modifications or additions
      to that Work or Derivative Works thereof, that is intentionally
      submitted to Licensor for inclusion in the Work by the copyright owner
      or by an individual or Legal Entity authorized to submit on behalf of
      the copyright owner. For the purposes of this definition, "submitted"
      means any form of electronic, verbal, or written communication sent
      to the Licensor or its representatives, including but not limited to
      communication on electronic mailing lists, source code control systems,
      and issue tracking systems that are managed by, or on behalf of, the
      Licensor for the purpose of discussing and improving the Work, but
      excluding communication that is conspicuously marked or otherwise
      designated in writing by the copyright owner as "Not a Contribution."

      "Contributor" shall mean Licensor and any individual or Legal Entity
      on behalf of whom a Contribution has been received by Licensor and
      subsequently incorporated within the Work.

   2. Grant of Copyright License. Subject to the terms and conditions of
      this License, each Contributor hereby grants to You a perpetual,
      worldwide, non-exclusive, no-charge, royalty-free, irrevocable
      copyright license to reproduce, prepare Derivative Works of,
      publicly display, publicly perform, sublicense, and distribute the
      Work and such Derivative Works in Source or Object form.

   3. Grant of Patent License. Subject to the terms and conditions of
      this License, each Contributor hereby grants to You a perpetual,
      worldwide, non-exclusive, no-charge, royalty-free, irrevocable
      (except as stated in this section) patent license to make, have made,
      use, offer to sell, sell, import, and otherwise transfer the Work,
      where such license applies only to those patent claims licensable
      by such Contributor that are necessarily infringed by their
      Contribution(s) alone or by combination of their Contribution(s)
      with the Work to which such Contribution(s) was submitted. If You
      institute patent litigation against any entity (including a
      cross-claim or counterclaim in a lawsuit) alleging that the Work
      or a Contribution incorporated within the Work constitutes direct
      or contributory patent infringement, then any patent licenses
      granted to You under this License for that Work shall terminate
      as of the date such litigation is filed.

   4. Redistribution. You may reproduce and distribute copies of the
      Work or Derivative Works thereof in any medium, with or without
      modifications, and in Source or Object form, provided that You
      meet the following conditions:

      (a) You must give any other recipients of the Work or
          Derivative Works a copy of this License; and

      (b) You must cause any modified files to carry prominent notices
          stating that You changed the files; and

      (c) You must retain, in the Source form of any Derivative Works
          that You distribute, all copyright, patent, trademark, and
          attribution notices from the Source form of the Work,
          excluding those notices that do not pertain to any part of
          the Derivative Works; and

      (d) If the Work includes a "NOTICE" text file as part of its
          distribution, then any Derivative Works that You distribute must
          include a readable copy of the attribution notices contained
          within such NOTICE file, excluding those notices that do not
          pertain to any part of the Derivative Works, in at least one
          of the following places: within a NOTICE text file distributed
          as part of the Derivative Works; within the Source form or
          documentation, if provided along with the Derivative Works; or,
          within a display generated by the Derivative Works, if and
          wherever such third-party notices normally appear. The contents
          of the NOTICE file are for informational purposes only and
          do not modify the License. You may add Your own attribution
          notices within Derivative Works that You distribute, alongside
          or as an addendum to the NOTICE text from the Work, provided
          that such additional attribution notices cannot be construed
          as modifying the License.

      You may add Your own copyright statement to Your modifications and
      may provide additional or different license terms and conditions
      for use, reproduction, or distribution of Your modifications, or
      for any such Derivative Works as a whole, provided Your use,
      reproduction, and distribution of the Work otherwise complies with
      the conditions stated in this License.

   5. Submission of Contributions. Unless You explicitly state otherwise,
      any Contribution intentionally submitted for inclusion in the Work
      by You to the Licensor shall be under the terms and conditions of
      this License, without any additional terms or conditions.
      Notwithstanding the above, nothing herein shall supersede or modify
      the terms of any separate license agreement you may have executed
      with Licensor regarding such Contributions.

   6. Trademarks. This License does not grant permission to use the trade
      names, trademarks, service marks, or product names of the Licensor,
      except as required for reasonable and customary use in describing the
      origin of the Work and reproducing the content of the NOTICE file.

   7. Disclaimer of Warranty. Unless required by applicable law or
      agreed to in writing, Licensor provides the Work (and each
      Contributor provides its Contributions) on an "AS IS" BASIS,
      WITHOUT WARRANTIES OR CONDITIONS OF ANY KIND, either express or
      implied, including, without limitation, any warranties or conditions
      of TITLE, NON-INFRINGEMENT, MERCHANTABILITY, or FITNESS FOR A
      PARTICULAR PURPOSE. You are solely responsible for determining the
      appropriateness of using or redistributing the Work and assume any
      risks associated with Your exercise of permissions under this License.

   8. Limitation of Liability. In no event and under no legal theory,
      whether in tort (including negligence), contract, or otherwise,
      unless required by applicable law (such as deliberate and grossly
      negligent acts) or agreed to in writing, shall any Contributor be
      liable to You for damages, including any direct, indirect, special,
      incidental, or consequential damages of any character arising as a
      result of this License or out of the use or inability to use the
      Work (including but not limited to damages for loss of goodwill,
      work stoppage, computer failure or malfunction, or any and all
      other commercial damages or losses), even if such Contributor
      has been advised of the possibility of such damages.

   9. Accepting Warranty or Additional Liability. While redistributing
      the Work or Derivative Works thereof, You may choose to offer,
      and charge a fee for, acceptance of support, warranty, indemnity,
      or other liability obligations and/or rights consistent with this
      License. However, in accepting such obligations, You may act only
      on Your own behalf and on Your sole responsibility, not on behalf
      of any other Contributor, and only if You agree to indemnify,
      defend, and hold each Contributor harmless for any liability
      incurred by, or claims asserted against, such Contributor by reason
      of your accepting any such warranty or additional liability.

   END OF TERMS AND CONDITIONS

   APPENDIX: How to apply the Apache License to your work.

      To apply the Apache License to your work, attach the following
      boilerplate notice, with the fields enclosed by brackets "[]"
      replaced with your own identifying information. (Don't include
      the brackets!)  The text should be enclosed in the appropriate
      comment syntax for the file format. We also recommend that a
      file or class name and description of purpose be included on the
      same "printed page" as the copyright notice for easier
      identification within third-party archives.

   Copyright [yyyy] [name of copyright owner]

   Licensed under the Apache License, Version 2.0 (the "License");
   you may not use this file except in compliance with the License.
   You may obtain a copy of the License at

       http://www.apache.org/licenses/LICENSE-2.0

   Unless required by applicable law or agreed to in writing, software
   distributed under the License is distributed on an "AS IS" BASIS,
   WITHOUT WARRANTIES OR CONDITIONS OF ANY KIND, either express or implied.
   See the License for the specific language governing permissions and
   limitations under the License.
DeRar is a simple Java program to brute force the keyword of a RAR file.
If there’s any problem regarding the program, please post an issue on the program’s GitHub page.
If you have ideas to improve the code, make sure to post a pull request.
Disclaimer
The DeRar project and its modifications are not affiliated with or endorsed by WinRar or RarLab. The program is an independent work and is not officially supported or endorsed by WinRar or RarLab. Use of the program is at your own risk, and the creators of the program cannot be held responsible for any damages or losses that may result from its use.
Also ask the owner of the .rar archive permission before using this tool.
Features
The user can select several charsets to generate the combinations with, such as lower case, upper case, accented letters, special characters or digits.
The user can specify the number of threads to run.
The progress of each thread gets displayed in a window thanks to a progress bar.
ToDo
Optimize the code.
Improve the GUI.
Translate code, comments and prompts in english.
Make the user choose between a dictionary or a brute force attack.
Add more charsets for the user to choose from.
How to run
Create1 a folder and put derar.java and utils.java inside it.
Place the .rar archive in the same folder.
Open the Windows command prompt 2 and type the following commands:
javac -encoding UTF-8 derar.java -> to compile the program
java derar -> to run the program
How it works
The program generates every combination of words up to the user preferred length, then it tries every single one by running a cmd command.
Inputs
The program asks the user to input the length of the word that will get generated with the combination algorithm. This means that the program will combine the selected characters and create words that go from the length of 1 character to the inputted length.
The user will then be asked to write the name of the file (not including the .rar extension, it is automatically concatenated to the filename string).
The last thing that will be asked to input is the number of threads the user wants to run.
Outputs
The program will print a recap of the informations and the various user inputs and will prompt several requests for the press of the ENTER key, so the user can check the informations with calm.
Extraction
After the recap, the open windows will get minimized to show only the desktop where a JFrame for every thread will show the progress in the checking of the combinations.
IMPORTANT: Some threads may work faster than others due to several factors such as how the processor handles them.
If the windows showing the progress of the keyword check close without the progress bars reaching 100% it means the archive got extracted in the folder it got placed in the beginning.
If you cloned the project from GitHub you’ll have a folder named \DeRar\ with a .rar archive to test the program, the keywords for test.rar is “abc”. ↩
I personally reccomend compiling and running the program from the Windows command prompt because from tests it is a little quicker, but if you prefer you can surely run it from applications like VS Code. ↩
For updates, you can ‘Star’ this repo to see updates in your GitHub feeds, or ‘Watch’ this repo and subscribe to releases to get notified (uncheck others to avoid unwanted pings).
These softwares are mostly stable and complete, and you don’t have to update if it doesn’t deliver a feature you need.
See Releases for all previous binaries. Check out Actions for workflows to produce these binaries.
The motivation is to build a small physical Wi-Fi enabled switch that controls lights via openHAB. It should require only a power cable and send the commands via Wi-Fi and MQTT to the openHAB server which then controls the lights.
Hardware
Besides the openHAB server and some lights (this guide uses Philips Hue lights but others work as well), the following components are used:
The OLED display is used to show network information and confirmation of the commands. The switch setup would probably also work with other ESP8266 boards but Adafruit’s Feather board is nice and easy to use. The buttons on the OLED board are used as the switch buttons but it’s also possible to use externally connected buttons/switches.
ESP8266 Setup
Flash the Arduino sketch esp8266-openhab-switch.ino to the board. Don’t forget to adjust the Wi-Fi and MQTT settings at the beginning of the sketch. The sketch requires that the ESP8266 drivers are installed and the Adafruit libraries for the Feather board and the OLED board are loaded in the Arduino IDE.
On the openHAB2 server, first install the MQTT server and the openHAB MQTT binding. When using openHAB2 on a Raspberry Pi with Raspbian, the MQTT server can be installed with the following commands:
After that the MQTT binding can be installed via the Paper UI. There’s also a good beginner’s guide on MakeUsOf that explains how to setup and test the MQTT server and binding. After installation, the MQTT binding has to be configured as shown in services/mqtt.cfg.
Items & Rules
In addition to the Hue light kitchen_ceiling_light_dimmer, two items are defined in the item file items/all.items: A dimmer that represents the ESP8266 board and a string to send a message to the ESP8266 OLED display, both connected to MQTT.
The rule file rules/esp8266_switch.rules defines the dimmer behavior. The ESP8266 board sends values 100, 50, and 0 with the buttons A, B, and C via MQTT. The rule Kitchen Switch sets the Hue light state to the value that the board sent. The rule Kitchen Switch Display sends a string with the Hue light state to the board so it can be displayed. What’s cool here is that this string gets sent whenever the light state is changed, even through another UI (e.g. the Android app).
ReservedSlots.zip file is a version that does not support Discord Utilities
ReservedSlots_DU_Support.zip file is a version that supports Discord Utilities (You can combine flags and discord roles)
Unzip into your servers csgo/addons/counterstrikesharp/plugins/ dir
Restart the server
Dependencies
CS2 Discord Utilities (Only if you want to use a version thats supports Discord Utilities)
Configuration
configs/plugins/ReservedSlots/ReservedSlots.json
What it does
Reserved Slots
Plugin version that does not support Discord Utilities
Reserved Flags
• List of Flags for reserved slot – Cannot be empty!
Reserved Admin Flags
• List of Flags for admin reserved slot – When a player with an Admin reserved slot joins, no one is kicked – Can be empty
Reserved Slots (With Discord Utilities Support)
Plugin version that supports Discord Utilities
Reserved Flags and Roles
• List of Flags and Discord Roles for reserved slot – You can combine roles and flags (If a player does not have a role, his flags will be checked) – Cannot be empty!
Reserved Admin Flags and Roles
• List of Flags and Discord Roles for admin reserved slot – When a player with an Admin reserved slot joins, no one is kicked – You can combine roles and flags (If a player does not have a role, his flags will be checked) – Can be empty!
What it does
Reserved Slots
How many slots will be reserved if the reserved slots method is 1 or 2
Reserved Slots Method
0 – There will always be one slot open. For example, if your maxplayers is set to 10, the server can have a maximum of 9 players. If a 10th player joins with a Reservation flag/role, it will kick a player based on the Kick type. If the 10th player doesn’t have a reservation flag/role, they will be kicked
1 – Maintains the number of available slots according to the reservation slots setting, allowing only players with a Reservation flag/role to join. For example, if you have maxplayers set to 10 and Reserved slots set to 3, when there are 7/10 players on the server, additional players can only join if they have a Reservation flag/role. If they don’t, they will be kicked. If the server is already full and a player with a Reservation flag/role attempts to join, it will kick a player based on the Kick type
2 – It works the same way as in method 2, except players with a Reservation flag/role are not counted towards the total player count. For example, if there are 7/10 players on the server, and Reserved slots are set to 3. Out of those 7 players, two players have a Reservation flag/role. The plugin will then consider that there are 5 players on the server, allowing two more players without a Reservation flag/role to connect. If the server is already full and a player with a Reservation flag/role attempts to join, it will kick a player based on the Kick type
Leave One Slot Open
Works only if reserved slots method is set to 1 or 2. If set to true, there will always be one slot open. (true or false)
Kick Immunity Type
Who will be immune to the kick?
0 – Players with a Reserved flag/role or an Admin reserved flag/role
Clone the repository: git clone https://github.com/orbitthemes/geekx.git
    # clone the repository
    $ git clone https://github.com/orbitthemes/geekx.git

    # go into the directory
    $ cd geekx

    # install all dependencies
    $ npm install

    #For Development Options
    $ gulp dev
After downloading, simply edit the HTML and CSS files included with the template in your favorite text editor to make changes. These are the only files you need to worry about, you can ignore everything else! To preview the changes you make to the code, you can open the index.html file in your web browser.
Advanced Usage
After installation, run npm install and then run gulp dev which will open up a preview of the template in your default browser, watch for changes to core template files, and live reload the browser when changes are saved. You can view the gulpfile.js to see which tasks are included with the dev environment.
Gulp Tasks
gulp the default task that builds everything.
gulp dev browserSync opens the project in your default browser and live reloads when changes are made.
gulp css:compile compiles the SCSS into CSS file.
gulp css:minify minifies the compiled CSS file.
gulp css compiles SCSS files into CSS and minify the css.
gulp js Combines all js scripts to one file named main.js, Minify the file, and save it as main.min.js.
gulp export copies dependencies from node_modules to the dist directory.
gulp clean Removes all the directories inside dist, minified js files and all compiled css files.
You can hire Orbit Themes to create a custom build of any template, or create something from scratch using Bootstrap. For more information, visit the Contact Page.
Other Templates
Album Plus – Album Plus is a Simple Photography and Magazine template for Bootstrap 4.
Blog – Blog Is The Beautiful Blogger Template For Bootstrap 4.
My Shop – My Shop is a Simple E-Commerce template for Bootstrap 4.
Carousel Plus – Clean and Responsive Bootstrap 4 slideshow Template.
Checkout Plus – Simple, Clean and Stylish Bootstrap 4 Checkout Page Template.
Cover Plus – Cover Plus Is The Beautiful One Page Template for Bootstrap 4.
Dashboard – Free and Responsive admin dashboard template for bootstrap 4.
Healthy – Clean Responsive Fitness Landing Page For Bootstrap 4.
Kreative – Kreative Business Landing Page Template.
Pricing Plus – Clean and Responsive Pricing Page Template With High Quality UI.
How to contribute
To contribute, please ensure that you have stable Node.js and npm installed.
Test if Gulp CLI is installed by running gulp --version. If the command isn’t found, run npm install -g gulp. For more information about installing Gulp, see the Gulp’s Getting Started!.
To have all gulp dependencies run npm install
If gulp is installed, follow the steps below.
Fork and clone the repository.
Run gulp dev, this will open Template on your default browser.
Now you can code, code and code!
Submit a pull request.
About
Orbit Themes is an open source library of free Bootstrap templates and themes. All of the free templates and themes on Orbit Themes are released under the MIT license, which means you can use them for any purpose, even for commercial projects.
The ICT HelpDesk Application is a web-based solution designed to facilitate the management of technical issues within an organization. It provides a platform for clients to report issues and for HelpDesk officers to manage, assign, and resolve these issues effectively.
Features
User Authentication: Secure login and registration for clients and HelpDesk staff.
Role-Based Access Control: Different functionalities for clients, General HelpDesk Officers, and HelpDesk Officers.
Issue Reporting: Clients can report technical issues they encounter.
Issue Assignment: General HelpDesk Officers can assign reported issues to specific HelpDesk Officers.
Issue Management: HelpDesk Officers can view, manage, and resolve assigned issues.
Notifications: Alerts for issue assignments and updates.
React Web App with C# API and SQL Database on Azure
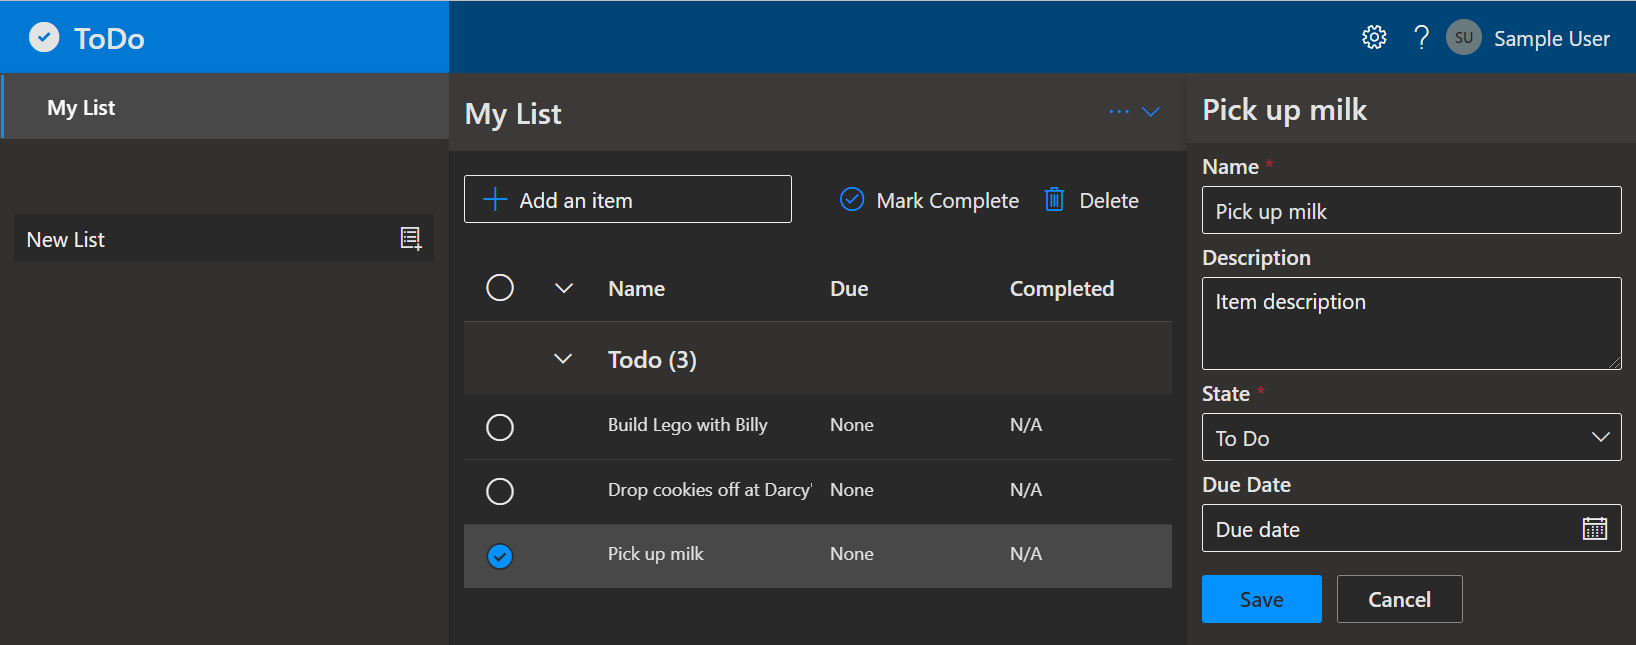
A complete ToDo app with C# API and Azure SQL database for storage. Uses Azure Developer CLI (azd) to build, deploy, and monitor
React Web App with C# API and SQL Database on Azure
A blueprint for getting a React web app with a C# API and a SQL database running on Azure. The blueprint includes sample application code (a ToDo web app) which can be removed and replaced with your own application code. Add your own source code and leverage the Infrastructure as Code assets (written in Bicep) to get up and running quickly.
Let’s jump in and get this up and running in Azure. When you are finished, you will have a fully functional web app deployed to the cloud. In later steps, you’ll see how to setup a pipeline and monitor the application.
Screenshot of the deployed ToDo app
Prerequisites
This template will create infrastructure and deploy code to Azure. If you don’t have an Azure Subscription, you can sign up for a free account here. Make sure you have contributor role to the Azure subscription.
The following prerequisites are required to use this application. Please ensure that you have them all installed locally.
To learn how to get started with any template, follow the steps in this quickstart with this template (Azure-Samples/todo-csharp-sql).
This quickstart will show you how to authenticate on Azure, initialize using a template, provision infrastructure and deploy code on Azure via the following commands:
# Log in to azd. Only required once per-install.
azd auth login

# First-time project setup. Initialize a project in the current directory, using this template.
azd init --template Azure-Samples/todo-csharp-sql

# Provision and deploy to Azure
azd up
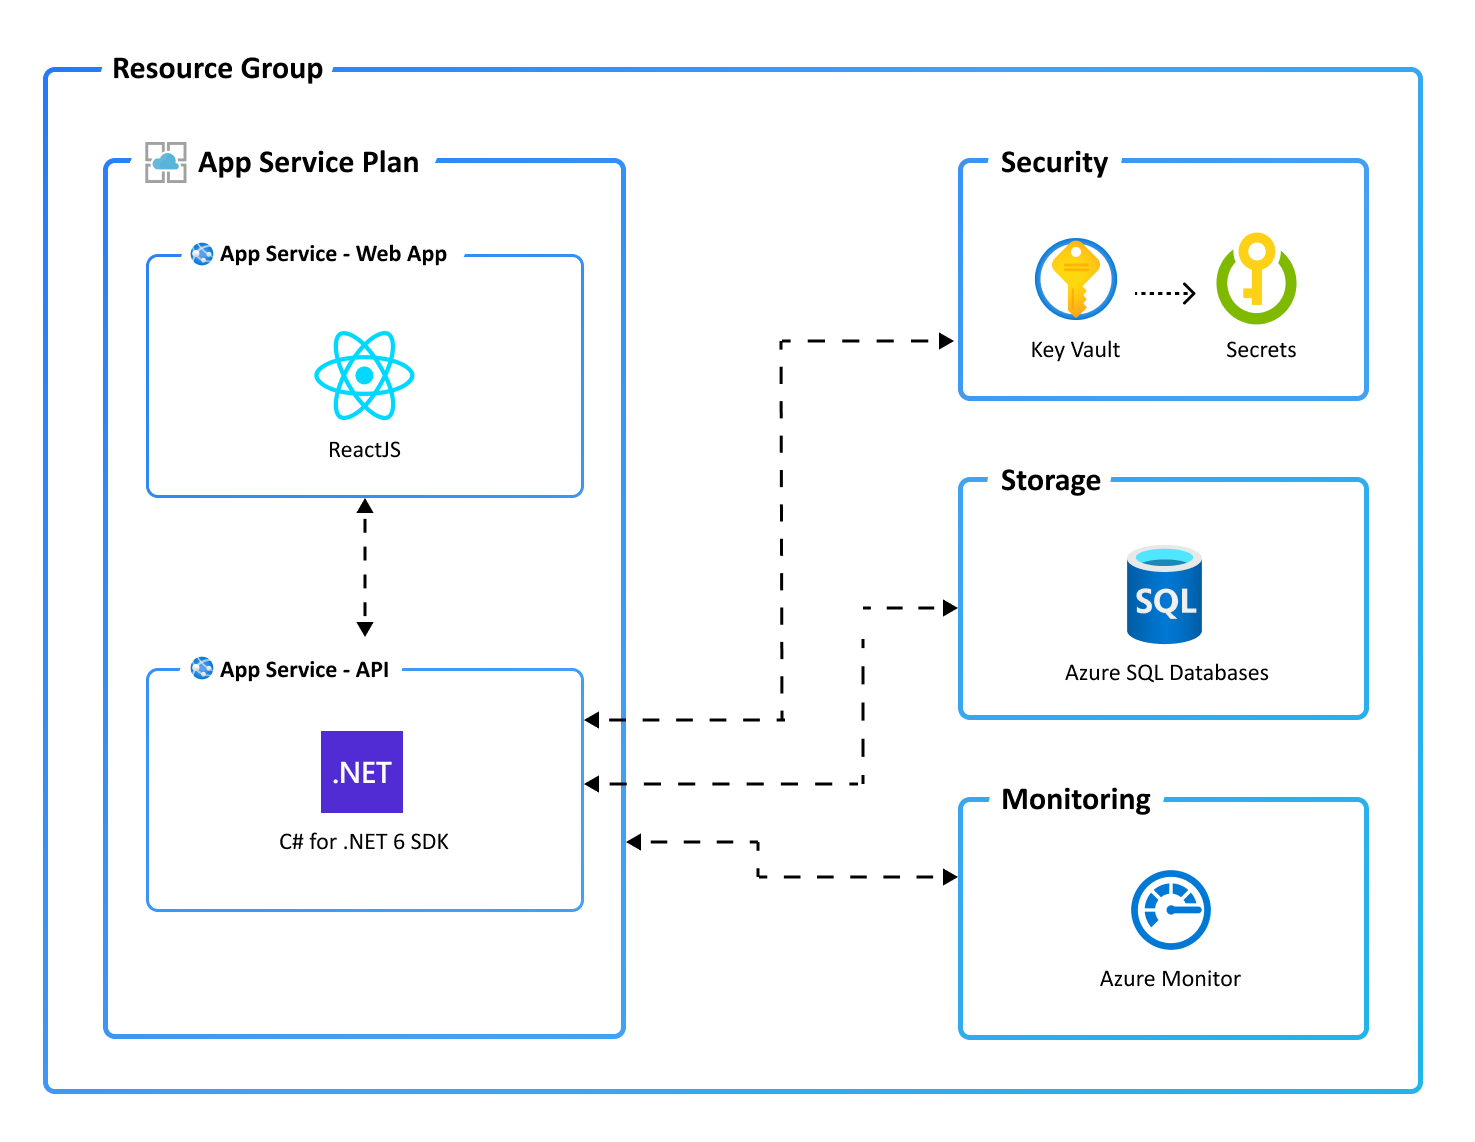
Application Architecture
This application utilizes the following Azure resources:
Here’s a high level architecture diagram that illustrates these components. Notice that these are all contained within a single resource group, that will be created for you when you create the resources.
Cost of provisioning and deploying this template
This template provisions resources to an Azure subscription that you will select upon provisioning them. Refer to the Pricing calculator for Microsoft Azure to estimate the cost you might incur when this template is running on Azure and, if needed, update the included Azure resource definitions found in infra/main.bicep to suit your needs.
At this point, you have a complete application deployed on Azure. But there is much more that the Azure Developer CLI can do. These next steps will introduce you to additional commands that will make creating applications on Azure much easier. Using the Azure Developer CLI, you can setup your pipelines, monitor your application, test and debug locally.
Note: Needs to manually install setup-azd extension for Azure DevOps (azdo).
azd pipeline config – to configure a CI/CD pipeline (using GitHub Actions or Azure DevOps) to deploy your application whenever code is pushed to the main branch.
azd monitor – to monitor the application and quickly navigate to the various Application Insights dashboards (e.g. overview, live metrics, logs)
Run and Debug Locally – using Visual Studio Code and the Azure Developer CLI extension
azd down – to delete all the Azure resources created with this template
The Azure Developer CLI includes many other commands to help with your Azure development experience. You can view these commands at the terminal by running azd help. You can also view the full list of commands on our Azure Developer CLI command page.
Security
Roles
This template creates a managed identity for your app inside your Azure Active Directory tenant, and it is used to authenticate your app with Azure and other services that support Azure AD authentication like Key Vault via access policies. You will see principalId referenced in the infrastructure as code files, that refers to the id of the currently logged in Azure Developer CLI user, which will be granted access policies and permissions to run the application locally. To view your managed identity in the Azure Portal, follow these steps.
The template will also create a dedicated Azure SQL user for the application and store its credentials in a KeyVault (see below). The application user’s access is restricted to the ToDo database only; a separate administrator account is set up for managing the whole Azure SQL instance.
Key Vault
This template uses Azure Key Vault to securely store your Azure SQL Database credentials and the connection string used by the application to interact with the database. Key Vault is a cloud service for securely storing and accessing secrets (API keys, passwords, certificates, cryptographic keys) and makes it simple to give other Azure services access to them. As you continue developing your solution, you may add as many secrets to your Key Vault as you require.
Reporting Issues and Feedback
If you have any feature requests, issues, or areas for improvement, please file an issue. To keep up-to-date, ask questions, or share suggestions, join our GitHub Discussions. You may also contact us via AzDevTeam@microsoft.com.