Merchant Vessel Safety and Performance Enhancement
Introduction
The Merchant Vessel Safety and Performance Enhancement with Machine Learning project is dedicated to improving the safety, efficiency, and sustainability of merchant vessels by applying advanced machine learning techniques. This comprehensive README provides detailed insights into the project’s features, installation steps, and usage guidelines.
Features
Predictive Maintenance: Early detection of equipment failures to minimize downtime and prevent accidents.
Fuel Consumption Optimization: Real-time adjustments for optimal fuel usage based on vessel conditions.
Route Planning and Optimization: Intelligent route recommendations considering weather, traffic, and efficiency.
Crew Performance Monitoring: Continuous assessment of crew well-being and performance for safer operations.
Regulatory Compliance: Ensuring adherence to maritime regulations and safety standards.
Environmental Impact Reduction: Minimizing the vessel’s ecological footprint by reducing emissions.
Continuous Learning and Feedback Loop: Iterative improvements based on real-world outcomes.
Real-time Decision Support: Providing actionable recommendations for both crew and operators.
Scalability: Adaptable to different vessel types and configurations.
Project Overview
The Merchant Vessel Safety and Performance Enhancement project harnesses advanced machine learning techniques to enhance the safety, operational efficiency, and sustainability of merchant vessels. It accomplishes this by continuously analyzing real-time data from sensors and ship systems and delivering actionable insights to vessel operators.
Data Collection
Real-time Data Sources: The project relies on real-time data from sensors and ship systems, encompassing engine performance, weather conditions, cargo load, crew activity, and more.
Data Pipeline: A data pipeline is established to collect, transmit, and preprocess data. Data collection components on the vessel are configured to transmit data to a designated data processing infrastructure.
Data Preprocessing
Data Cleaning: Raw sensor data is meticulously cleaned to eliminate noise, outliers, and data quality issues.
Feature Engineering: The project extracts relevant features and performs transformations to prepare the data for machine learning analysis.
Machine Learning Analysis
Machine Learning Models: ML models, trained on historical data, detect patterns, anomalies, and correlations within real-time data.
Predictive Maintenance: ML models predict equipment failures and maintenance requirements by continuously monitoring critical equipment.
Fuel Consumption Optimization: Models analyze real-time data to determine optimal fuel consumption settings based on vessel conditions.
Route Planning and Optimization: ML models provide route recommendations by considering real-time weather data, maritime traffic, and other variables.
Crew Performance Monitoring: ML models assess crew performance and safety by identifying signs of fatigue or safety concerns.
Real-time Decision Support
User Interface: A user-friendly interface or dashboard presents real-time insights, recommendations, and alerts generated by the ML models.
Actionable Recommendations: ML models provide actionable recommendations for vessel operators, crew members, and stakeholders.
Continuous Learning and Feedback Loop
Iterative Process: The project establishes an iterative feedback loop, continually learning from both successful and unsuccessful recommendations.
Monitoring Impact: The project tracks the impact of its recommendations on vessel safety, efficiency, and sustainability, evaluating the effectiveness of actions taken in response to recommendations.
Compliance and Reporting
Regulatory Compliance: The project ensures compliance with maritime regulations and safety standards. It also focuses on environmental compliance to reduce the vessel’s ecological footprint.
Reporting: Comprehensive reports are generated for vessel operators and stakeholders, showcasing performance improvements, safety enhancements, and environmental impact reductions achieved through the project.
Conclusion
In conclusion, the Merchant Vessel Safety and Performance Enhancement project with Machine Learning is an advanced system that employs real-time data analysis, machine learning, and continuous learning to boost the safety, efficiency, and sustainability of merchant vessels. It delivers valuable insights and recommendations to vessel operators, contributing to safer and more cost-effective maritime operations.
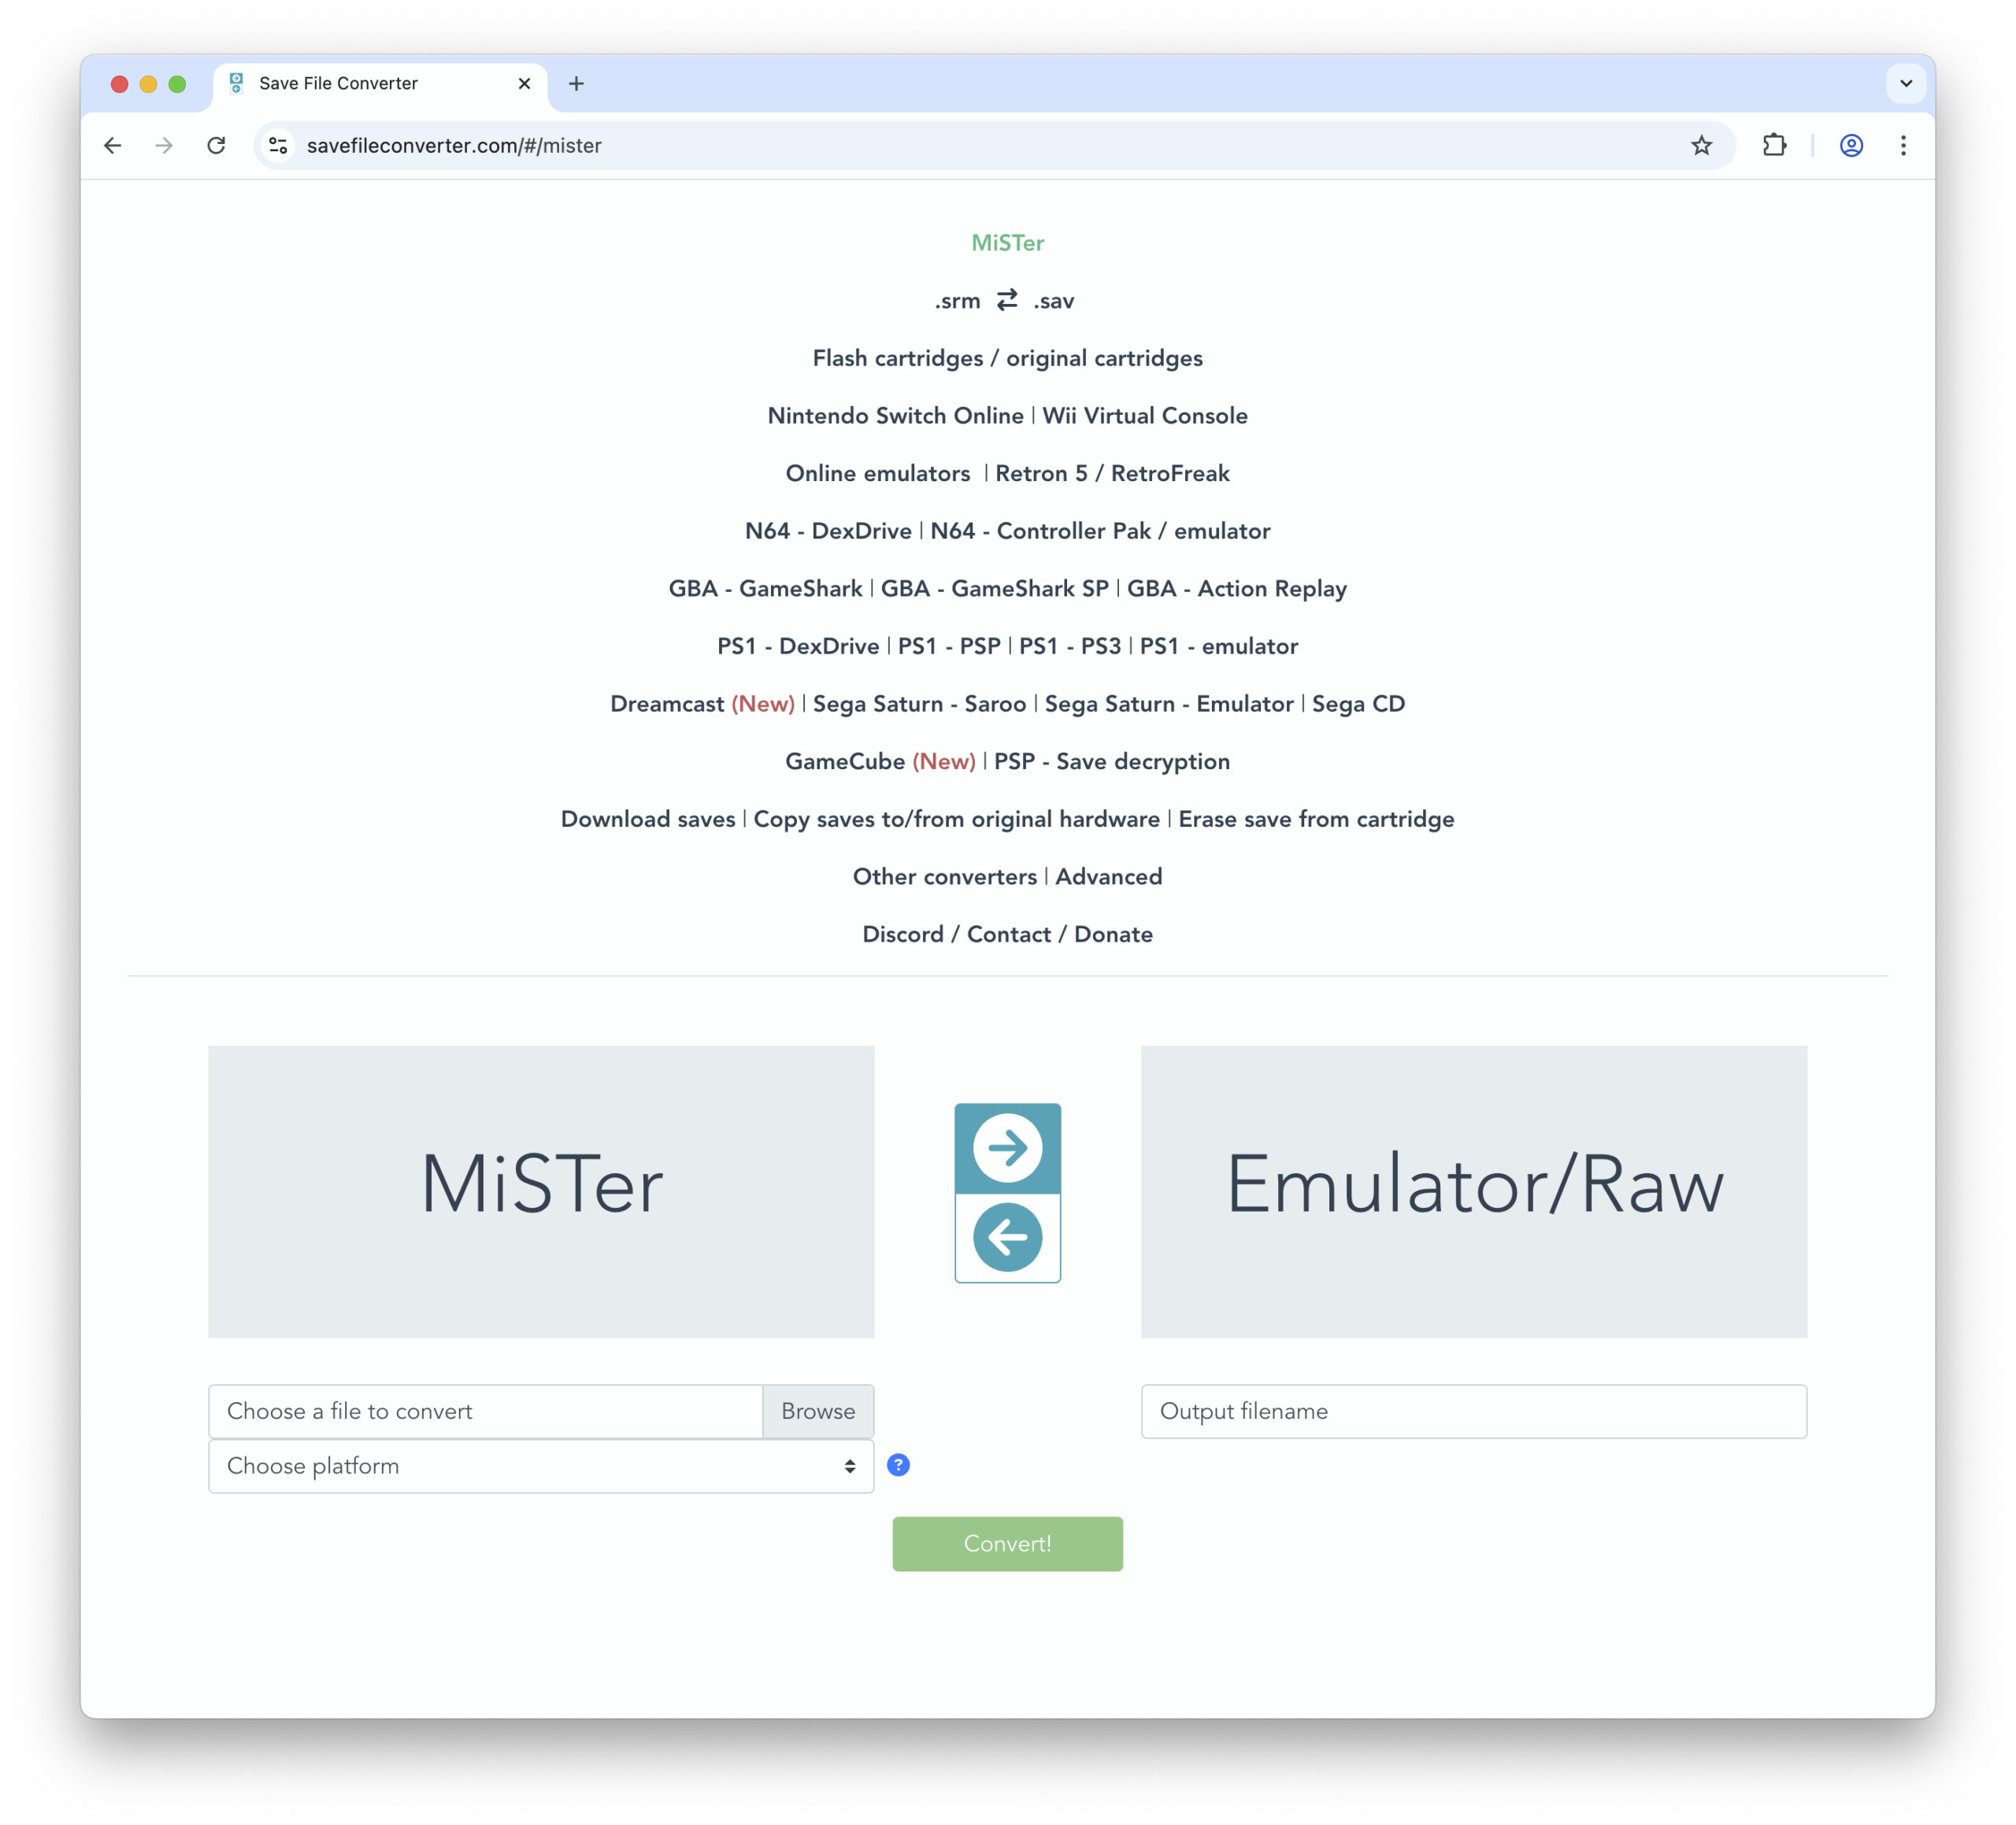
I can’t seem to find an online list of game keys, and requiring users to install a plugin on their PSP then type a gamekey into the interface seems like too much to ask.
I’m not sure there’s enough demand for a web-based tool that does this. The devices aren’t available for sale anymore and you already have to run a Windows program to transfer the games. Also the Windows tool for the SNES Classic has the ability to convert saves already.
Occassionally there’s a need to use the tool offline, such as when you’ll be without an Internet connection for an extended period. There’s 2 methods to achieve this:
Method 1: Use a website saving tool
You can’t just right click on the page and select Save As… because the site is divided internally into many different files, and that will only download some of them.
Google website saving tool or something similar to find an up-to-date list of such tools.
Method 2: Build it locally (for people comfortable with the command line and development tools)
You may need to modify some of these steps depending on your development environment, but this should give you the general idea.
Requires the composer.json and composer.lock files to be available and readable in the environment you plan to use this module. All information is based on these files.
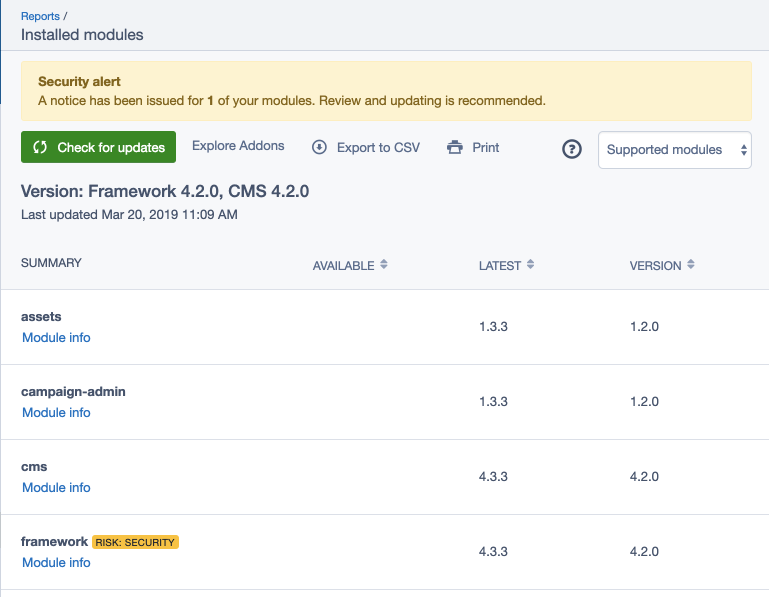
The queuedjobs module updates metadata on your installed modules in the background. You need to configure it to run those jobs.
For the optional update checkers, the webserver environment needs to be able to contact external information sources through network requests
SilverStripe:
Maintenance ^2.2: Silverstripe ^4.4
Maintenance ~2.1.0: Silverstripe 4.0-4.3
Maintenance: ^1.0: Silverstripe 3.x
Suggested Modules
By default, the module will read your installed modules,
and present them as a report in the CMS under admin/reports.
In order to get information about potential updates to these modules,
we recommend the installation of the following additional module:
Build schema and queue an initial job to populate the database:
sake dev/build
If you haven’t already, you need to configure the job queue
to update module metadata in the background. By default, this happens every day,
but can be configured to run at different intervals through YAML config:
The report available through the CMS shows “Available” and “Latest” versions (see user guide).
The version recommendations in those columns depend on your
composer.json configuration. When setting tight constraints (e.g. silverstripe/framework:4.3.2@stable),
newer releases don’t show up as expected. We recommend to have looser constraints by default
(e.g. silverstripe/framework:^4.3). When the “Latest” version shows dev-master,
it likely means that you have "minimum-stability": "dev" in your composer.json.
Contributions are welcome! Create an issue, explaining a bug or propose development ideas. Find more information on
contributing in the Silverstripe developer documentation.
Reporting Issues
Please create an issue for any bugs you’ve found, or features you’re missing.
This repository is now archived because it has been merged into LedgerHQ/app-stellar.
Introduction
This is the wallet app for the Ledger Nano S, Ledger Nano S Plus and Ledger Nano X that makes it possible to store Stellar-based assets on those devices and generally sign any transaction for the Stellar network.
Documentation
This app follows the specification available in the ./docs folder.
SDK
You can communicate with the app through the following libraries:
If not for development purposes, you should install this app via Ledger Live.
To build and install the app on your Nano S or Nano S Plus you must set up the Ledger build environments. Please follow the load the application instructions at the Ledger developer portal.
Additionaly, install this dependency:
sudo apt install libbsd-dev
The command to compile and load the app onto the device is:
make load
To remove the app from the device do:
make delete
Testing
This project provides unit tests, integration tests and end-to-end tests, unit tests are located under the ./tests_unit folder, and the integration tests and end-to-end tests are located under the ./tests_zemu folder.
During development, we recommend that you run the unit test first, as it takes less time to run, and then run the other tests after the unit test has run successfully.
Unit testing
The ./tests_unit directory contains files for testing the utils, the xdr transaction parser, the screen formatter and the swap function.
hrr_rb_ssh is a pure Ruby SSH 2.0 server and client implementation.
With hrr_rb_ssh, it is possible to write an SSH server easily, and also possible to write an original server side application on secure connection provided by SSH protocol. And it supports to write SSH client as well.
NOTE: ED25519 public key algorithm is now separated from hrr_rb_ssh. Please refer to hrr_rb_ssh-ed25519.
First of all, hrr_rb_ssh library needs to be loaded.
require'hrr_rb_ssh'
Logging
IMPORTANT: DEBUG log level outputs all communications between local and remote in human-readable plain-text including password and any secret. Be careful to use logging.
The library provides logging functionality. To enable logging in the library, you are to give a logger to Server.new or Client.new.
HrrRbSsh::Server.newoptions,logger: logger
or
HrrRbSsh::Client.newtarget,options,logger: logger
Where, the logger variable can be an instance of standard Logger class or user-defined logger class. What the library requires for logger variable is that the logger instance responds to #fatal, #error, #warn, #info and #debug with the following syntax.
For instance, logger variable can be prepared like below.
logger=Logger.newSTDOUTlogger.level=Logger::INFO
Writing standard SSH server
Starting server application
The library is to run on a socket IO. To start SSH server, running a server IO and accepting a connection are required. The 10022 port number is just an example.
Where, an options variable is an instance of Hash, which has optional (or sometimes almost necessary) values.
Registering pre-generated secret keys for server host key
By default, server host keys are generated everytime the gem is loaded. To use pre-generated keys, it is possible to register the keys in HrrRbSsh::Transport through options variable. The secret key value must be PEM or DER format string. The below is an example of registering ecdsa-sha2-nistp256 secret key. The supported server host key algorithms are listed later in this document.
By default, any authentications get failed. To allow users to login to the SSH service, at least one of the authentication methods must be defined and registered into the instance of HrrRbSsh::Authentication through options variable.
The library defines a sort of strategies to implement handling authentication.
Single authentication
Each authenticator returns true (or HrrRbSsh::Authentication::SUCCESS) or false (or HrrRbSsh::Authentication::FAILURE). When it is true, the user is accepted. When it is false, the user is not accepted and a subsequent authenticator is called.
Password authentication
Password authentication is the most simple way to allow users to login to the SSH service. Password authentication requires user-name and password.
To define a password authentication, the HrrRbSsh::Authentication::Authenticator.new { |context| ... } block is used. When the block returns true, then the authentication succeeded.
The context variable in password authentication context provides the followings.
#username : The username that a remote user tries to authenticate
#password : The password that a remote user tries to authenticate
#variables : A hash instance that is shared in each authenticator and subsequent session channel request handlers
#vars : The same object that #variables returns
#verify(username, password) : Returns true when username and password arguments match with the context’s username and password. Or returns false when username and password arguments don’t match.
Publickey authentication
The second one is public key authentication. Public key authentication requires user-name, public key algorithm name, and PEM or DER formed public key.
To define a public key authentication, the HrrRbSsh::Authentication::Authenticator.new { |context| ... } block is used as well. When the block returns true, then the authentication succeeded as well. However, context variable behaves differently.
The context variable in public key authentication context provides the #verify method. The #verify method takes three arguments; username, public key algorithm name and PEM or DER formed public key.
And public keys that is in OpenSSH public key format is now available. To use OpenSSH public keys, it is easy to use $USER_HOME/.ssh/authorized_keys file.
Keyboard-interactive authentication
The third one is keyboard-interactive authentication. This is also known as challenge-response authentication.
To define a keyboard-interactive authentication, the HrrRbSsh::Authentication::Authenticator.new { |context| ... } block is used as well. When the block returns true, then the authentication succeeded as well. However, context variable behaves differently.
The context variable in keyboard-interactive authentication context does NOT provides the #verify method. Instead, #info_request method is available. Since keyboard-interactive authentication has multiple times interactions between server and client, the values in responses needs to be verified respectively.
The #info_request method takes four arguments: name, instruction, language tag, and prompts. The name, instruction, and language tag can be empty string. The prompts needs to have at least one charactor for prompt message, and true or false value to specify whether echo back is enabled or not.
The responses are listed in the same order as request prompts.
None authentication (NOT recomended)
The last one is none authentication. None authentication is usually NOT used.
To define a none authentication, the HrrRbSsh::Authentication::Authenticator.new { |context| ... } block is used as well. When the block returns true, then the authentication succeeded as well. However, context variable behaves differently.
In none authentication context, context variable provides the #username method.
Multi-step authentication
In this strategy that conbines single authentications, it is possible to implement multi-step authentication. In case that the combination is a publickey authentication method and a password authentication method, it is so-called two-factor authentication.
A return value of each authentication handler can be HrrRbSsh::Authentication::PARTIAL_SUCCESS. The value means that the authentication method returns success and another authenticatoin method is requested (i.e. the authentication method is deleted from the list of authentication that can continue, and then the server sends USERAUTH_FAILURE message with the updated list of authentication that can continue and partial success true). When all preferred authentication methods returns PARTIAL_SUCCESS (i.e. there is no more authentication that can continue), then the user is treated as authenticated.
A context variable in an authenticator gives an access to remaining authentication methods that can continue. In this strategy, an implementer is able to control the order of authentication methods and to control which authentication methods are used for the user.
The below is an example. It is expected that any user must be verified by publickey and then another authentication is requested for the user accordingly.
auth_preferred_authentication_methods=['none']auth_none=HrrRbSsh::Authentication::Authenticator.new{ |context|
context.authentication_methods.push'publickey'HrrRbSsh::Authentication::PARTIAL_SUCCESS}auth_publickey=HrrRbSsh::Authentication::Authenticator.new{ |context|
ifsome_verification(context)casecontext.usernamewhen'user1'context.authentiation_methods.push'keyboard-interactive'HrrRbSsh::Authentication::PARTIAL_SUCCESSelsefalseendelsefalseend}auth_keyboard_interactive=HrrRbSsh::Authentication::Authenticator.new{ |context|
ifsome_verification(context)true# or HrrRbSsh::Authentication::PARTIAL_SUCCESS; both will accept the user because remaining authentication method is only 'keyboard-interactive' in this caseelsefalseend}options['authentication_preferred_authentication_methods']=auth_preferred_authentication_methodsoptions['authentication_none_authenticator']=auth_noneoptions['authentication_publickey_authenticator']=auth_publickeyoptions['authentication_keyboard_interactive_authenticator']=auth_keyboard_interactive
Handling session channel requests
By default, any channel requests belonging to session channel are implicitly ignored. To handle the requests, defining request handlers are required.
Reference request handlers
There are pre-implemented request handlers available for reference as below.
It is also possible to define customized request handlers. For instance, echo server can be implemented very easily as below. In this case, echo server works instead of shell and PTY-req and env requests are undefined.
conn_echo=HrrRbSsh::Connection::RequestHandler.new{ |context|
context.chain_proc{ |chain|
beginloopdobuf=context.io[0].readpartial(10240)breakifbuf.include?(0x04.chr)# break if ^Dcontext.io[1].writebufendexitstatus=0rescue=>elogger.error([e.backtrace[0],": ",e.message," (",e.class.to_s,")\n\t",e.backtrace[1..-1].join("\n\t")].join)exitstatus=1endexitstatus}}options['connection_channel_request_shell']=conn_echo
In HrrRbSsh::Connection::RequestHandler.new block, context variable basically provides the followings.
#io => [in, out, err] : in is readable and read data is sent by remote. out and err are writable. out is for standard output and written data is sent as channel data. err is for standard error and written data is sent as channel extended data.
#chain_proc => {|chain| ... } : When a session channel is opened, a background thread is started and is waitng for a chained block registered. This #chain_proc is used to define how to handle subsequent communications between local and remote. The chain variable provides #call_next method. In #proc_chain block, it is possible to call subsequent block that is defined in another request handler. For instance, shell request must called after pty-req request. The chain in pty-req request handler’s #chain_proc calls #next_proc and then subsequent shell request handler’s #chain_proc will be called.
#close_session : In most cases, input and output between a client and the server is handled in #chain_proc and closing the #chain_proc block will lead closing the underlying session channel. This means that to close the underlying session channel it is required to write at least one #chain_proc block. If it is not required to use #chain_proc block or is required to close the underlying session channel from outside of #chain_proc block, #close_session can be used. The #close_session will close the background thread that calls #chain_proc blocks.
#variables => Hash : A hash instance that is passed from authenticator and is shared in subsequent session channel request handlers
#vars : The same object that #variables returns
And request handler’s context variable also provides additional methods based on request type. See lib/hrr_rb_ssh/connection/channel/channel_type/session/request_type/<request type>/context.rb.
Defining preferred algorithms (optional)
Preferred encryption, server-host-key, KEX and compression algorithms can be selected and defined.
Supported algorithms can be got with each algorithm class’s #list_supported method, and default preferred algorithms can be got with each algorithm class’s #list_preferred method.
Outputs of #list_preferred method are ordered as preferred; i.e. the name listed at head is used as most preferred, and the name listed at tail is used as non-preferred.
By default, hrr_rb_ssh sends SSH-2.0-HrrRbSsh-#{VERSION} string at initial negotiation with remote peer. To address security concerns, it is possible to replace the version string.
# Hiding versionoptions['local_version']="SSH-2.0-HrrRbSsh"# Simulating OpenSSHoptions['local_version']="SSH-2.0-OpenSSH_x.x"# Simulating OpenSSH and hiding versionoptions['local_version']="SSH-2.0-OpenSSH"
Please note that the beginning of the string must be SSH-2.0-. Otherwise SSH 2.0 remote peer cannot continue negotiation with the local peer.
Writing SSH client (Experimental)
Starting SSH connection
The client mode can be started with HrrRbSsh::Client.start. The method takes target and options arguments. The target that the SSH client connects to can be one of:
(IO) An io that is open for input and output
(Array) An array of the target host address or host name and its service port number
(String) The target host address or host name; in this case the target service port number will be 22
And the options contains various parameters for the SSH connection. At least username key must be set in the options. Also at least one of password, publickey, or keyboard-interactive needs to be set for authentication instead of authenticators that are used in server mode. Also as similar to server mode, it is possible to specify preferred transport algorithms and preferred authentication methods with the same keywords.
target=['remotehost',22]options={username: 'user1',password: 'password1',publickey: ['ssh-rsa',"/home/user1/.ssh/id_rsa")],authentication_preferred_authentication_methods=['publickey','password'],}HrrRbSsh::Client.start(target,options)do |conn|
# Do something here# For instance: conn.exec "command"end
Executing remote commands
There are some methods supported in client mode. The methods works as a receiver of conn block variable.
exec method
The exec and exec! methods execute command on a remote host. Both takes a command argument that is executed in the remote host. And they can take optional pty and env arguments. When pty: true is set, then the command will be executed on a pseudo-TTY. When env: {'key' => 'value'} is set, then the environmental variables are set before the command is executed.
The exec! method returns [stdout, stderr] outputs. Once the command is executed and the outputs are completed, then the method returns the value.
conn.exec!"command"# => [stdout, stderr]
On the other hand, exec method takes block like the below example and returns exit status of the command. When the command is executed and the outputs and reading them are finished, then io_out and io_err return EOF.
conn.exec"command"do |io_in,io_out,io_err|
# Do something hereend
shell method
The shell method provides a shell access on a remote host. As similar to exec method, it takes block and its block variable is also io_in, io_out, io_err. shell is always on pseudo-TTY, so it doesn’t take pty optional argument. It takes env optional argument. Exiting shell will leads io_out and io_err EOF.
conn.shelldo |io_in,io_out,io_err|
# Do something hereend
subsystem method
The subsystem method is to start a subsystem on a remote host. The method takes a subsystem name argument and a block. Its block variable is also io_in, io_out, io_err. subsystem doesn’t take pty nor env optional argument.
conn.subsystem("echo")do |io_in,io_out,io_err|
# Do something hereend
Demo
The demo/server.rb shows a good example on how to use the hrr_rb_ssh library in SSH server mode. And the demo/client.rb shows an example on how to use the hrr_rb_ssh library in SSH client mode.
Bug reports and pull requests are welcome on GitHub at https://github.com/hirura/hrr_rb_ssh. This project is intended to be a safe, welcoming space for collaboration, and contributors are expected to adhere to the Contributor Covenant code of conduct.
Code of Conduct
Everyone interacting in the HrrRbSsh project’s codebases, issue trackers, chat rooms and mailing lists is expected to follow the code of conduct.
License
The gem is available as open source under the terms of the Apache License 2.0.
In MS Excel, and Google Spreadsheets, literal ranges are denoted with opening and closing curly-brackets. E.g. “{1, 2, 3}”. In this implementation however, literal ranges are denoted with opening and closing brackets. E.g. “[1, 2, 3]”.
// OKsheet.setCell('A1','=SUM([1, 2, 3])');// NOT OKsheet.setCell('A1','=SUM({1, 2, 3})');
Docs
See DOCS.md for full list and documentation of all formulas available.
Contributing
When adding a formula, or fixing a bug please follow the commit message format:
[BUG_FEATURE_FILE_OR_COMPONENT] short description here of issue and fix
If you’re adding a new formula, before you submit a pull request or push ensure that:
The formula is tested inside the proper category file in tests/Formulas.
Make sure the formula is exported, and imported/exported in AllFormulas.ts.
The formula tests for reference errors, N/A errors, value errors for each input.
That the formula is tested for parsing inside SheetFormulaTest.ts.
Run tests with npm run test.
Build with npm run build.
Build DOCS.md with npm run docs.
Why?
Near the end of 2016 I began to ask myself why I didn’t know more about MS Excel and Google Spreadsheets. Why didn’t I know more about the most popular programing language in the world? I began to reverse engineer Google Spreadsheets in particular, gaining a better understanding along the way.
I chose TypeScript because, coming from Java, it is really nice to be able to see type errors, and catch them. I also just enjoy getting specific with my return types, even if the specifications for a spreadsheet treat type flexibly.
For the formula documentation, I tried to be at least — if not more — thorough as Google Spreadsheets.
License
For this repository’s code license, and related licenses, see LICENSES directory.
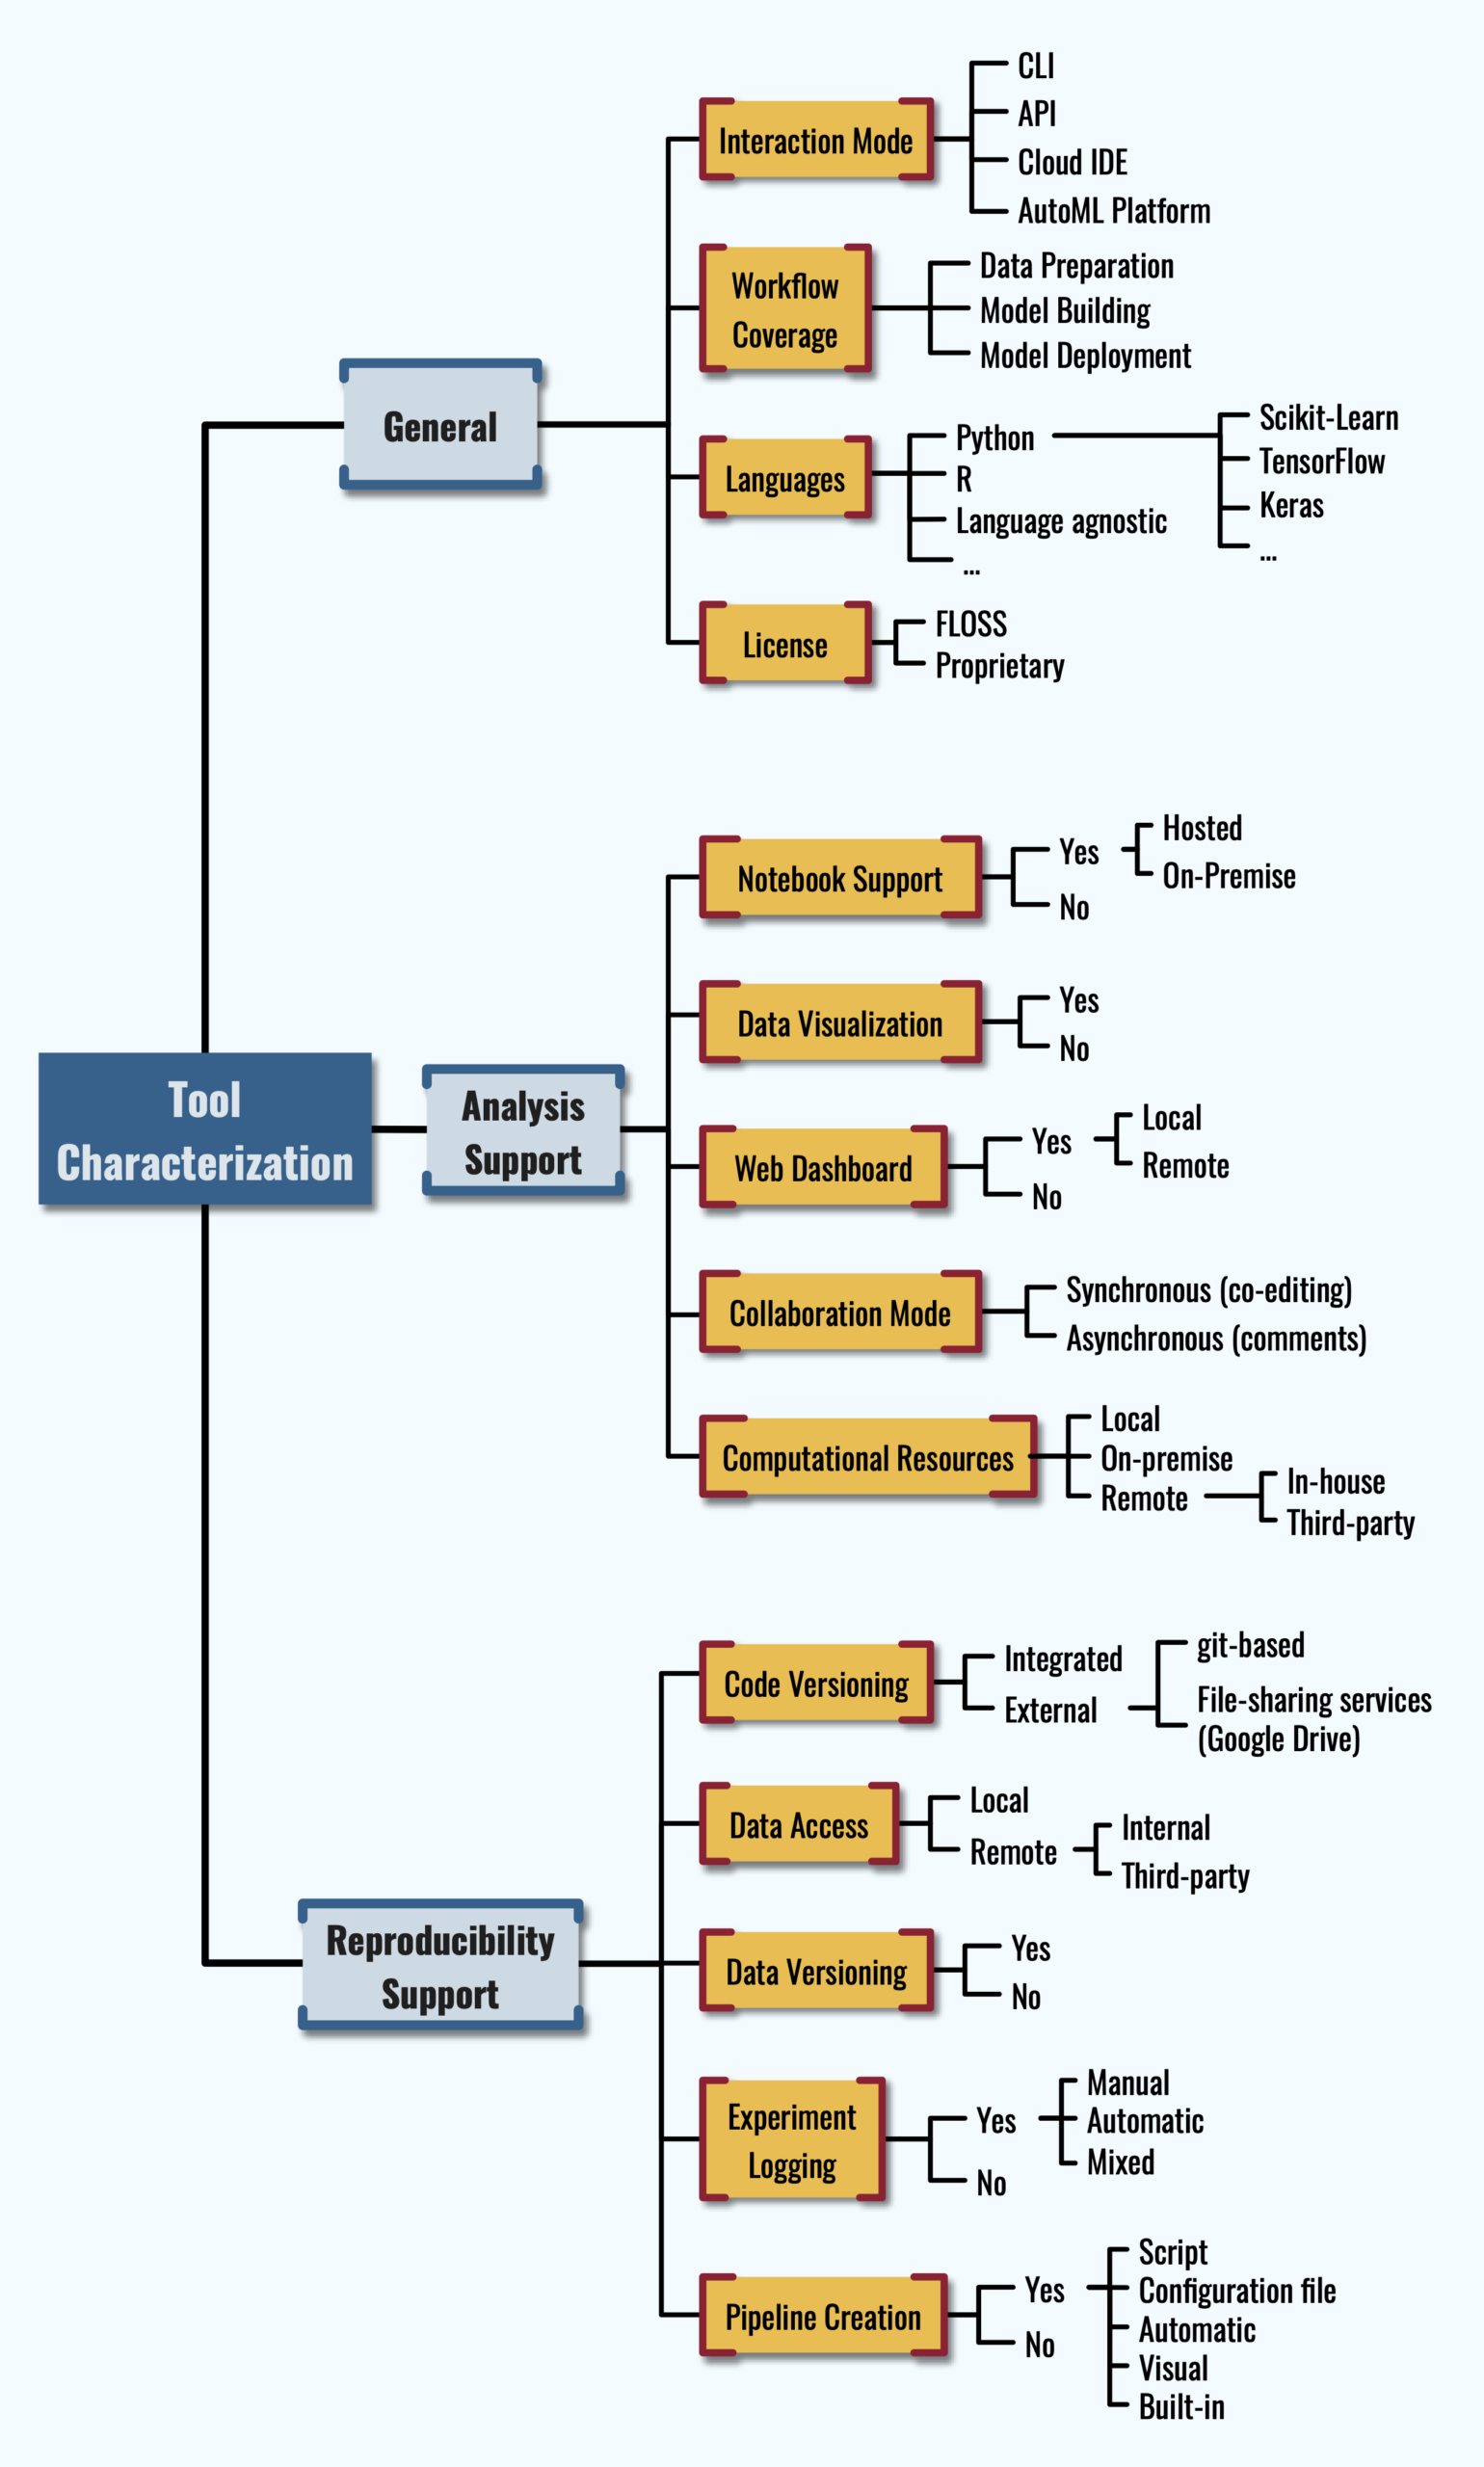
In the following of this README, the full sample of analyzed tools is classified according to the features from the taxonomy presented in the paper; for the reader’s convenience, a figure representing the taxonomy is also displayed in the following paragraph.
Please, include the following citation if you intend to (re)use our work:
L. Quaranta, F. Calefato and F. Lanubile, “A Taxonomy of Tools for Reproducible Machine Learning Experiments,” Proceedings of the AIxIA 2021 Discussion Papers Workshop (AIxIA DP 2021), 2021, pp. 65-76, online: CEUR-WS.org/Vol-3078/paper-81.pdf.
The Taxonomy
Tools Review
General
The tool sample classified according to the features of the General category.
N.B.: Rows related to Dotscience are strike-through because the service seems to be shutting down. We read this blog post a few days after our trial.
Repository contents
The tools/ folder contains environment templates for the tools that require a local installation to be executed. To try the tools we used — where possible — a realistic case study inspired to the lessons of the Kaggle’s micro-courses “Intro to Machine Learning” and “Intermediate Machine Learning”. The kernels/ folder contains template notebooks implementing the case study, while the sample dataset is stored in the input/ folder.
Setup instructions
To try one of the reviewed tools, follow these steps:
go to the tool’s folder: /tools/<tool_name>;
if a .env_template file exist, make a copy of it; give the name .env to the copy; edit .env giving a value to each of the mentioned variables.
if a README.md file is present, follow the specific instruction there.
Btrieve / Pervasive.SQL / ZEN : Rosetta-code example repository project
Idea
Provide documented example code for all database access methods supported by Pervasive.SQL on all platforms using all popular languages. Preferably useful for both beginner and advanced user as a reference guide.
For many years it struck me that code/coding examples were scarce. Also they varied over time (platforms, languages supported), but most of all stuck in time. Not very appealing for a starter, whether (s)he would be new to a programming language or to Pervasive.SQL.
Over the years I developed ideas on how to improve this and made some efforts writing code.
The task ahead is quite extensive. Especially if one wants to do a proper job.
Ideas change, new projects or tasks got in between, etc. Long story short it took some time and the result is very different than at first anticipated as my first idea was to write a single reference application which could later be ported to other languages/platforms.
Layout
Based on the paragraph Database Access Methods in the Actian Pervasive.SQL V13 online documentation I created a Bash shellscript (mk_dirs.sh), taking a single argument being the programminglanguage name, which creates a directory structure listing all the database access methods as subdirectories. By using this script I was forced to look into and document all(?!) possibilities regardless how odd. All subdirectories contain their own markdown ReadMe file describing the (im)possibilities and code if provided.
All programminglanguages have a ReadMe markdown file in their root directory describing the ins and outs, what is and isn’t implemented as well as a Results markdown file to register what has been tested on which platform.
Missing files versus Copyright
The goals was not to infringe any copyrights, so headers must be copied from SDKs which can be downloaded from the Actian website. The same goes for example code which can be copy/pasted from the website. It would be great if example code (& headers) could be made available from a repository.
When looking around on Github one can find copyrighted header files. I leave it to Actian to add them.
Improvements
I very much welcome improvements, comments and other contributions.
Personally I can think of a view:
All code should confirm to coding standards.
Refactoring/cleanup of code.
All code should be very rich in comments. Annotate all database calls.
All code should be made very defensive: if an error occurs it should be reported or at least logged.
All code should be properly tested. Preferably on all relevant platforms. Which on turn should be documented.
Code must be written or adapted for other platforms. Notably: Mac, IOS, Android
Some obvious languages/platforms are missing. Notably: Win/VS: c#, VB.net, Win/Embarcadero C++, Win/MingW or other GNU C/C++, IOS/Objective C, Android/Java, Mac/making the bash-shell scripts compatible/supportive.
Also some languages which used to be supported/were important do not have sample code yet. What springs to mind: Cobol, Delphi, … ? And some are no longer important: (Visual) Basic (pre .net), Pascal, Turboc (DOS), Watcom C/C++ (DOS)
Some ‘languages’ are not very demonstratable as they seem to require severe boilerplating, project management and/or integration in an IDE. ASP.NET being an example.
Integrated platforms are not listed. For example Magic It probably makes no sense in listing them. Other platforms used in the past: Clarion and Power Builder
Another subject which requires attention is web-based development. One can think of: Windows/ASP, Python/Flask, Python/Django, Ruby/Ruby-on-rails and Javascript, NodeJS. Optionally expanded by new kids on the block such as Dart/Flutter, Meteor, etc. although a lot of them are based on Javascript.
Drivers. Currently especially one springs to mind: SQLAlchemy-Pervasive : it needs some serious TLC.
Currently a strong focus is on database connectivity.
Ultimately an application supporting commandline, curses (TUI), GUI while using all calls available in APIs (Btrieve, Btrieve2, ODBC, JDBC) would be a real bonus. It would cater for demoing, illustrating how calls should be used and obviously would provide a great test, especially if the code could be run using test automation.
This would be a major thing to design and implement properly. Some baby steps in this process alone would be great.
I am fully aware that most code does not comply to above standards. Refactoring all code would take a lot of time which would pospone the initial release or maybe even prevent it.
For this reason I am releasing code which does not meet my views on proper coding.
Credits
See the Credits.md file. This file applies to the entire project.
License
See the License.md file. This file applies to the entire project.
Warnings
For sake of completeness and uniformity all access methods mentioned in the programmers manual are listed as options for all languages. The combinations can be quite absurd or exotic. Obviously especially those are not implemented (yet) and/or properly tested.
All code and documentation in this repository is provided as is.
By no means I am an expert in all languages provided. The goal is to at least deliver working code which is a very low standard, but not uncommon unfortunately. Writing about programming versus Software Engineering can fill up bookshelves. Lets no go there now.
Hopefully the quality of code will increase over time if people being expert in a certain language participate and improve code.
Most code is tested on Linux only unless stated otherwise. To improve maturity and clearity on this subject test result tables have been added.
It’s an early alpha version of the platform for SONM.io project.
For now it has lots of unfinished task. The main idea is to show that such platform can be implemented and to chose a techstack for future implementation.
What is it here?
This repository contains code for Hub, Miner and CLI.
Where can I get it?
A docker container contained every CLI, Miner, Hub can be found on public DockerHub: sonm/insonmnia
docker pull sonm/insonmnia
If you want it’s easy to build all the components. You need golang > 1.8:
ID <jobid>, Endpoint [27960/tcp-><ip:port> 27960/udp-><ip:port>]
jobid is an unique name for the task. Later it can be used to specify a task for various operations.
Endpoint describes mapping of exposed ports (google for Docker EXPOSE) to the real ports of a miner
NOTE: later STUN will be used for UDP packets and LVS (ipvs) or userspace proxy (like SSH tunnel) for TCP. Miners who have a public IPv4 or can be reached via IPv6 would not need this proxy. The proxy is intended to get through NAT.
stop a container
To stop the task just provide the jobid
sonmcli --hub <hubip:port> stop <jobid>
How to cook a container
Dockerfile for the image should follow several requirements:
ENTRYPOINT or CMD or both must present
Network ports should be specified via EXPOSE
Technical overview
Technologies we use right now:
golang is the main language. Athough golang has disadvantages, we believe that its model is good for fast start and the code is easy to understand. The simplicity leads to less errors. Also it makes easy to contribute to a project as a review process is very clean.
Docker is a heart of an isolation in our platform. We rely on security features (It’s not 100% safe!), metrics, ecosystem it provides. The cool thing Docker is supported by many platforms. Also Docker works a lot on a unikernel approach for container based applications, which opens a huge field for security and portability improvements.
whisper as a discovery protocol
Until the epoch of IPv6 begins we should bring a way to get through NAT. The solution depends on a concrete transport layer. For example, different approaches should be used for UDP (e.g. STUN) and TCP (naive userspace proxy). Each approach has its own overhead and the best fit solution depends on a task.
gRPC is an API protocol between components. It’s very easy to extend, supports traffic compression, flexible auth model, supported by many language. It’s becoming more and more popular as a technology for RPC.
Hub
Hub provides public gRPC-based API. proto files can be found in proto dir.
Miner
Miner is expected to discover a Hub using Whisper. Later the miner connects to the hub via TCP. Right now a Miner must have a public IP address. Hub sends orders to the miner via gRPC on top of the connection. Hub pings the miner from time to time.
The Kubernetes Learning Roadmap is constantly updated with new content, so you can be sure that you’re getting the latest and most up-to-date information available.
Learning Kubernetes can seem overwhelming. It’s a complex container orchestration system, that has a steep learning curve. But with the right roadmap and understanding of the foundational concepts, it’s something that any developer or ops person can learn.
In this Kubernetes learning roadmap, I have added prerequisites and complete Kubernetes learning path covering basic to advanced Kubernetes concepts.
Kubernetes Learning Prerequisites
Before jumping into learning kubernetes, you need to have a fair amount of knowledge of some of the underlying technologies and concepts.
Distributed system: Learn about distributed system basics & their use cases in modern IT infrastructure. CAP theorem is good to have knowledge.
Authentication & Authorization: A very basic concept in IT. However, engineers starting their careers tend to get confused. So please get a good understanding of learning from analogies. You will quite often see these terms in Kubernetes.
Key Value Store: It is a type of NoSQL Database. Understand just enough basics and their use cases.
API: Kubernetes is an API-driven system. So you need to have an understanding of RESTFUL APIs. Also, try to understand gRPC API. It’s good to have knowledge.
YAML: YAML stands for YAML Ain’t Markup Language. It is a data serialization language that can be used for data storage and configuration files. It’s very easy to learn and from a Kubernetes standpoint, we will use it for configuration files. So understanding YAML syntax is very important.
Container: Container is the basic building block of kubernetes.The primary work of Kubernetes is to orchestrate containers. You need to learn all the container basics and have hands-on experience working on container tools like Docker or Podman. I would also suggest reading about Open container initiative and Container Runtime Interface (CRI)
Service Discovery: It is one of the key areas of Kubernetes. You need to have basic knowledge of client-side and server-side service discovery. To put it simply, in client-side service discovery, the request goes to a service registry to get the endpoints available for backend services. In server-side service discovery, the request goes to a load balancer and the load balancer uses the service registry to get the ending of backend services.
Networking Basis
CIDR Notation & Type of IP Addresses
L3, L4 & L7 Layers (OSI Layers)
SSL/TLS: One way & Mutual TLS
Proxy
DNS
IPTables
IPVS
Software Defined Networking (SDN)
Virtual Interfaces
Overlay networking
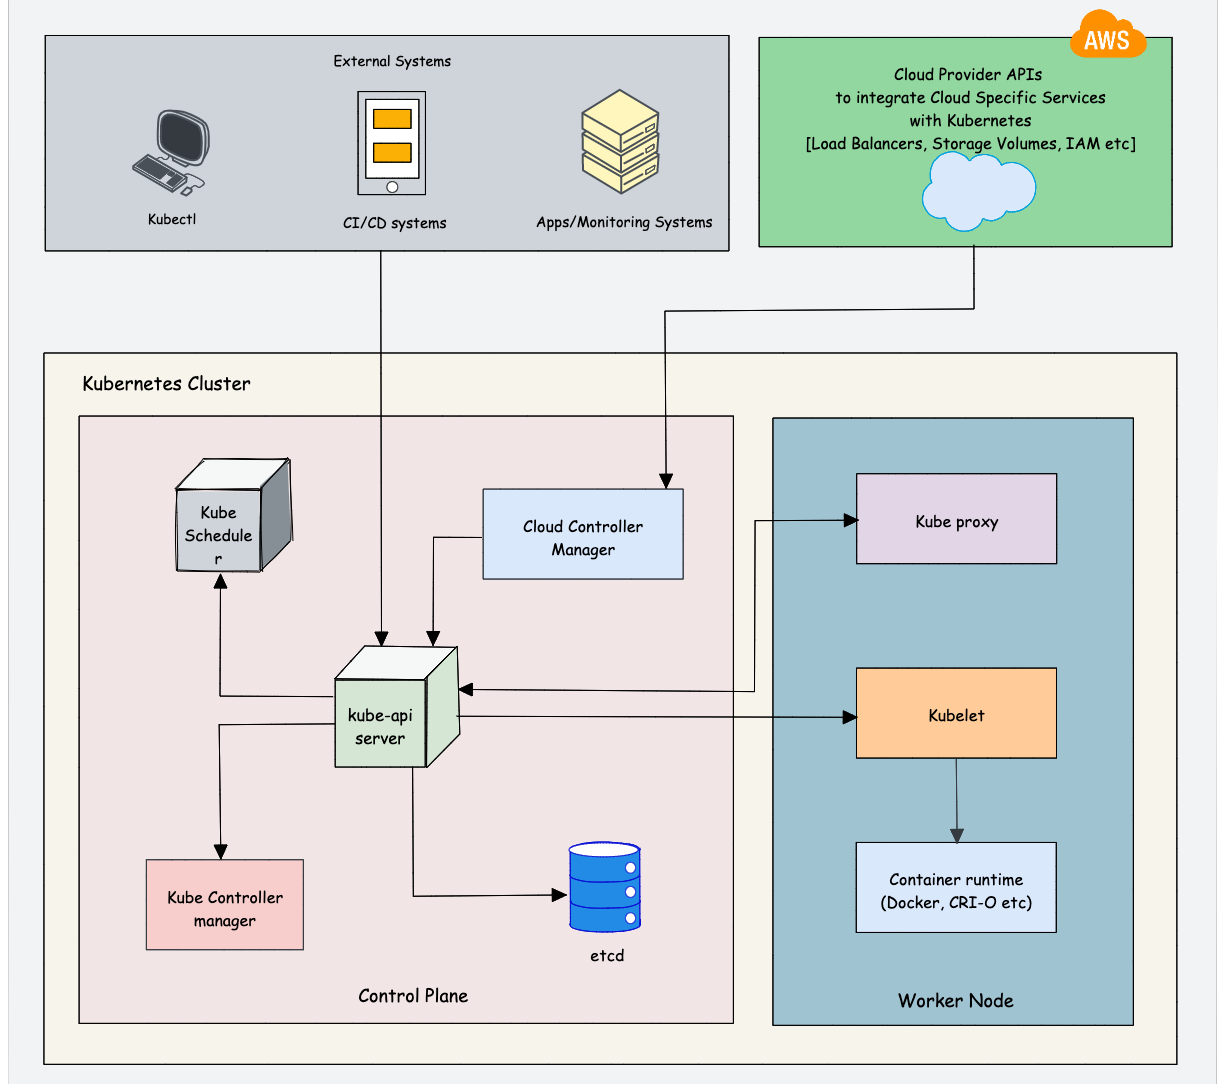
Learn Kubernetes Architecture
Understanding Kubernetes architecture is not an easy task. The system has many moving parts that need to be understood in order for you to get a grip on what’s happening beneath the surface. While learning architecture, you will come across the concepts we discuss in the prerequisites.
As Kubernetes is a complex system, trying to understand the core architecture could be a little overwhelming for DevOps Engineers. As you get more hands-on experience, you would be able to understand the core architecture better.
Here is my suggestion. Learn the high-level architecture and key components involved in Kubernetes. If you are not able to grasp the concept, either you can spend time and do more research on a specific topic or you can learn the concept while doing hands-on. It’s your choice.
Check out the Kubernetes Architecture guide to learn about all the Kubernetes components in detail.
Overall you need to learn the following:
Control plane components: Understand the role of each component like API server, etcd, Scheduler, and Controller manager.
Worker node components: Learn about Kube Proxy, Kubelet, Container Runtime
Addon Components: CoreDNS, Network plugins (Calico, weave, etc), Metric Server
Cluster high availability: Most organizations use managed Kubernetes services (GKE, EKS, AKS, etc). So the cloud provider takes care of the cluster’s control plane’s high availability. However, it is very important to learn the high availability concepts in scaling the cluster in multi zones and regions. It will help you in real-time projects and devops interviews.
Network Design: While it is easy to set up a cluster in an open network without restrictions, it is not that easy in a corporate network. As a DevOps engineer, you should understand the Kubernetes network design and requirements so that you can collaborate with the network team better. For example, When I was working with kubernetes setup on Google cloud, we used a CIDR pod range that was not routable in the corporate network. As a workaround, we had to deploy IP masquerading for the pod network.
$1000+ Free Cloud Credits to Launch Clusters
Deploying big clusters on the cloud could be expensive. So make use of the following cloud credits and learn to launch clusters as if you would on a real-time project. All platforms offer managed k8s services.
Use one account at a time. Once the credits are expired. move to the next account. You need to keep a watch on your credits as well as expiry. Or else you could get charged. Also, check the terms and instance usage limits if any.
Also, setting up servers on this platform is very easy and every cloud provider had extensive documentation to get started.
The Best Resources to Learn Kubernetes Online
Here are some of the best online resources to learn Kubernetes practically:
1️. The Official Kubernetes Basics Tutorial
The official Kubernetes website offers browser-based, hands-on tutorials powered by Katacoda scenarios. It covers:
Kubernetes Basics
Configurations
Stateless & Stateful Application Deployment
Services & Networking
Security & Access Control
🔹 You can also explore the official Kubernetes tasks for hands-on experience with real-world Kubernetes implementations. This will also help in preparing for Kubernetes certifications.
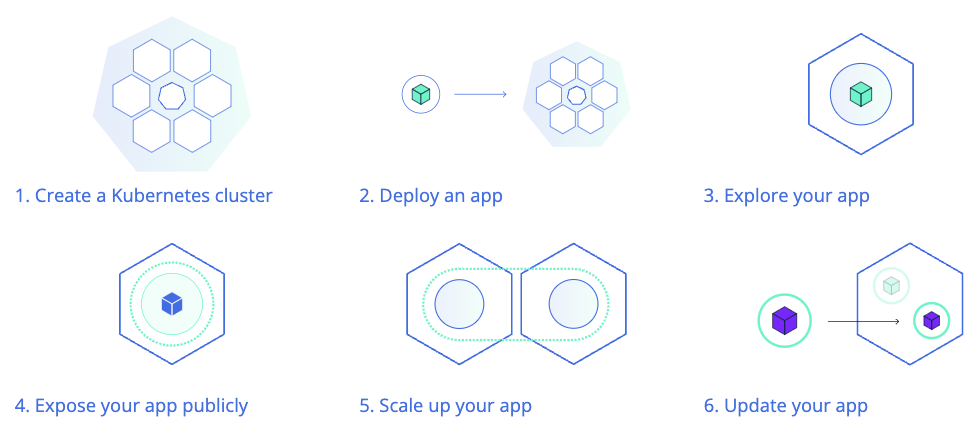
For a fully interactive browser-based learning experience, KillerCoda offers scenario-based Kubernetes playgrounds, where you can practice commands and learn in real-time.
Learn Kubernetes Cluster Setup & Administration
Kubernetes Cluster Setup
As DevOps engineers, it is very important to learn every component and cluster configuration. While there are many options to deploy a Kubernetes cluster, It is always better to learn to deploy multi-node clusters from scratch.
With multi-node clusters, you can learn about all the concepts like Cluster security, High Availability, Scaling, Networking, etc.
It gives you the feeling of working on a real-world project. It will also help you in interviews and you can be confident about production-level cluster configurations.
Following are my cluster setup suggestions.
Kubernetes the Hard Way: I would suggest you start with Kubernetes the hard way set up. It helps you understand all the configurations involved in bootstrapping a kubernetes cluster. If you want to work on production clusters, this lab will help you a lot. The setup is based on google cloud. You can use the $300 free credits to complete the lab.
Kubeadm Cluster Setup: Learning kubeadm cluster setup helps you in Kubernetes certification preparation. Also, it helps you automate Kubernetes cluster setup with best practices.
Minikube: If you want to have a minimal development cluster setup, minikube is the best option.
Kind: Kind is another local development Kubernetes cluster setup.
Vagrant Automated Kubernetes: If you prefer to have a multi-VM-based local Kubernetes cluster setup, you can try the automated vagrant setup that uses Kubeadm to bootstrap the cluster.
Learn About Cluster Configurations
Once you have a working cluster, you should learn about the key cluster configurations. This knowledge will be particularly helpful when working in a self-hosted Kubernetes setup.
Even if you use a managed Kubernetes cluster for your project, there may be certain cluster configurations that you need to modify.
For example, if you set up a cluster in a hybrid network, you may need to configure it with an on-premises private DNS server for private DNS resolution. This can be done via CoreDNS configuration.
Also, having a solid understanding of cluster configurations will help you with Kubernetes certifications (CKA & CKS) where you need to troubleshoot cluster misconfiguration and issues.
Understand KubeConfig File
Kubeconfig file is a YAML file that contains all the cluster information and credentials to connect to the cluster.
As a Devops Engineer, You should learn to connect to kubernetes clusters in different ways using the Kubeconfig file. Because you will be responsible for setting up cluster authentication for CI/CD systems, providing cluster access to developers, etc.
So spend some time, understanding the Kubeconfig file structure and associated parameters.
Understand Kubernetes Objects And Resources
You will quite often come across the names “Kubernetes Object” and “Kubernetes Resource“
First, you need to Understand the difference between an object and a resource in kubernetes.
To put it simply, anything a user creates and persists in Kubernetes is an object. For example, a namespace, pod, Deployment configmap, Secret, etc.
Before creating an object, you represent it in a YAML or JSON format. It is called an Object Specification (Spec). You declare the desired state of the object on the Object Spec. Once the object is created, you can retrieve its details from the Kubernetes API using Kubectl or client libraries.
As we discussed earlier in the prerequisite section, everything in Kubernetes is an API. To create different object types, there are API endpoints provided by the Kubernetes API server. Those object-specific api-endpoints are called resources. For example, an endpoint to create a pod is called a pod resource.
So when you try to create a Kubernetes Object using Kubectl, it converts the YAML spec to JSON format and sends it to the Pod resource (Pod API endpoint).
Learn About Pod & Associated Resources
Once you have an understanding of Kubernetes Objects and resources, you can start with a native Kubernetes object called Pod. A pod is a basic building block of Kubernetes.
You should learn all the Pod concepts and their associated objects like Service, Ingress, Persistent Volume, Configmap, and Secret. Once you know everything about a pod, it is very easy to learn other pod-dependent objects like deployments, Daemonset, etc.
First, learn about the Pod Resource Definition (YAML). A typical Pod YAML contains the following high-level constructs.
Kind
Metadata
Annotations
Labels
Selectors
Once you have a basic understanding of the above, move on to hands-on learning. These concepts will make more sense when you do hands-on.
Following are the hands-on tasks to learn about Pod and its associated objects.
Deploy a pod
Deploy pod on the specific worker node
Add service to pod
Expose the pod Service using Nodeport
Expose the Pod Service using Ingress
Setup Pod resources & limits
Setup Pod with startup, liveness, and readiness probes.
Add Persistent Volume to the pod.
Attach configmap to pod
Add Secret to pod
multi-container pods (sidecar container pattern)
Init containers
Ephemeral containers
Static Pods
Learn to troubleshoot Pods
Few advanced pod scheduling concepts.
Pod Preemption & Priority
Pod Disruption Budget
Pod Placement Using a Node Selector
Pod Affinity and Anti-affinity
Container Life Cycle Hooks
Learn About Pod Dependent Objects
Now that you have a better understanding of Pod and independent kubernetes resources, you can start learning about objects that are dependent on the Pod object. While learning this, you will come across concepts like HPA (Horizontal Pod Autoscaling) and VPA (Verification Pod Autoscaling)
Replicaset
Deployment
Daemonsets
Statefulset
Jobs & Cronjobs
Deploy End to End Application on Kubernetes
Once you understand the basics of these objects, you can try deploying an end-to-end microservices application on Kubernetes. Start with simple use cases and gradually increase complexity.
I would suggest you get a domain name and try setting up a microservice application from scratch and host it on your domain.
You don’t need to develop an application for this. Choose any open-source microservice-based application and deploy it. My suggestion is to choose the open-source pet clinic microservice application based on spring boot.
Following are the high-level tasks.
Build Docker images for all the services. Ensure you optimize the Dockerfile to reduce the Docker Image size.
Create manifests for all the services. (Deployment, Statefulset, Services, Configmaps, Secrets, etc)
Expose the front end with service type ClusterIp
Deploy Nginx Ingress controller and expose it with service type Loadbalancer
Map the load balancer IP to the domain name.
Create an ingress object with a DNS name with the backend as a front-end service name.
Validate the application.
Learn About Securing Kubernetes Cluster
Security is a key aspect of Kubernetes. There are many ways to implement security best practices in Kubernetes starting from building a secure container image.
Following the native ways of implementing security in kubernetes.
Service account
Pod Security Context
Seccomp & AppArmor
Role Based Access Control (RBAC)
Attribute-based access control (ABAC)
Network Policies
The following are the open-source tools you need to look at.
Open Policy Agent
Kyverno
Kube-bench
Kube-hunter
Falco
Learn About Kubernetes Operator Pattern
Kubernetes Operators is an advanced concept.
To understand operators, first, you need to learn the following Kubernetes concepts.
Custom resource definitions
Admission controllers
Validating & Mutating Webhooks
To get started with operators, you can try setting the following operators on Kubernetes.
Prometheus Operator
MySQL Operator
If you are a Go developer or you want to learn to extend/customize kubernetes, I would suggest you create your own operator using Golang.
Learn Important Kubernetes Configurations
While learning kubernetes, you might use a cluster in open network connectivity. So most of the tasks get executed without any issues. However, it is not the case with clusters set up on corporate networks.
So following are the some of the custom cluster configurations you should be aware of.
Custom DNS server
Custom image registry
Shipping logs to external logging systems
Kubernetes OpenID Connect
Segregating & securing Nodes for PCI & PII Workloads
Learn Kubernetes Production Best Practices
Following are the resources that might help and add value to the Kubernetes learning process in terms of best practices.
12 Factor Apps: It is a methodology that talks about how to code, deploy and maintain modern microservices-based applications. Since Kubernetes is a cloud-native microservices platform, it is a must-know concept for DevOps engineers. So when you work on a real-time kubernetes project, you can implement these 12-factor principles.
Kubernetes Failure Stories: Kubernetes failure stories is a website that has a list of articles that talk about failures in Kubernetes implementation. If you read those stories, you can avoid those mistakes in your kubernetes implementation.
Case Studies From Organizations: Spend time on use cases published by organizations on Kubernetes usage and scaling. You can learn a lot from them. Following are some of the case studies that are worth reading.
Scheduling 300,000 Kubernetes Pods in Production Daily
Scaling Kubernetes to 7,500 Nodes
Real-World Kubernetes Case Studies
When I spoke to the DevOps community, I found that a common issue was the lack of real-world experience with Kubernetes. If you don’t have an active Kubernetes project in your organization, you can refer to case studies and learning materials published by organizations that use Kubernetes. This will also help you in Kubernetes interviews.
Here are some good real-world Kubernetes case studies that can enhance your Kubernetes knowledge:
Resources: Links to official documentation, practice labs, and study guides.
Community and News Sources
News and Blogs: Resources to stay updated with Kubernetes trends, like CNCF blog, Kubernetes Podcast, and KubeWeekly.
Community Forums: Links to Kubernetes Slack channels, Stack Overflow, and other communities for support.
Contribute and Collaborate
Tip
This repository thrives on community contributions and collaboration. Here’s how you can get involved:
Fork the Repository: Create your own copy of the repository to work on.
Submit Pull Requests: Contribute your projects or improvements to existing projects by submitting pull requests.
Engage with Others: Participate in discussions, provide feedback on others’ projects, and collaborate to create better solutions.
Share Your Knowledge: If you’ve developed a new project or learned something valuable, share it with the community. Your contributions can help others in their learning journey.
Join the Community
Important
We encourage you to be an active part of our community:
Join Our Telegram Community: Connect with fellow DevOps enthusiasts, ask questions, and share your progress in our Telegram group.
Follow Me on GitHub: Stay updated with new projects and content by following me on GitHub.
Code of Conduct
Caution
We are committed to fostering a welcoming and respectful environment for all contributors. Please take a moment to review our Code of Conduct before participating in this community.
Hit the Star! ⭐
If you find this repository helpful and plan to use it for learning, please give it a star. Your support is appreciated!
🛠️ Author & Community
This project is crafted by Harshhaa 💡.
I’d love to hear your feedback! Feel free to share your thoughts.